Click the links below to jump to that section of the page.
Note: This post contains affiliate links

When following a knitting pattern, the term "casting on" is just a knitting term for creating stitches independently of other stitches. In other words, new stitches are either added to an existing knitting project or at the start of a new knitting project. In order to start any knitting pattern, you will first need to "cast on" a certain amount of stitches required by the pattern. This essentially means you will attach your working yarn to your knitting needles in order to start knitting. There are many different ways to cast on, but below I've provided my two favorite methods: Long Tail Cast On and Single Cast On. Both are fast and very beginner-friendly.
For every single Darling Jadore knitting pattern, you can use either of these cast on techniques to begin your knitting pattern. It's really that simple!

LONG-TAIL CAST ON: THE METHOD
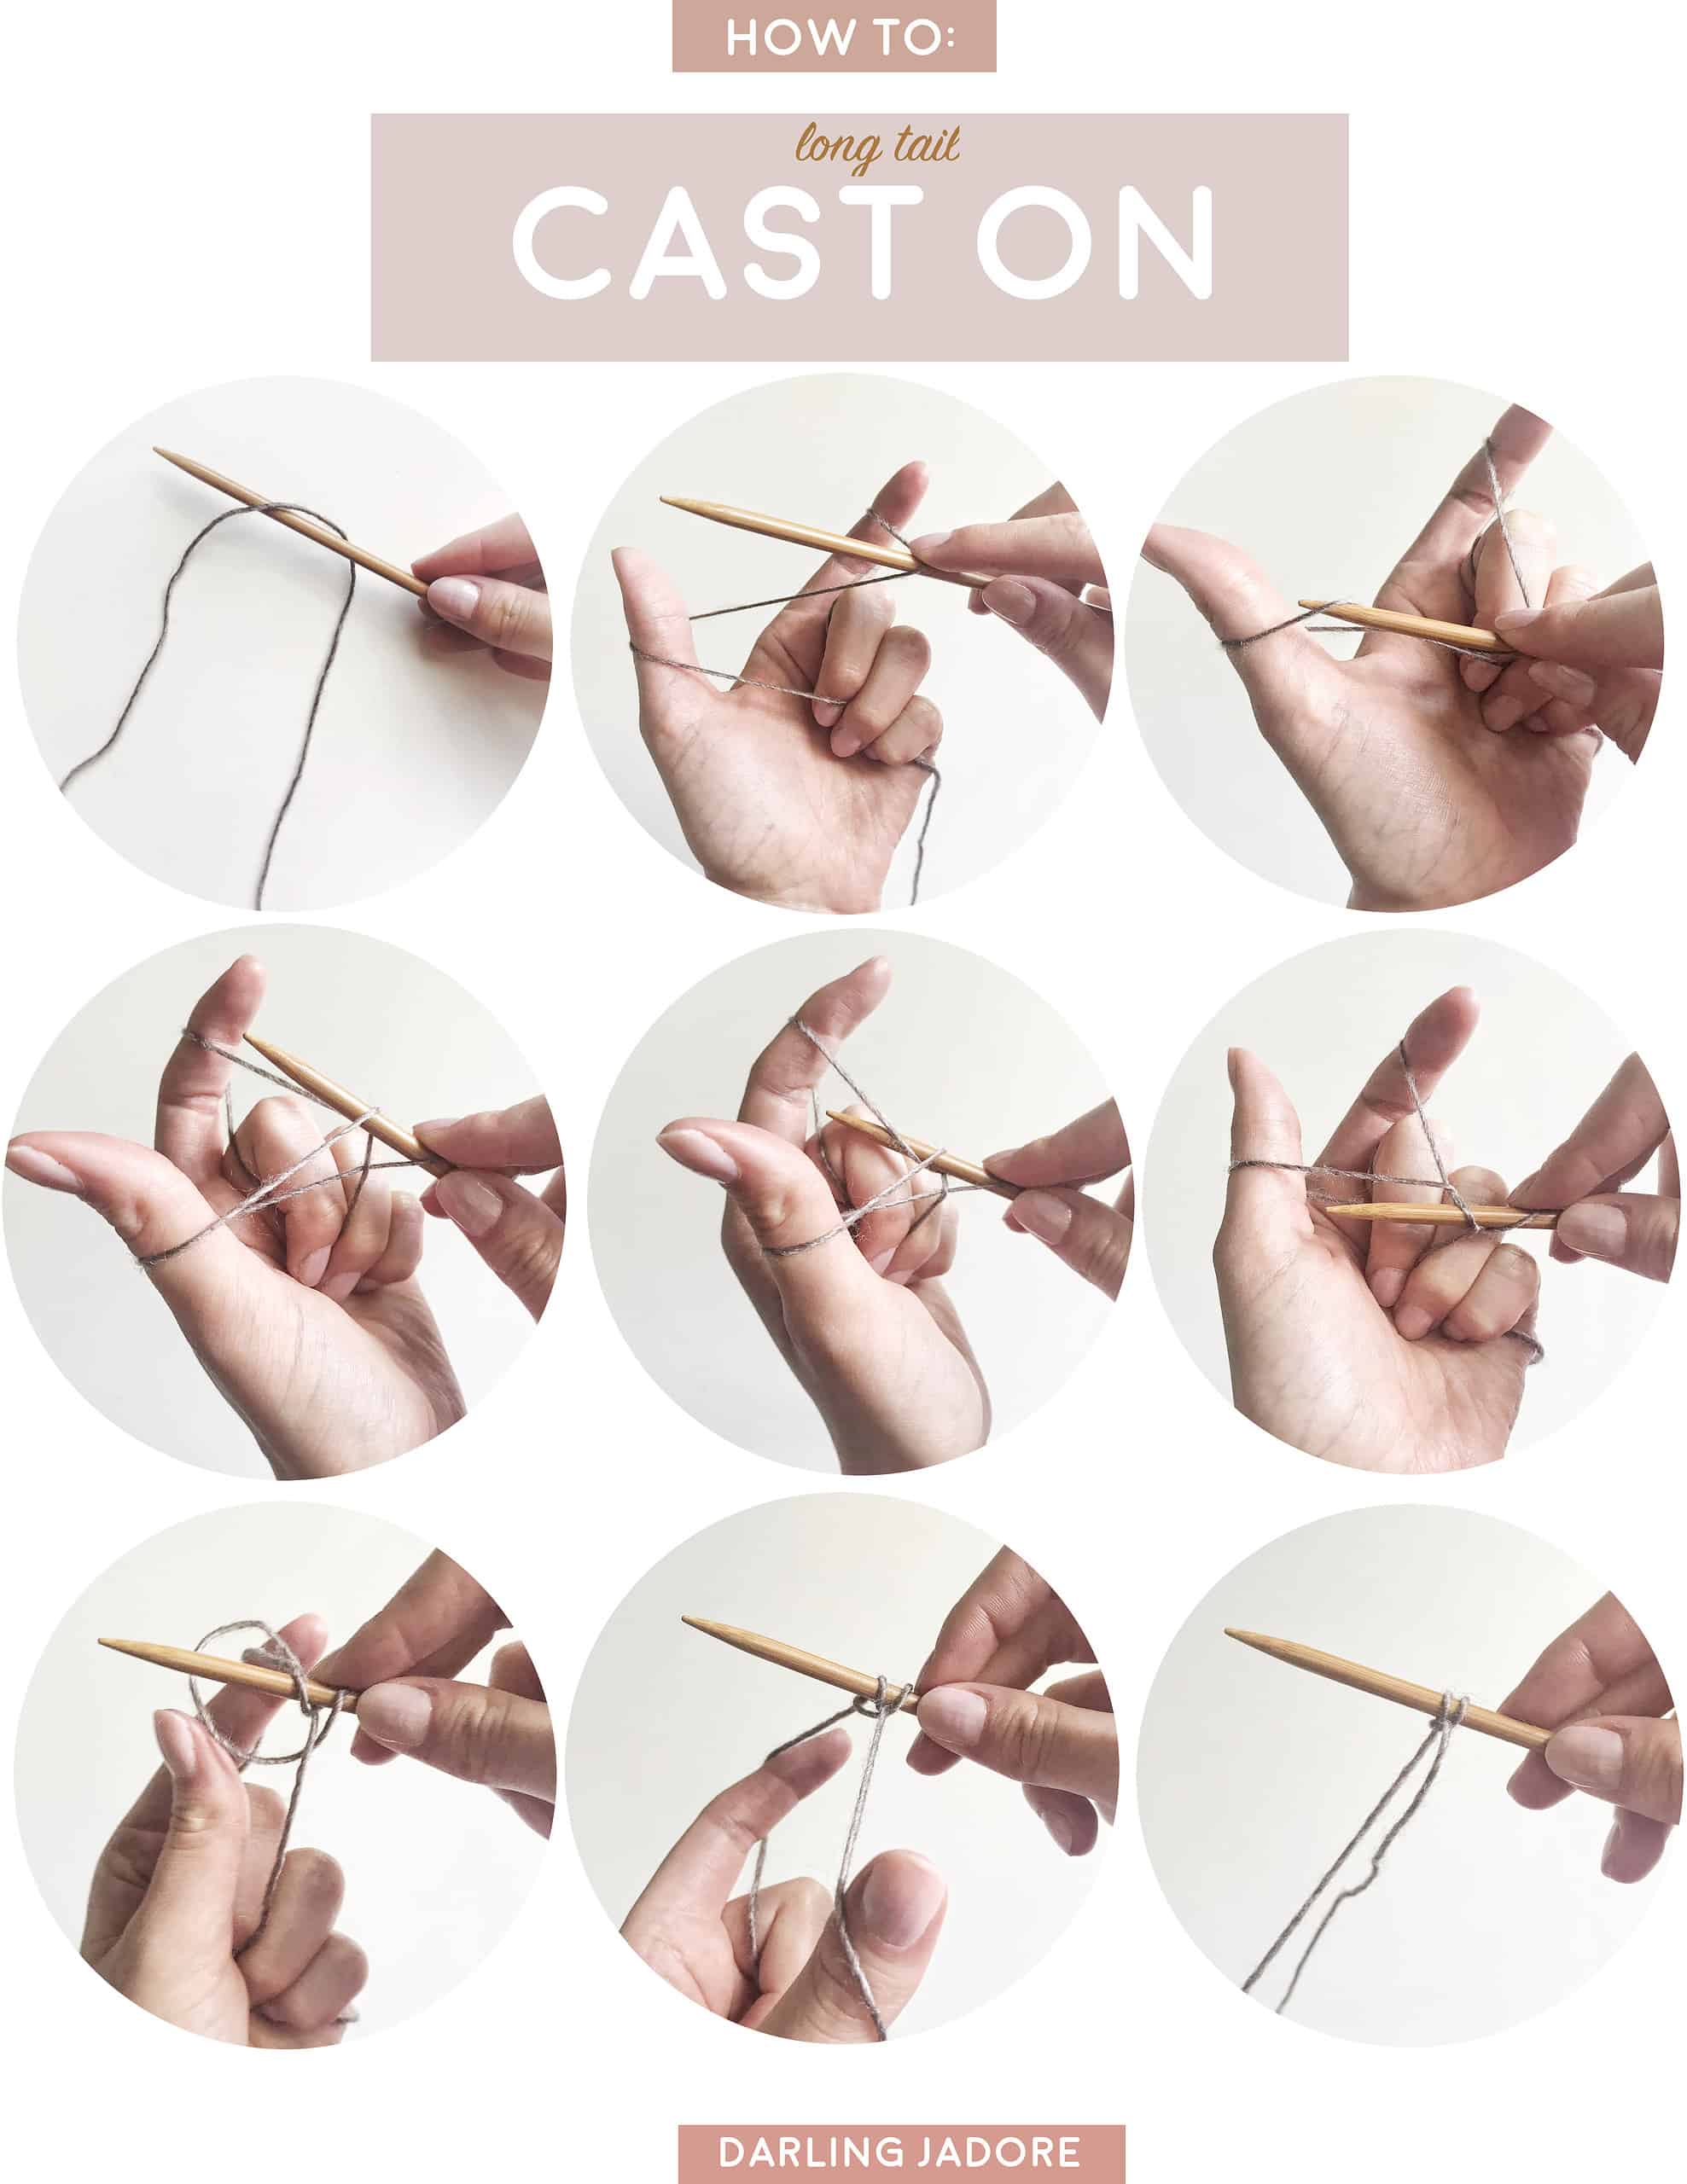
For this method of casting on while following a knitting pattern, you will keep a long tail of yarn while you cast on. The number of stitches you want to cast on determines the length of the yarn tail.
STEP ONE: Drape your yarn tail over the knitting needle.
STEP TWO: Hold your yarn tail between your pointer finger and thumb by wrapping it around both fingers.
STEP THREE: Hold the knitting needle in your right hand on top of the yarn, between your thumb and pointer finger.
STEP FOUR: Pick up the yarn held by your thumb through the bottom, and draw it toward you.
STEP FIVE: Bring the knitting needle over the yarn connected to your pointer finger and then back towards your thumb again.
STEP SIX: Drop the knitting needle down through the loop around your thumb. Release your thumb from the loop and pull the yarn to secure the cast-on stitch to your knitting needle.
You'll then simply repeat steps one through six until you cast on the desired number of stitches.

SINGLE CAST ON: THE METHOD
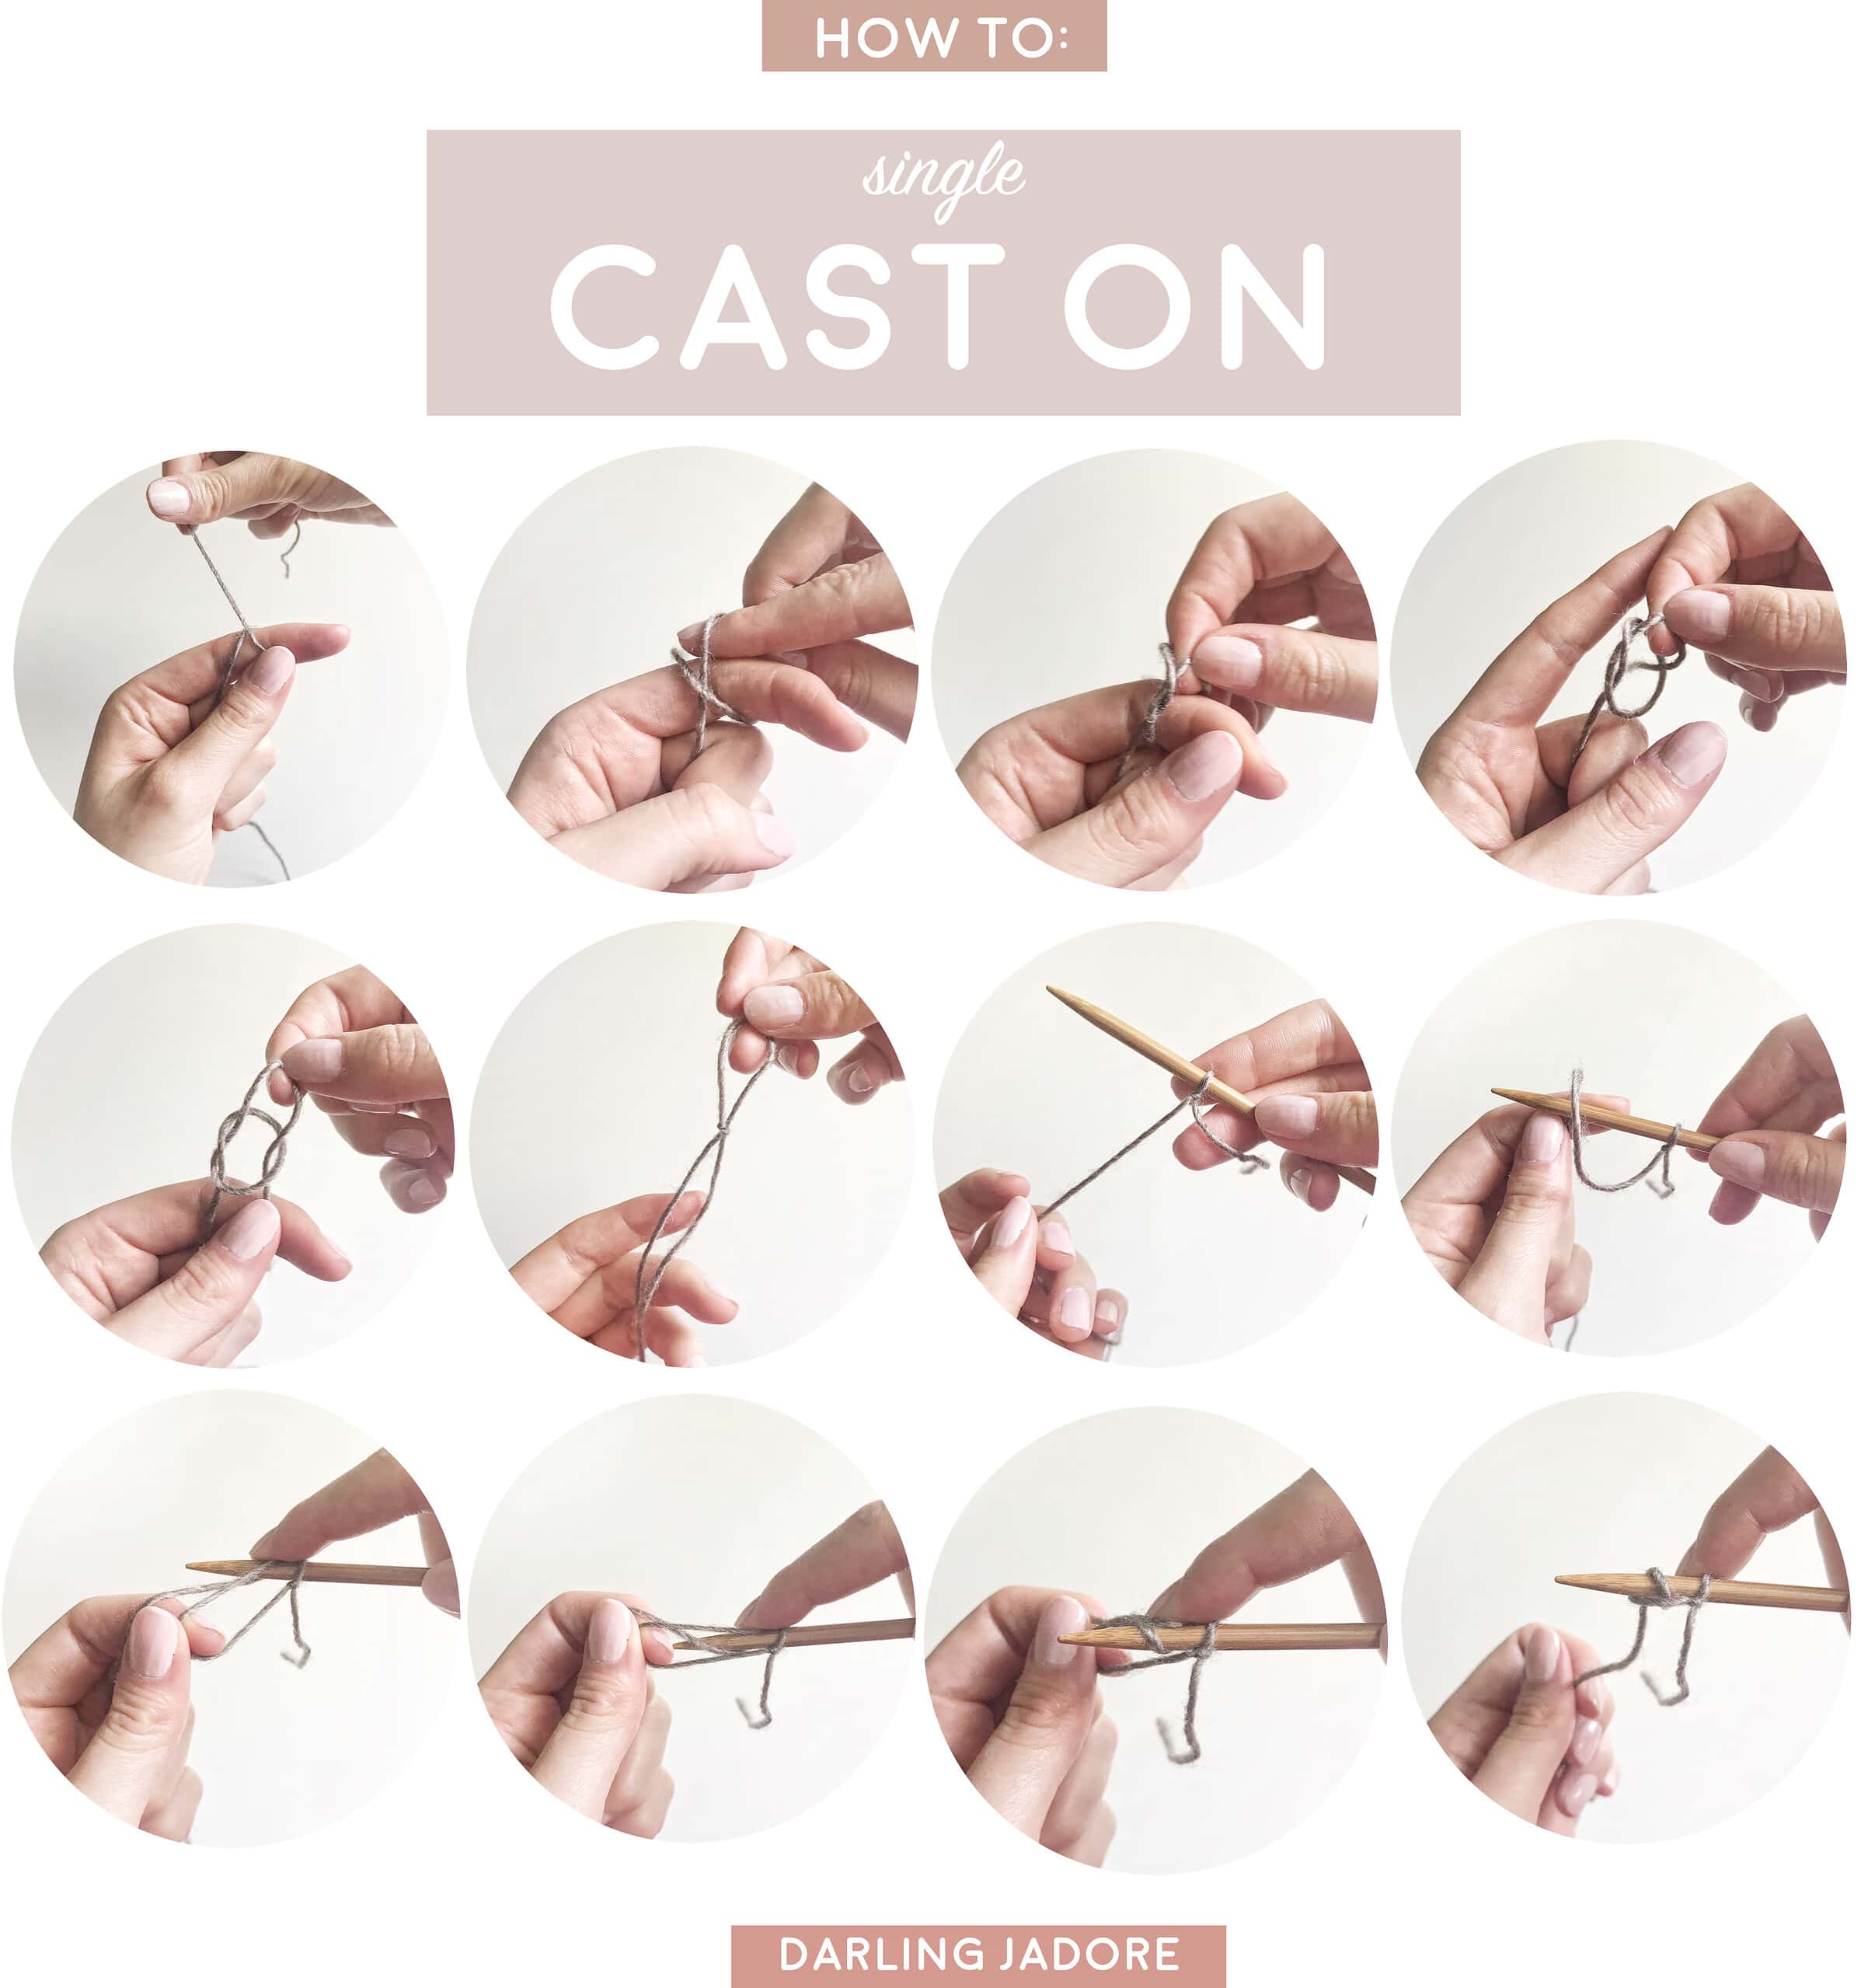
For Single Cast On, also known as "back loop cast on", you will essentially be creating half hitches on your knitting needles. This cast on method is also a great way to add stitches in the middle of a project, like when casting on a few stitches under the armpit of a sweater.
STEP ONE: You'll first make a slip knot (see video above) by making a loop with the yarn, bringing the yarn through the loop, then creating another loop with a knot at the end.
STEP TWO: Attach that slip knot onto a knitting needle and pull the yarn to tighten the knot.
STEP THREE: Wrap the yarn up and around your knitting needle.
STEP FOUR: Bring your knitting needle under and up through the loop.
You'll then simply repeat steps one through four until you cast on the desired number of stitches.

CAST ON: CIRCULAR NEEDLES
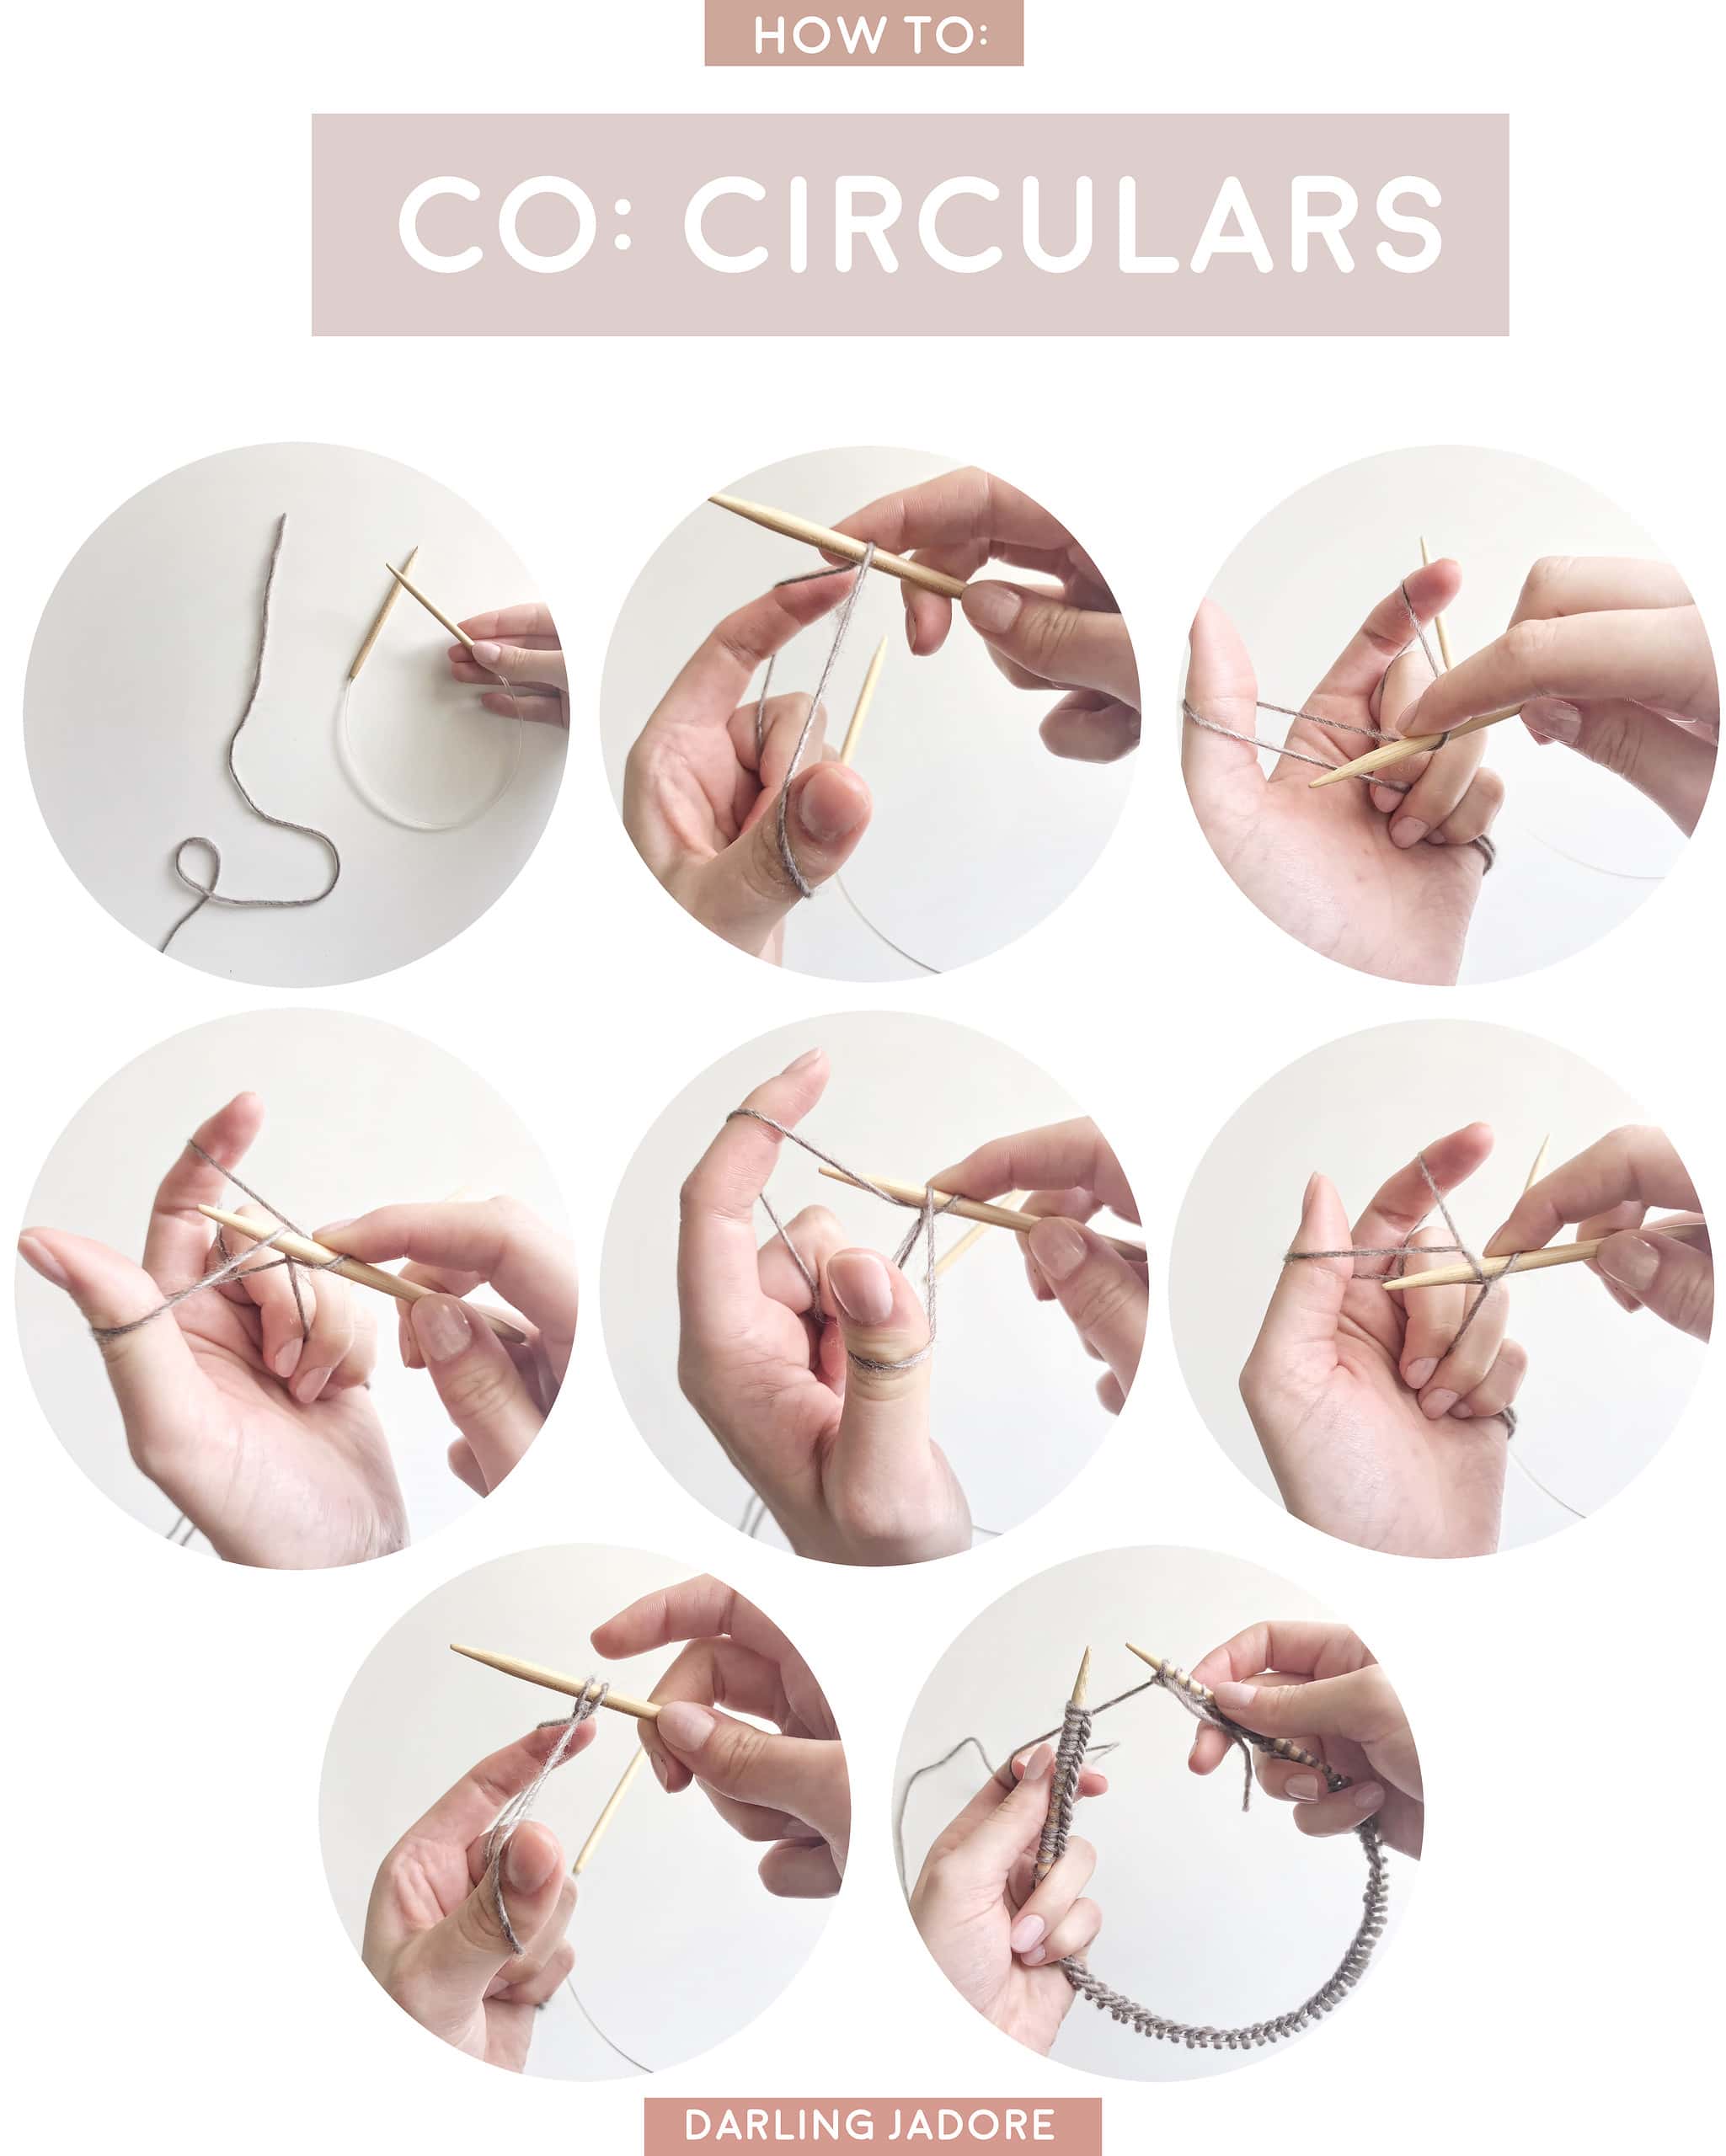
When casting on stitches onto circular knitting needles (aka: "circulars"), you will use the exact same technique as casting on stitches onto standard, straight knitting needles. When using circulars, you can choose whichever technique you wish to cast on, and I've demonstrated the Long Tail Cast On above. You will cast stitches onto circulars for circular-shaped projects that are knitted in the round (instead of knitted flat), such as hat and beanie knitting patterns like The Avalon Hat, The Lakewood Hat, and The Fleur Hat. Circulars can also be used to knit designs flat back and forth; for this, you will not join in the round, but rather work back and forth flat on the circulars. This is one great advantage to circulars, because they will accommodate a large amount of stitches compared to standard knitting needles, so they are often used to knit larger flat projects like shawls and sweaters. To learn how to perform the Invisible Join in the round on circulars after you've cast on your stitches, you can jump to the section here.
STEP ONE: Pick up one knitting needle and hold it in your right hand. With the working yarn, drape it over the knitting needle. Follow the exact same process as outlined above for Long Tail Cast On or Single Cast on. Above, I've demonstrated Long Tail Cast On.
STEP TWO: Drape the yarn tail over your knitting needle.
STEP THREE: Hold the yarn tail between your pointer finger and thumb, by wrapping it around both fingers.
STEP FOUR: Hold the knitting needle in your right hand on top of the yarn, between your thumb and pointer finger.
STEP FIVE: Pick up the yarn held by your thumb through the bottom, and draw it toward you.
STEP SIX: Bring the knitting needle over the yarn connected to your pointer finger and then back towards your thumb again.
STEP SEVEN: Drop the knitting needle down through the loop around your thumb. Release your thumb from the loop and pull the yarn to secure the cast-on stitch to the knitting needle.
You'll then simply repeat steps one through seven until you cast on the desired number of stitches.
PATTERNS THAT REQUIRE CIRCULAR NEEDLES

CAST ON DPNS: PT. 1
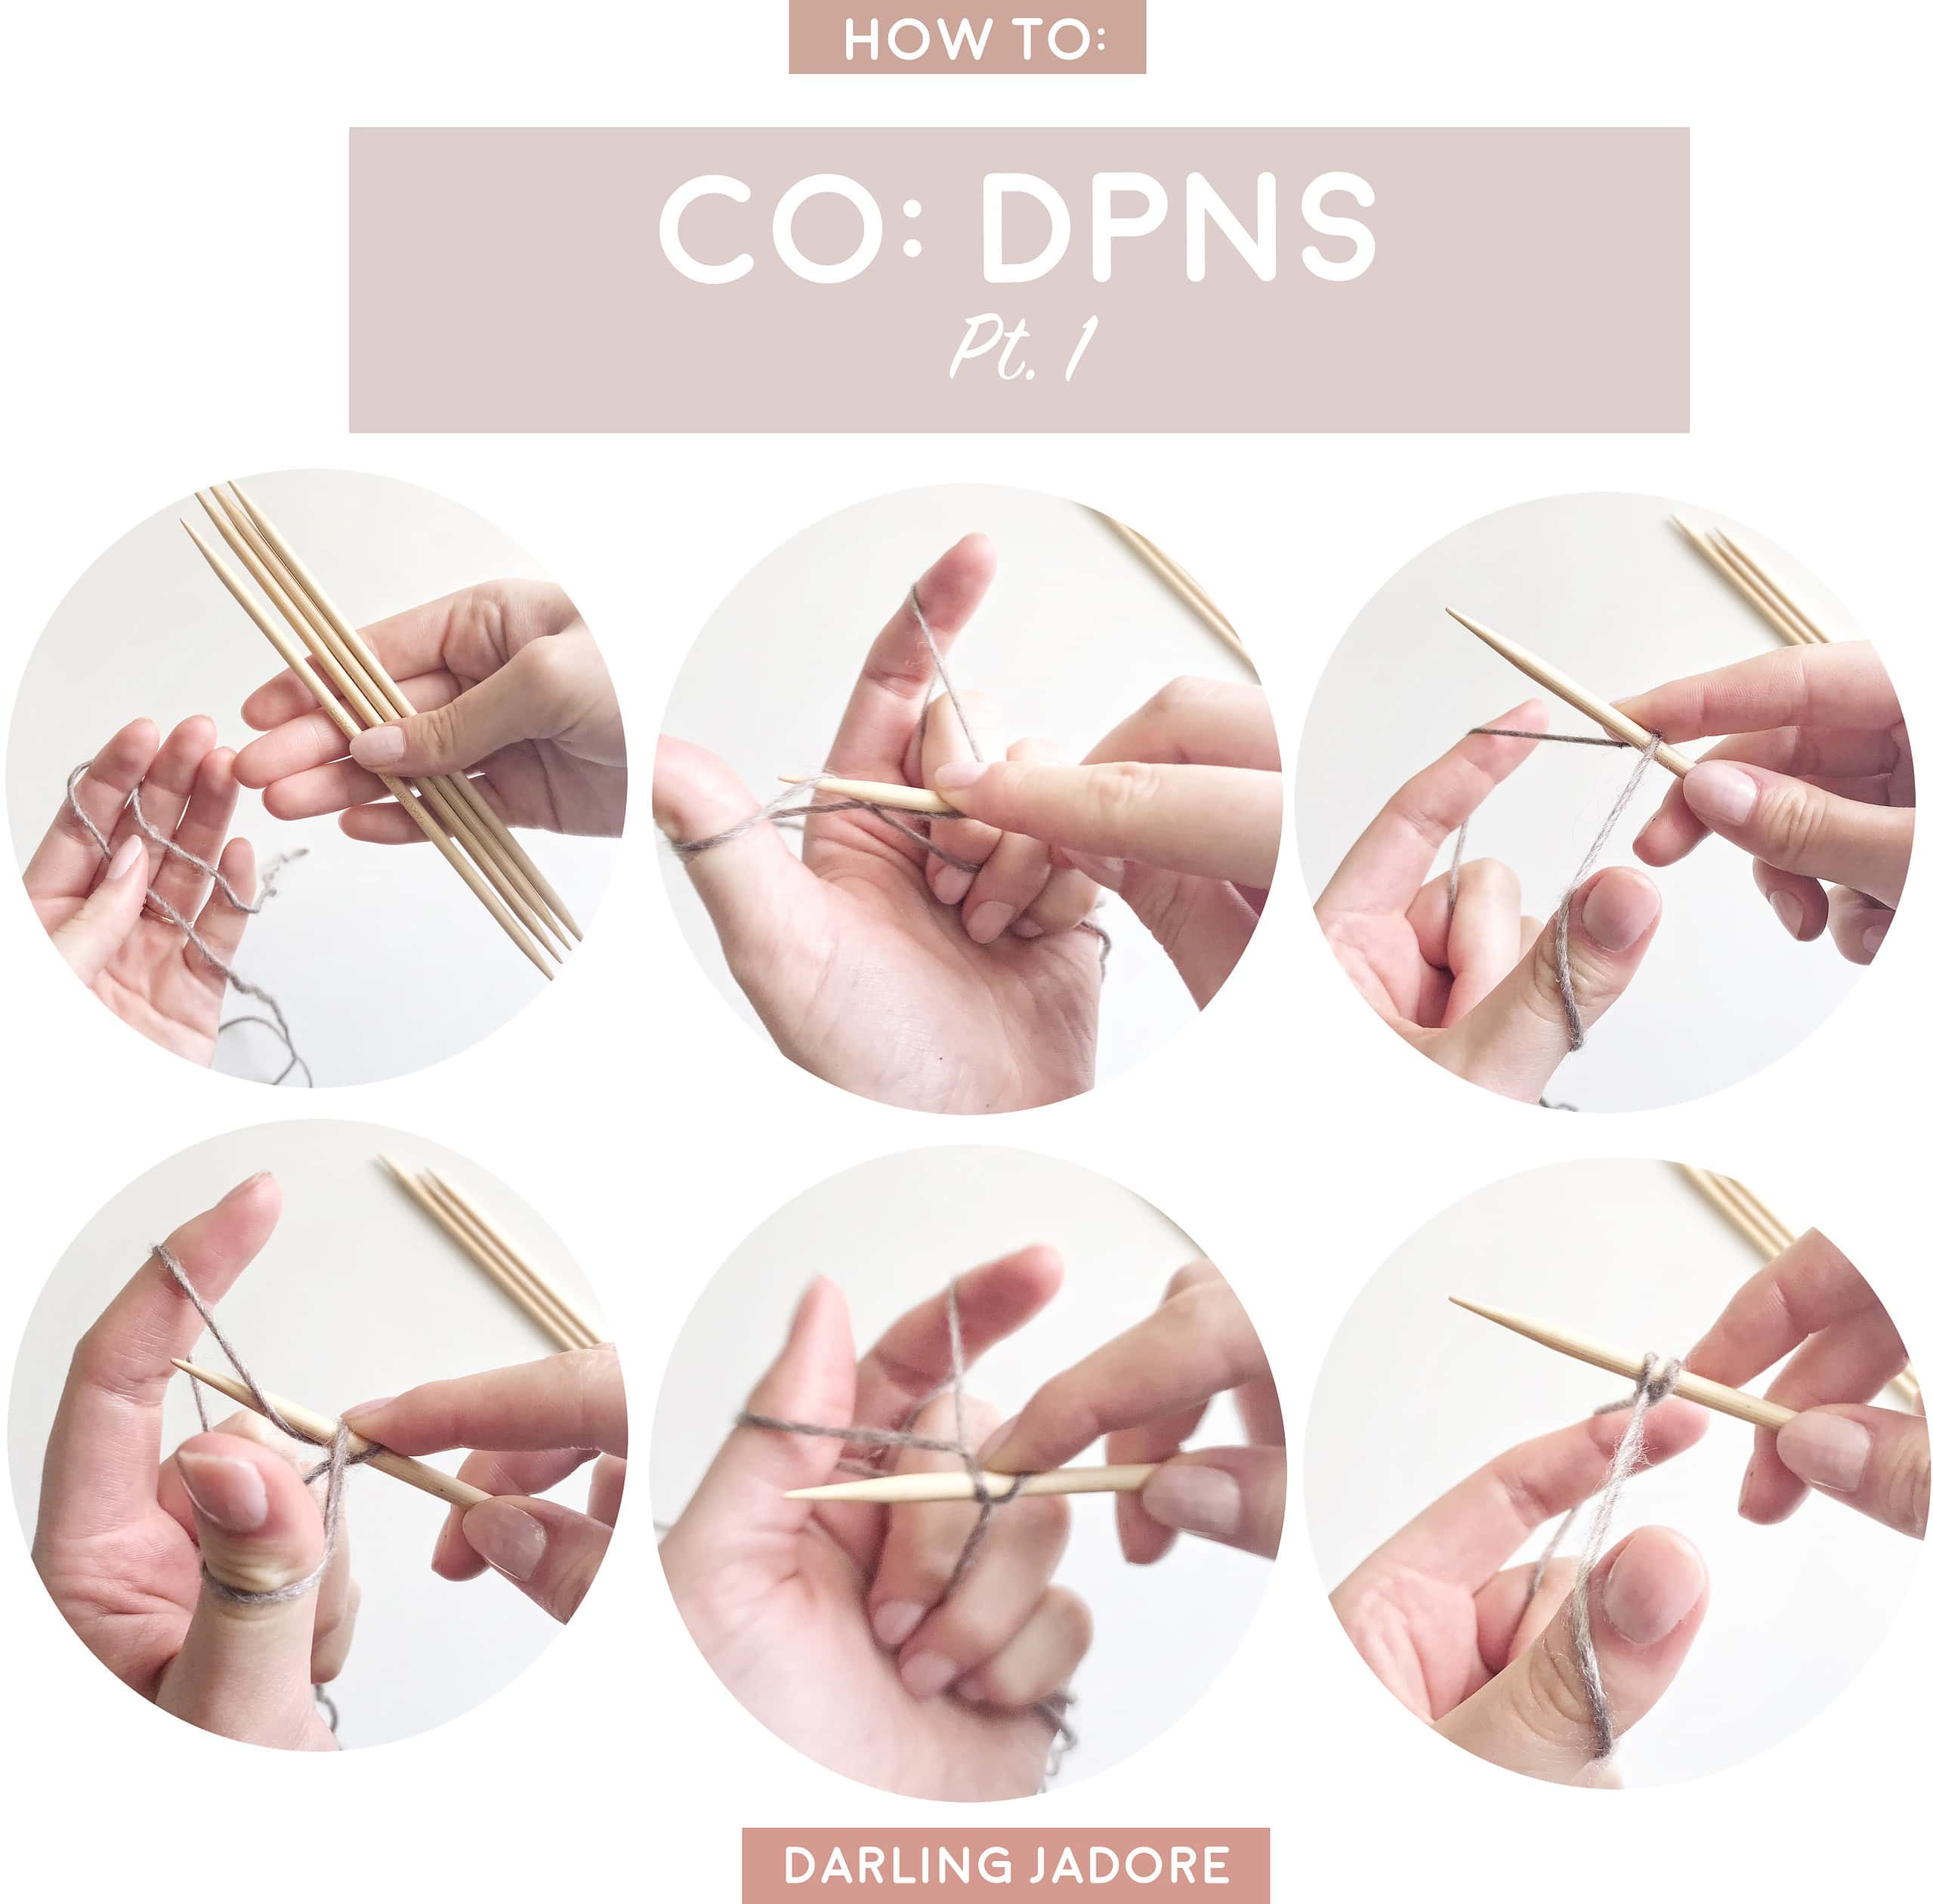
Casting on stitches onto double-pointed knitting needles (aka: "DPNs") is the exact same process as casting on stitches onto standard, straight knitting needles or circular knitting needles as demonstrated above. You can choose whichever style of casting on you prefer when working with DPNs, but above I've demonstrated the Long Tail Cast On. You will utilize DPNs and cast on stitches onto DPNs when working circular projects that are knitted in the round. Similar to knitting with circulars, you will use DPNs when knitting in the round, except DPNs are used for smaller projects, such as mittens like The Cappuccino Mitts and The Frostfall Mitts. In other words, the circumference of the DPNs lends to smaller circular projects than the circumference of circular knitting needles, which can be very long and even used to make cowls. To learn how to perform the Invisible Join in the round with DPNs after you've cast on your stitches, you can jump to the section here.
While at first it can look intimidating using four knitting needles at once, it's actually very simple. You will only be working with two knitting needles at a time, just like when working with standard needles, and the other two DPNs will simply be holding your other stitches.
STEP ONE: Pick up and hold one DPN; you will cast on stitches onto one DPN only. Drape the yarn tail over your DPN. From here, you will follow the same instructions outlined for Long Tail Cast On or Single Cast. Above, I've demonstrated Long Tail Cast On.
STEP TWO: Hold the yarn tail between your pointer finger and thumb, by wrapping it around both fingers.
STEP THREE: Hold the DPN in your right hand on top of the yarn, between your thumb and pointer finger.
STEP FOUR: Pick up the yarn held by your thumb through the bottom, and draw it toward you.
STEP FIVE: Bring the DPN over the yarn connected to your pointer finger and then back towards your thumb again.
STEP SIX: Drop the DPN down through the loop around your thumb. Release your thumb from the loop and pull the yarn to secure the cast-on stitch to the needle.
Follow steps seven through nine below for the second part of casting on stitches onto DPNs.
CAST ON DPNS: PT. 2
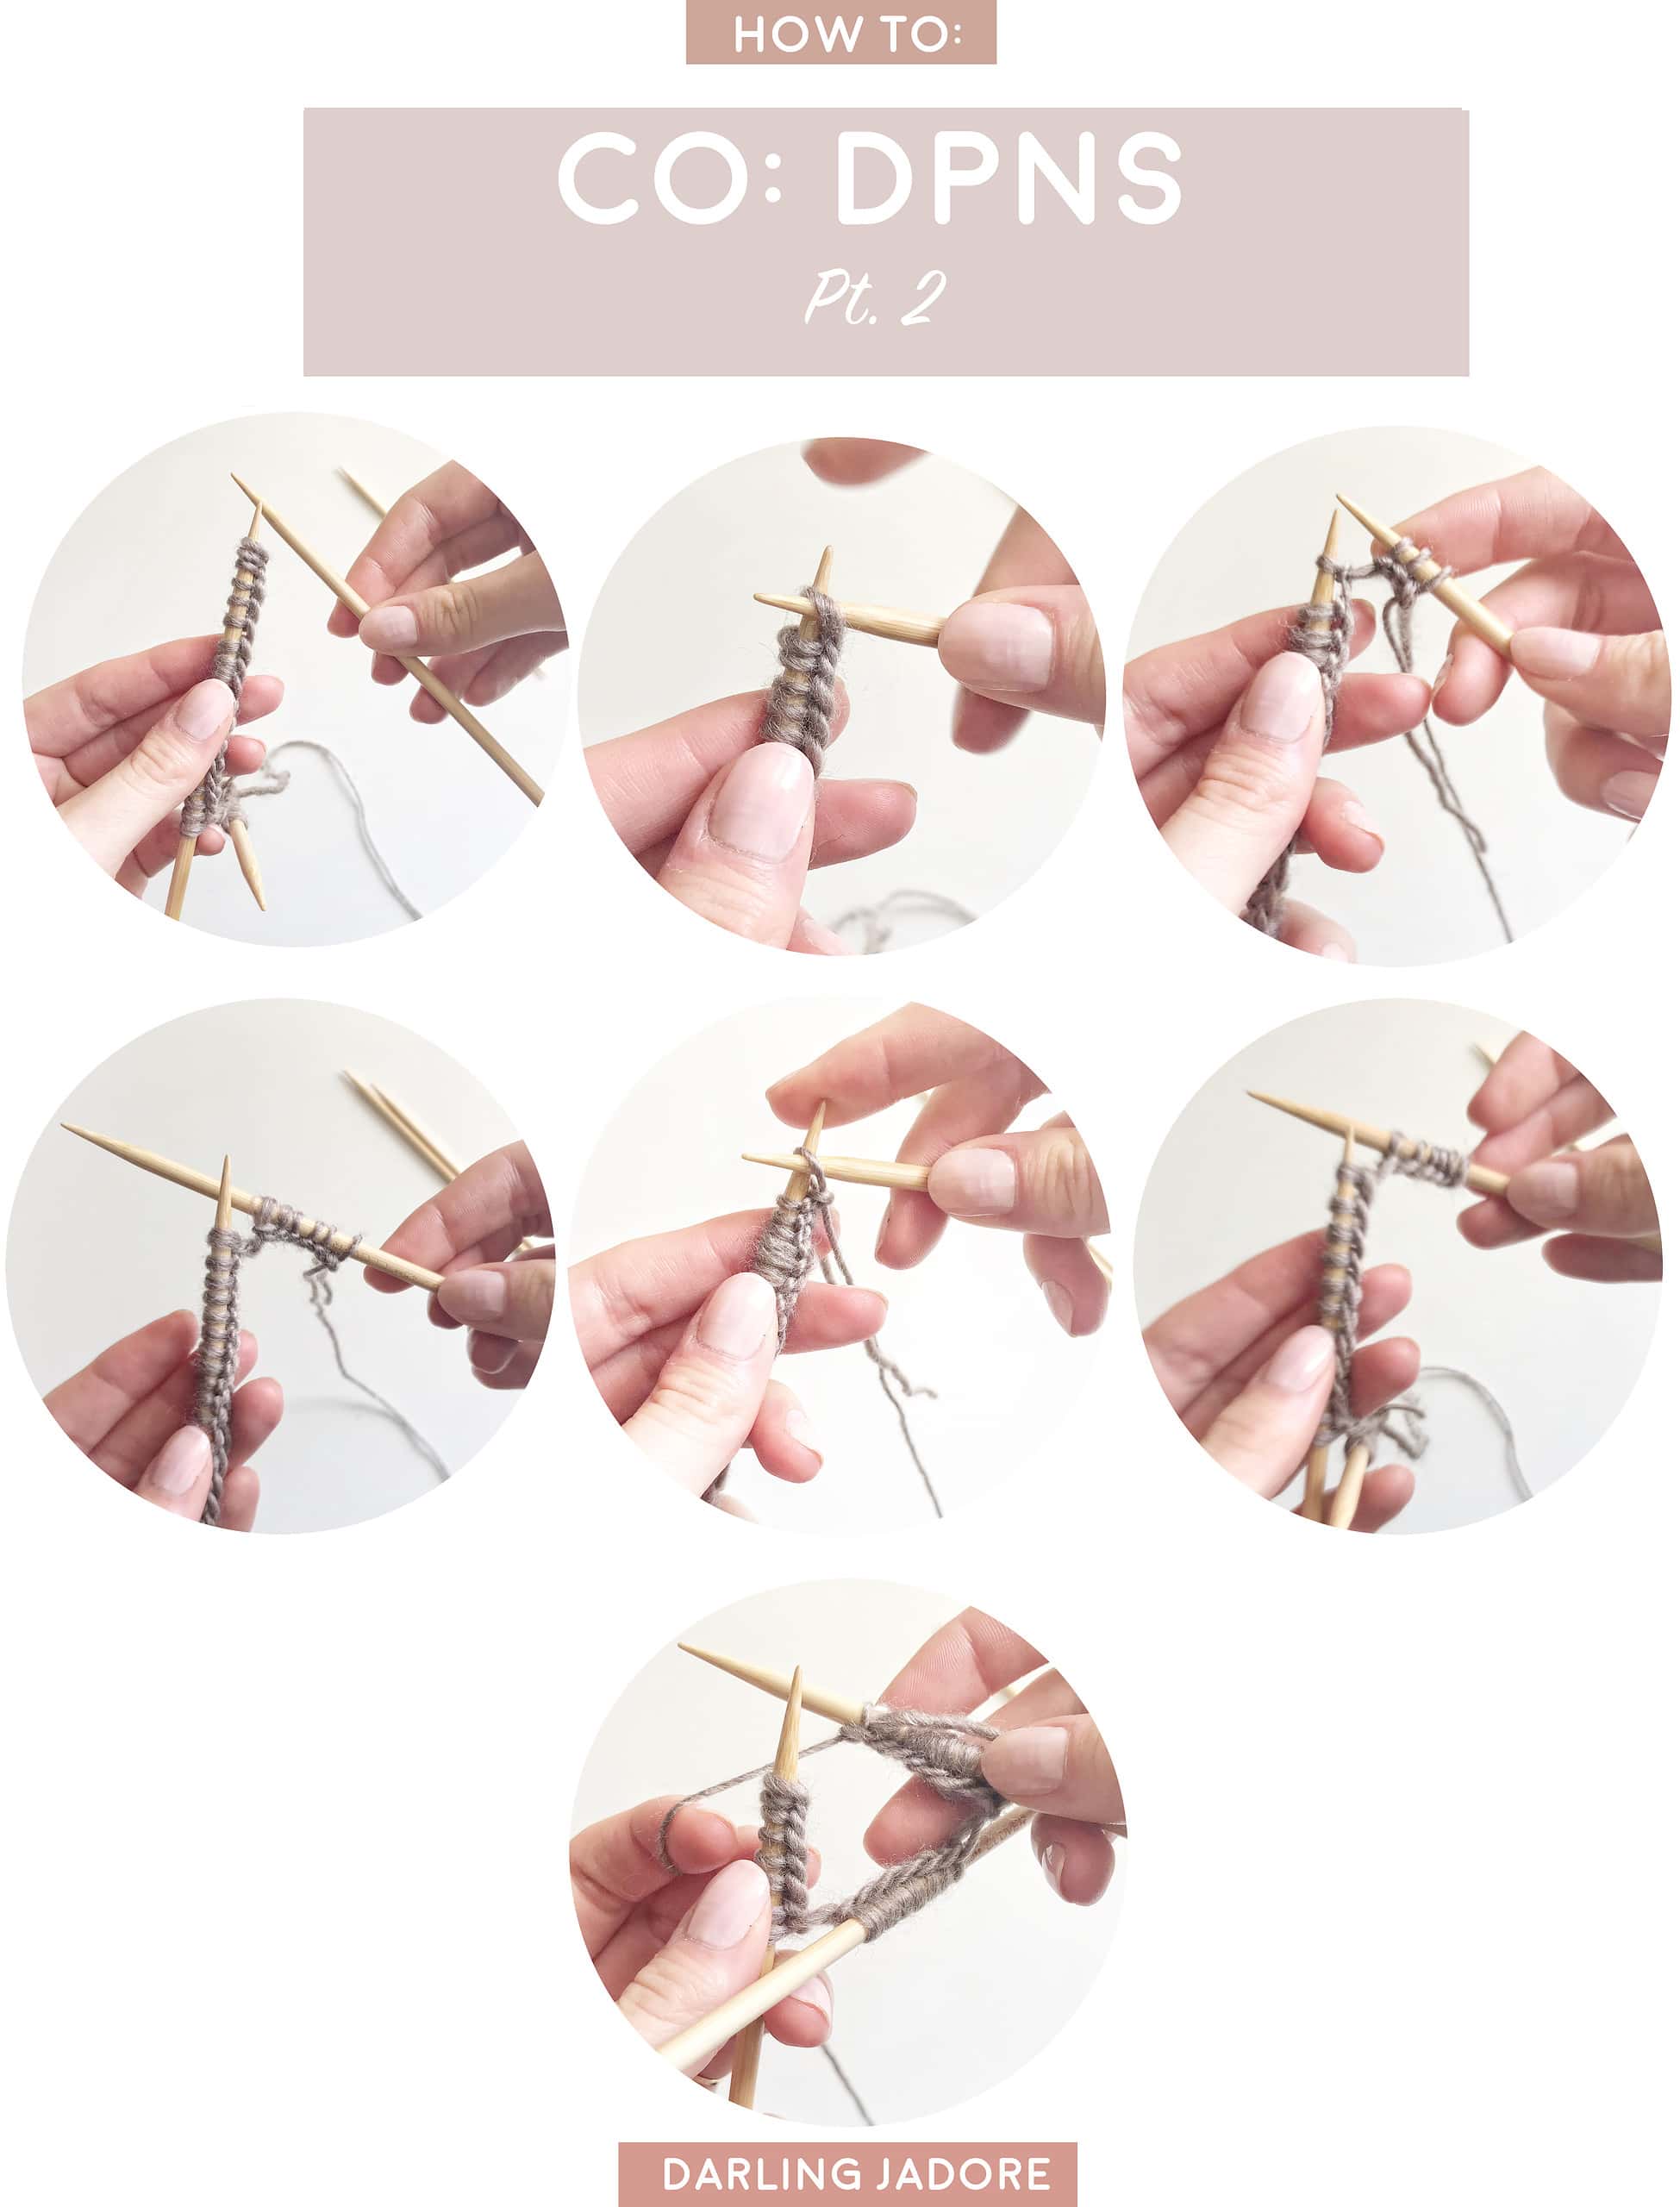
Once you have the number of stitches required by your pattern cast on your DPNs, the next step is to divide them evenly (or as evenly as possible) among two other DPNs. Darling Jadore knitting patterns will state how many stitches to place onto each DPNs, for convenience. The fourth DPN is used solely to knit with, so you will not divide stitches onto it. Sometimes you will find a pattern that states to simply split up the stitches among the DPNs as evenly as possible.
STEP SEVEN: Hold your DPN with the cast on stitches in your left hand and one of your empty DPNs in your right hand as if to knit, with your working yarn behind your needles.
STEP EIGHT: With your right DPN, gently slip some stitches from your left DPN onto the right DPN from the right to left. Make sure that the bottom cast-on edge of the stitches are staying aligned and aren't twisting.
STEP NINE: When you've slipped the number of stitches required by the pattern onto your second DPN, pick up a third empty DPN and repeat the same process, slipping stitches onto it.
You can learn how to join in the round on DPNS here.
PATTERNS THAT REQUIRE DPNS
BUILDING THE BASICS: KNIT + PURL
Once you've mastered the cast on technique, the next step is to learn the two most basic knit stitches: the knit stitch and the purl stitch. Both stitches are required stitches for almost any knitting pattern, and alone, you can create really beautiful designs and combinations with them.
Below, I've demonstrated both stitches knit Continental Style. There are many different ways to knit, most notably English style and Continental style. These two styles refer mainly to the way in which the working yarn is held: English style knitters hold their working yarn in their right hand; Continental style knitters hold their working yarn in their left hand. You can learn more about Continental Style knitting on this page here.

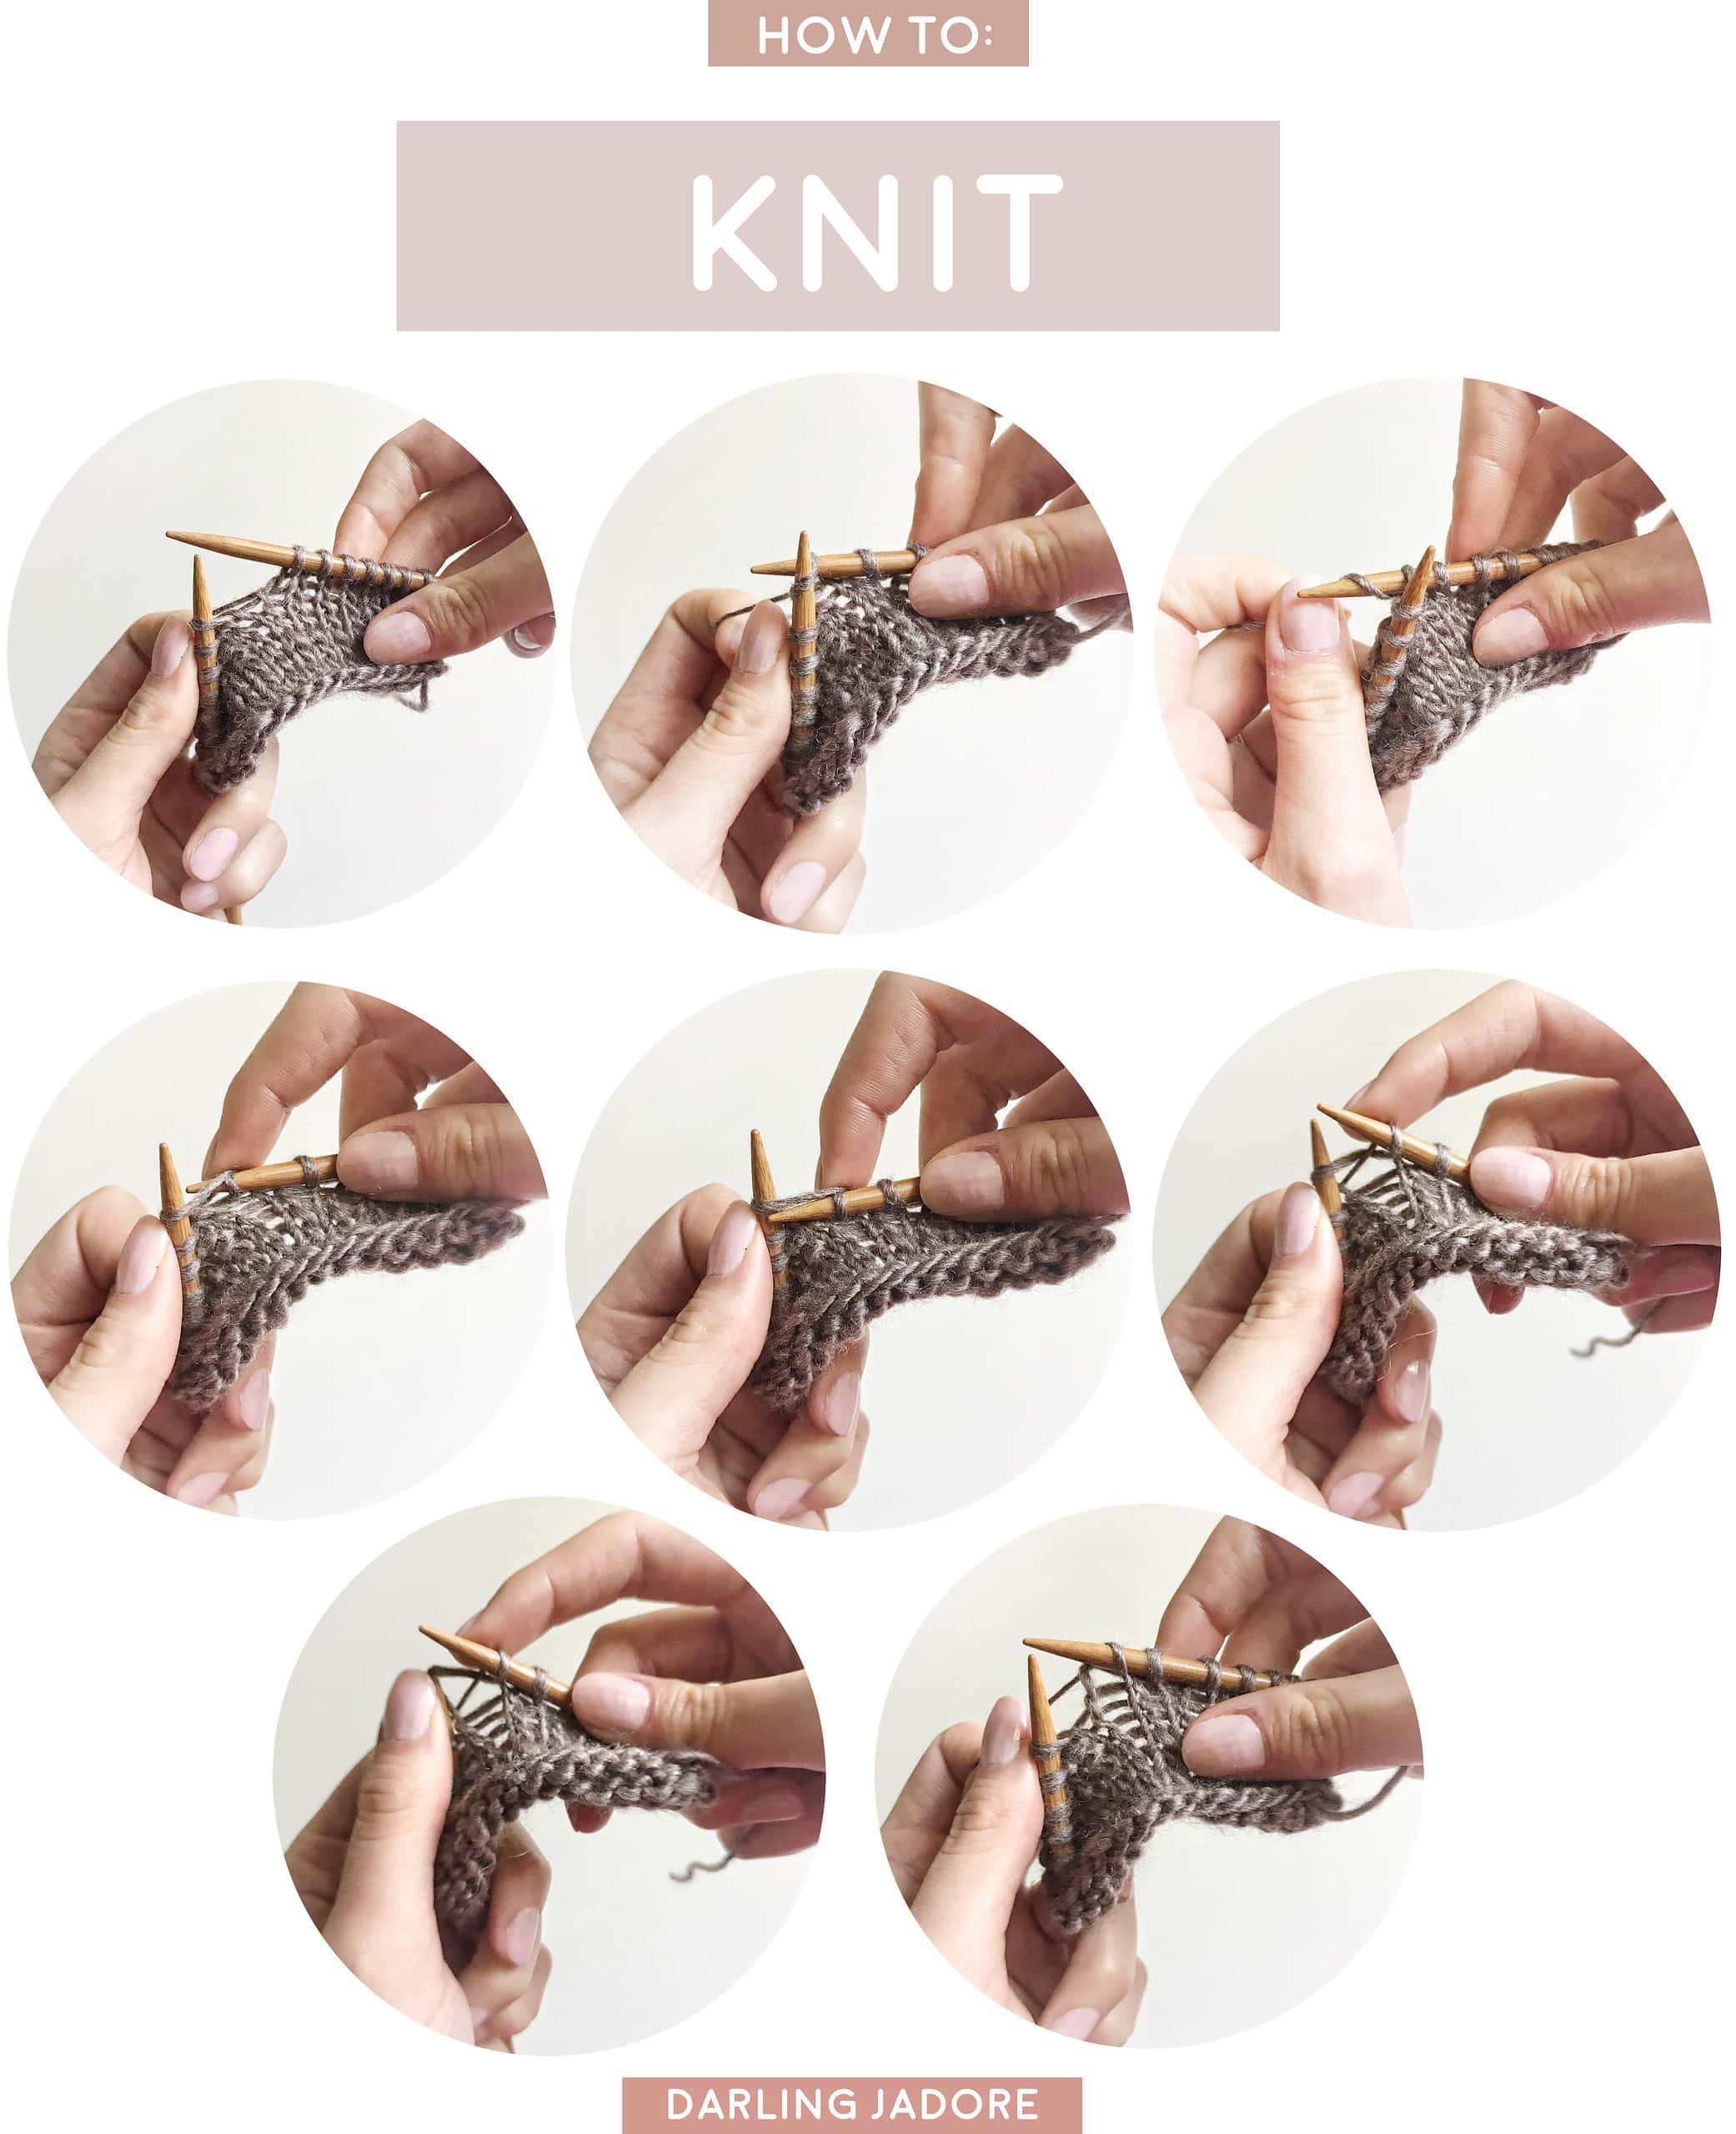
The knit stitch is the most basic knitting stitch. It is easy, fun, and once you master the steps, the rhythm of this classic stitch is quite addictive!
STEP ONE: Hold your knitting needles with the working yarn behind your work. Insert your right knitting needle into the first stitch on your left knitting needle from left to right and from front to back, forming a "T" with the tips of your knitting needles.
STEP TWO: With your right hand, bring the yarn to the front from the left side of your right knitting needle, and then up and over your right knitting needle. Essentially, you are wrapping the yarn over your right knitting needle.
STEP THREE: Bring the tip of your right knitting needle with its wrap of yarn through the loop on your left knitting needle to the front.
STEP FOUR: Gently slide your right knitting needle to the right until that loop on your left knitting needle drops off.
Then you'll simply repeat steps one though four until you’ve knitted all the stitches from your left knitting needle. Once you reach the end of your row (if knitting a flat piece) or round (if you're knitting a circular or tubular piece), you'll then turn your work, that is, flip your work around and switch hands so that the knitting needle with the stitches is in your left hand. Then you'll just knit all the stitches as usual.

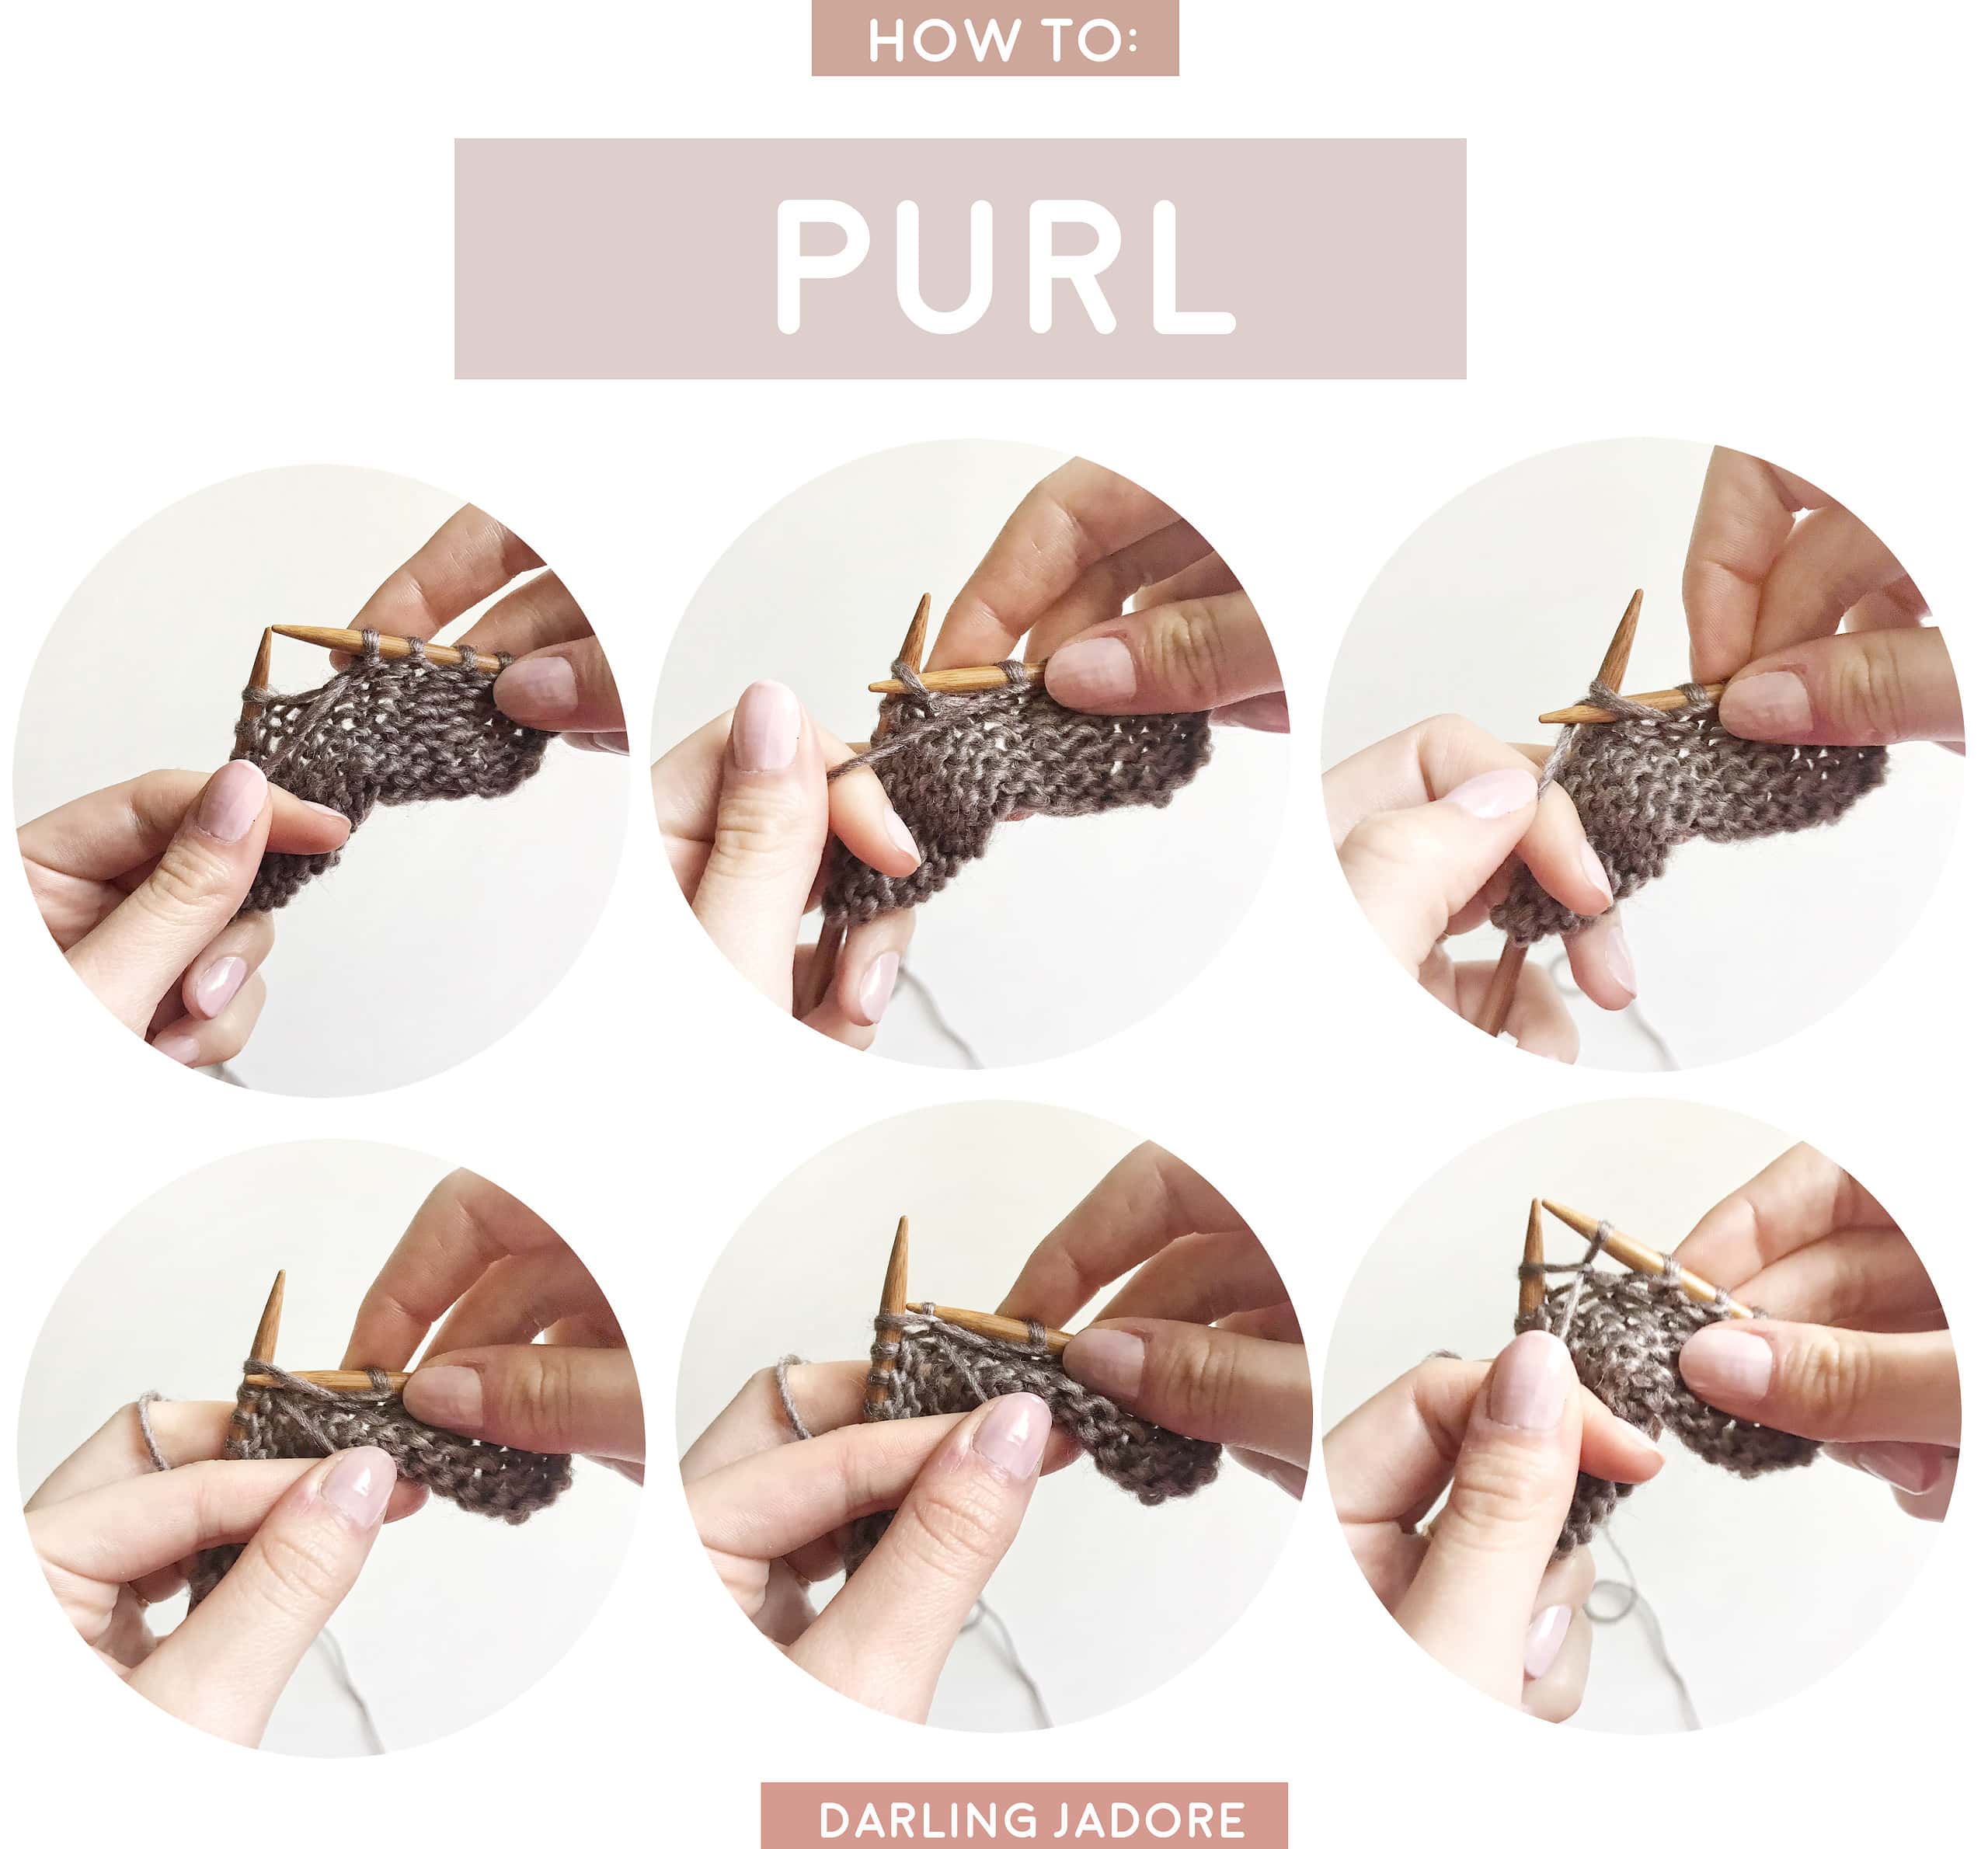
Purling is another basic knitting stitch which involves all the same steps as required to make a knit stitch but with slightly different motions. It has a similar appearance to the classic knit stitch (aka: "Garter Stitch"), which is discussed here.
STEP ONE: Hold your knitting needles as if to knit, but holding your working yarn in the front of your work. Insert your right knitting needle through the first stitch on your left needle, from right to left, back to front.
STEP TWO: Wrap the working yarn under, up, and around your right knitting needle.
STEP THREE: Gently pull the tip of your right knitting needle out through the loop, keeping the yarn wrapped around it.
Then simply follow steps one through three all the way across your row or round.
COMBINING STITCHES: STOCKINETTE, GARTER + RIBBING
Once you've gotten the knit and purl stitches down pat, you can combine them to create lovely designs and overall stitches such as the "Garter Stitch", "Stockinette Stitch", and "Ribbing". All of these combinations of knit and purl stitches are very classic and used in many different knitting patterns and designs.

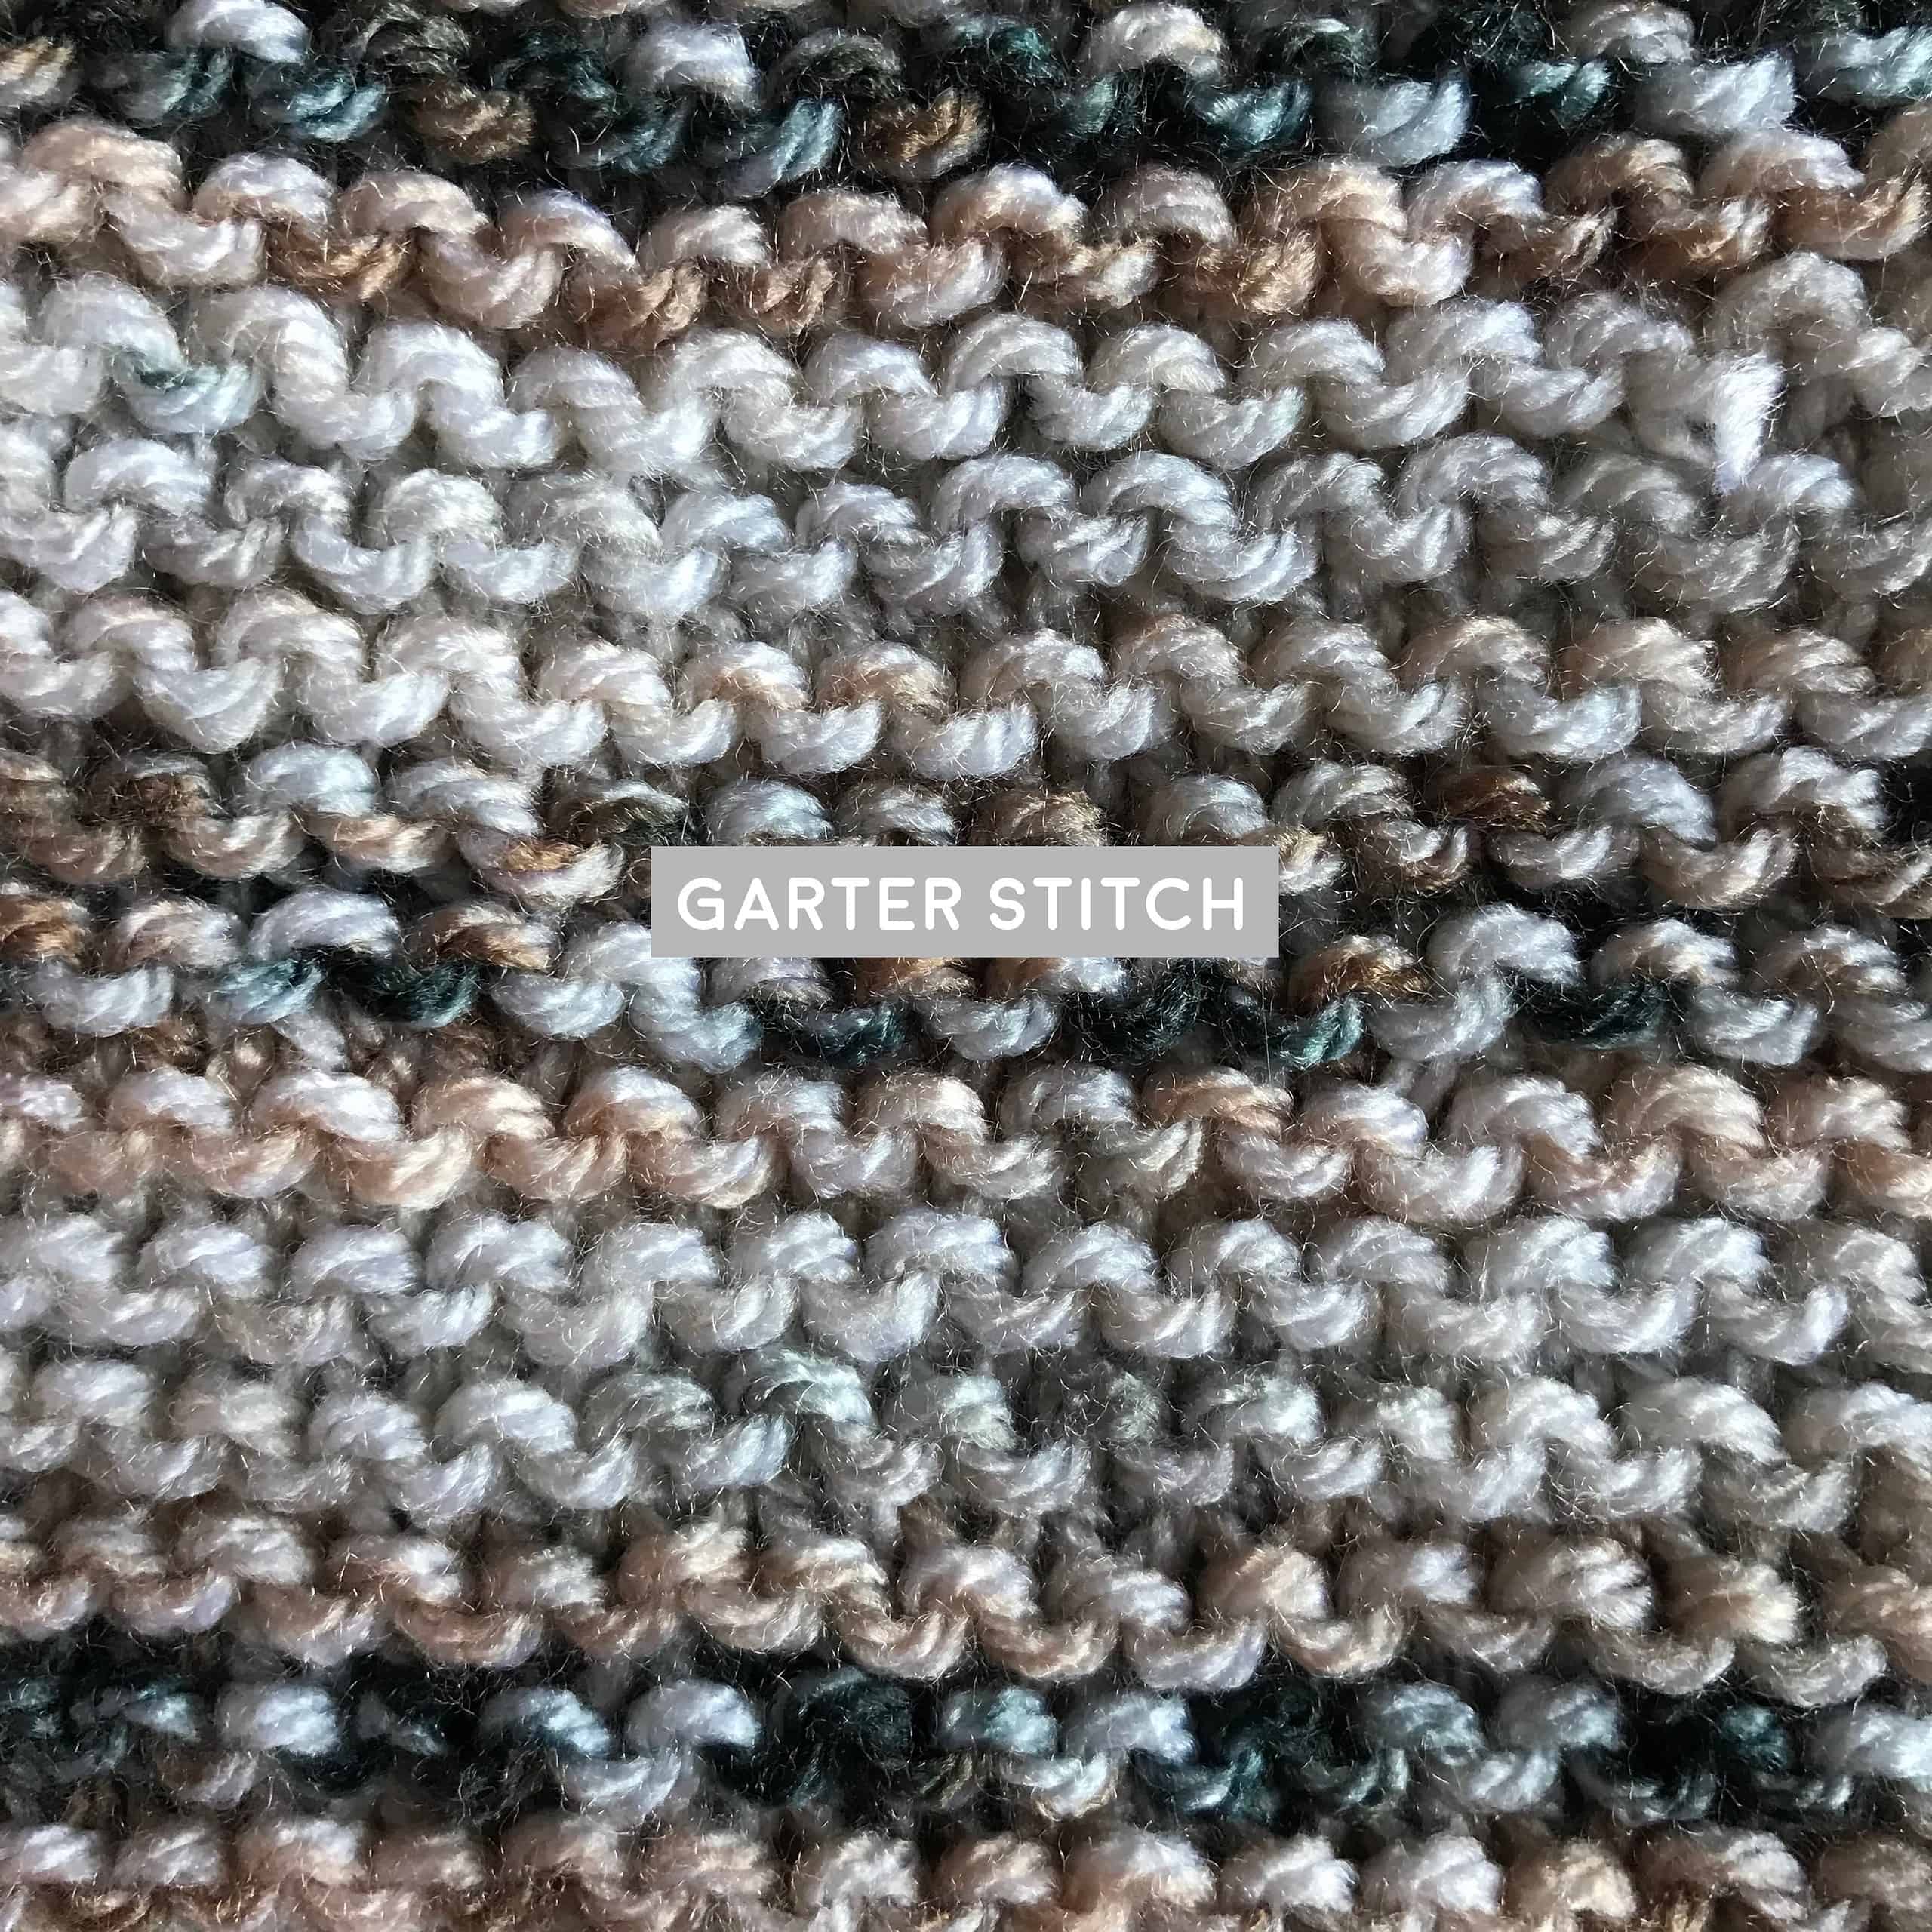
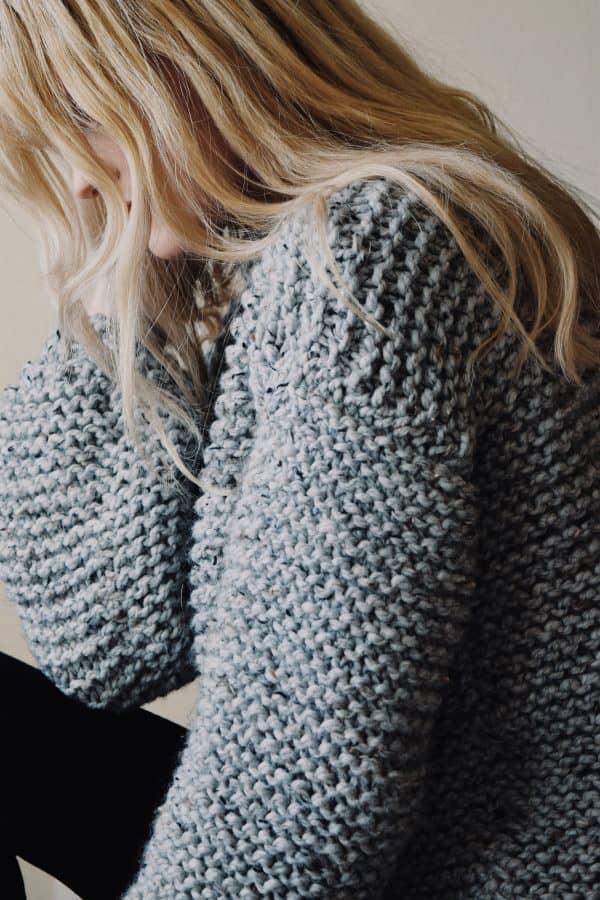
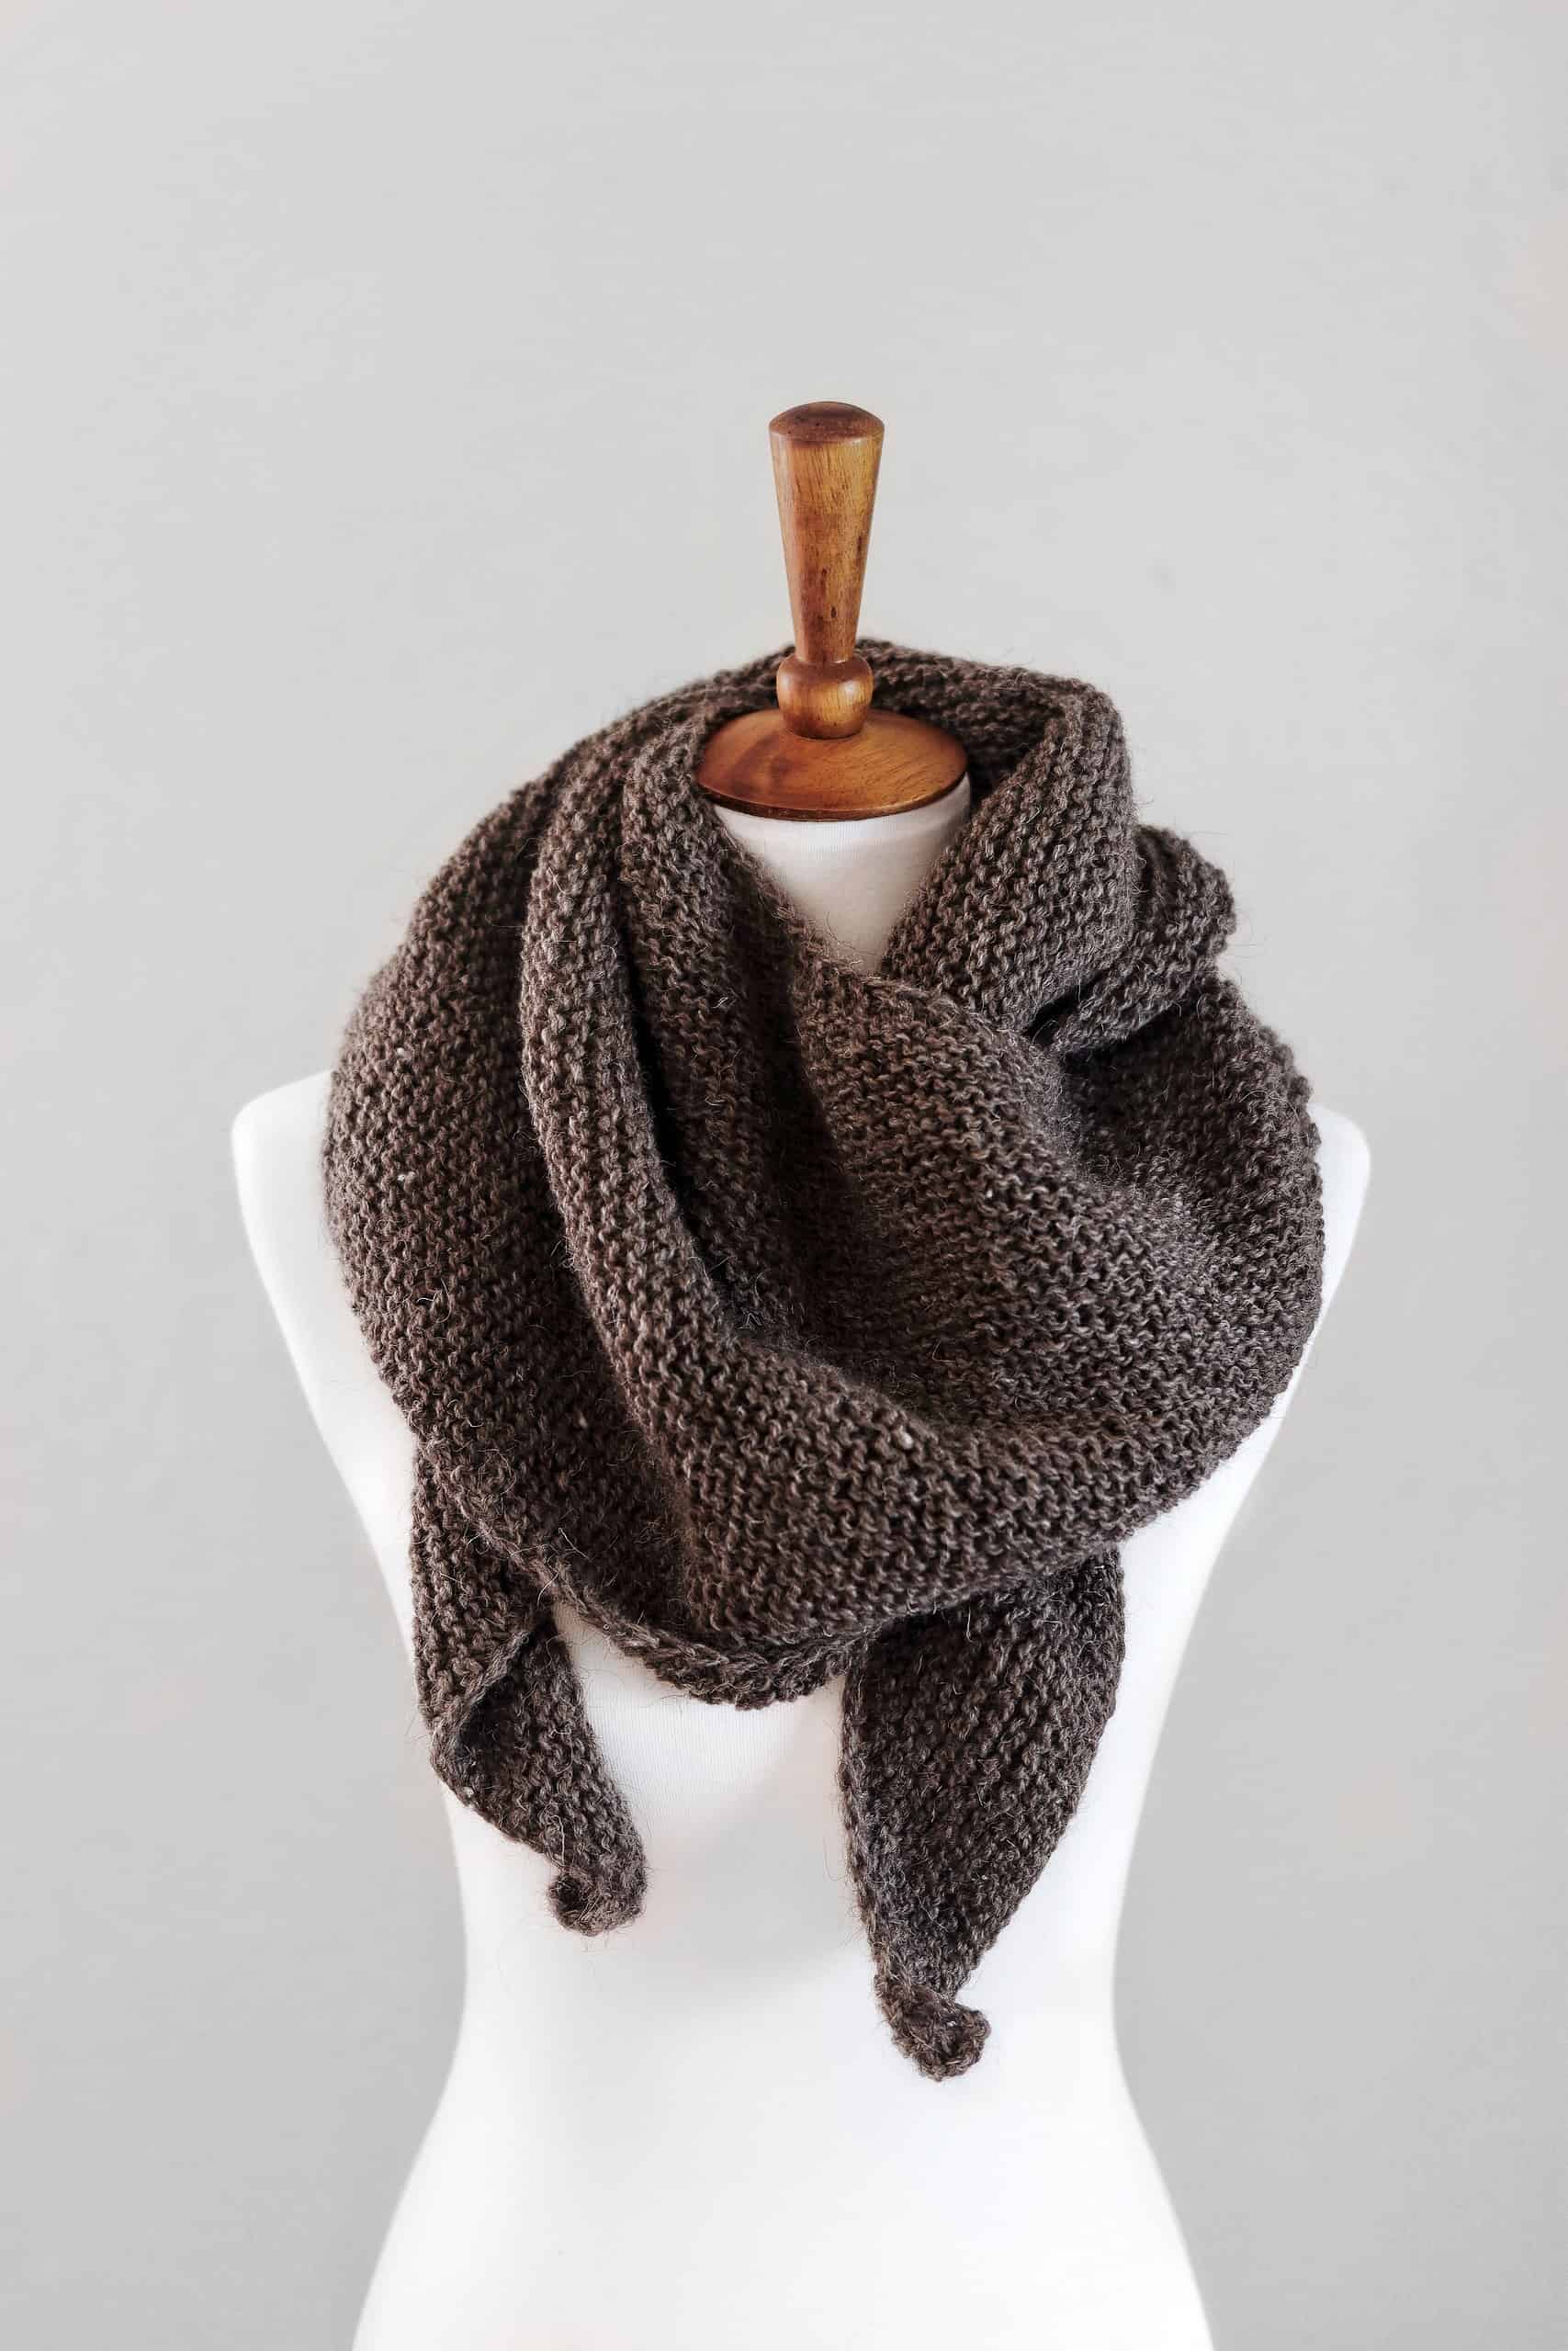
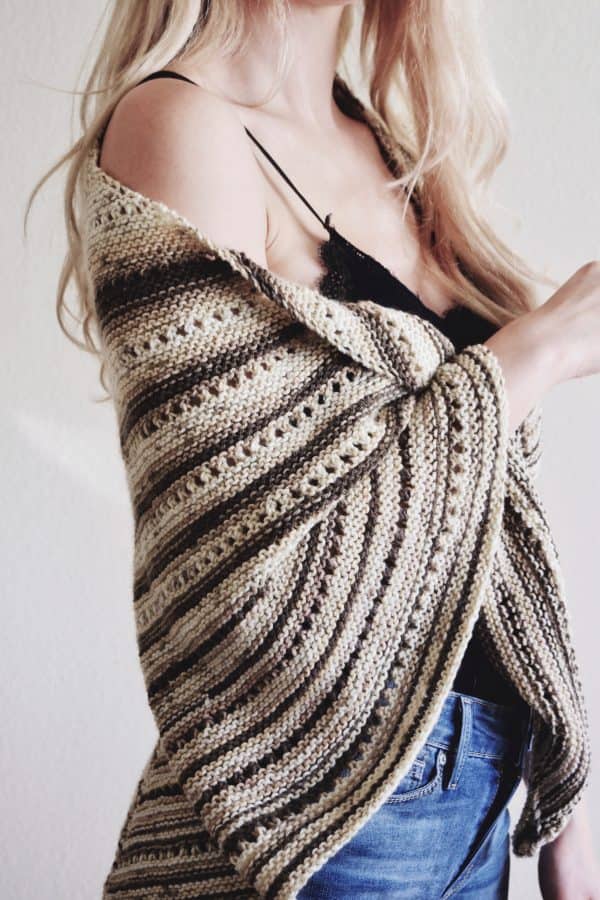
If you knit every row, you'll be left with "Garter Stitch"; likewise, if you purl every row, you'll be left with "Garter Stitch". Garter Stitch is simply just a series of stitches (either knitted or purl) that result in easily-recognizable horizontal ridges. This stitch creates a beautiful, squishy denseness in the finished fabric that adds warmth and thickness, so it's great for many different designs. Once you've mastered the Garter Stitch (both knit and purl), you can easily complete The Campfire Sweater knitting pattern and The Blanket Scarf knitting pattern, because both patterns incorporate these stitches for the entirety of the pattern. I'm often asked what would be the knitting pattern I recommend as a first pattern for beginners, and I always recommend The Blanket Scarf. The scarf is made up entirely of gorgeous knit stitches, and it's a relaxing and easy pattern to follow. When following this pattern, you'll gain a lot of practice working the knit stitch, and you'll be a master in no time!
PATTERNS THAT USE GARTER STITCH

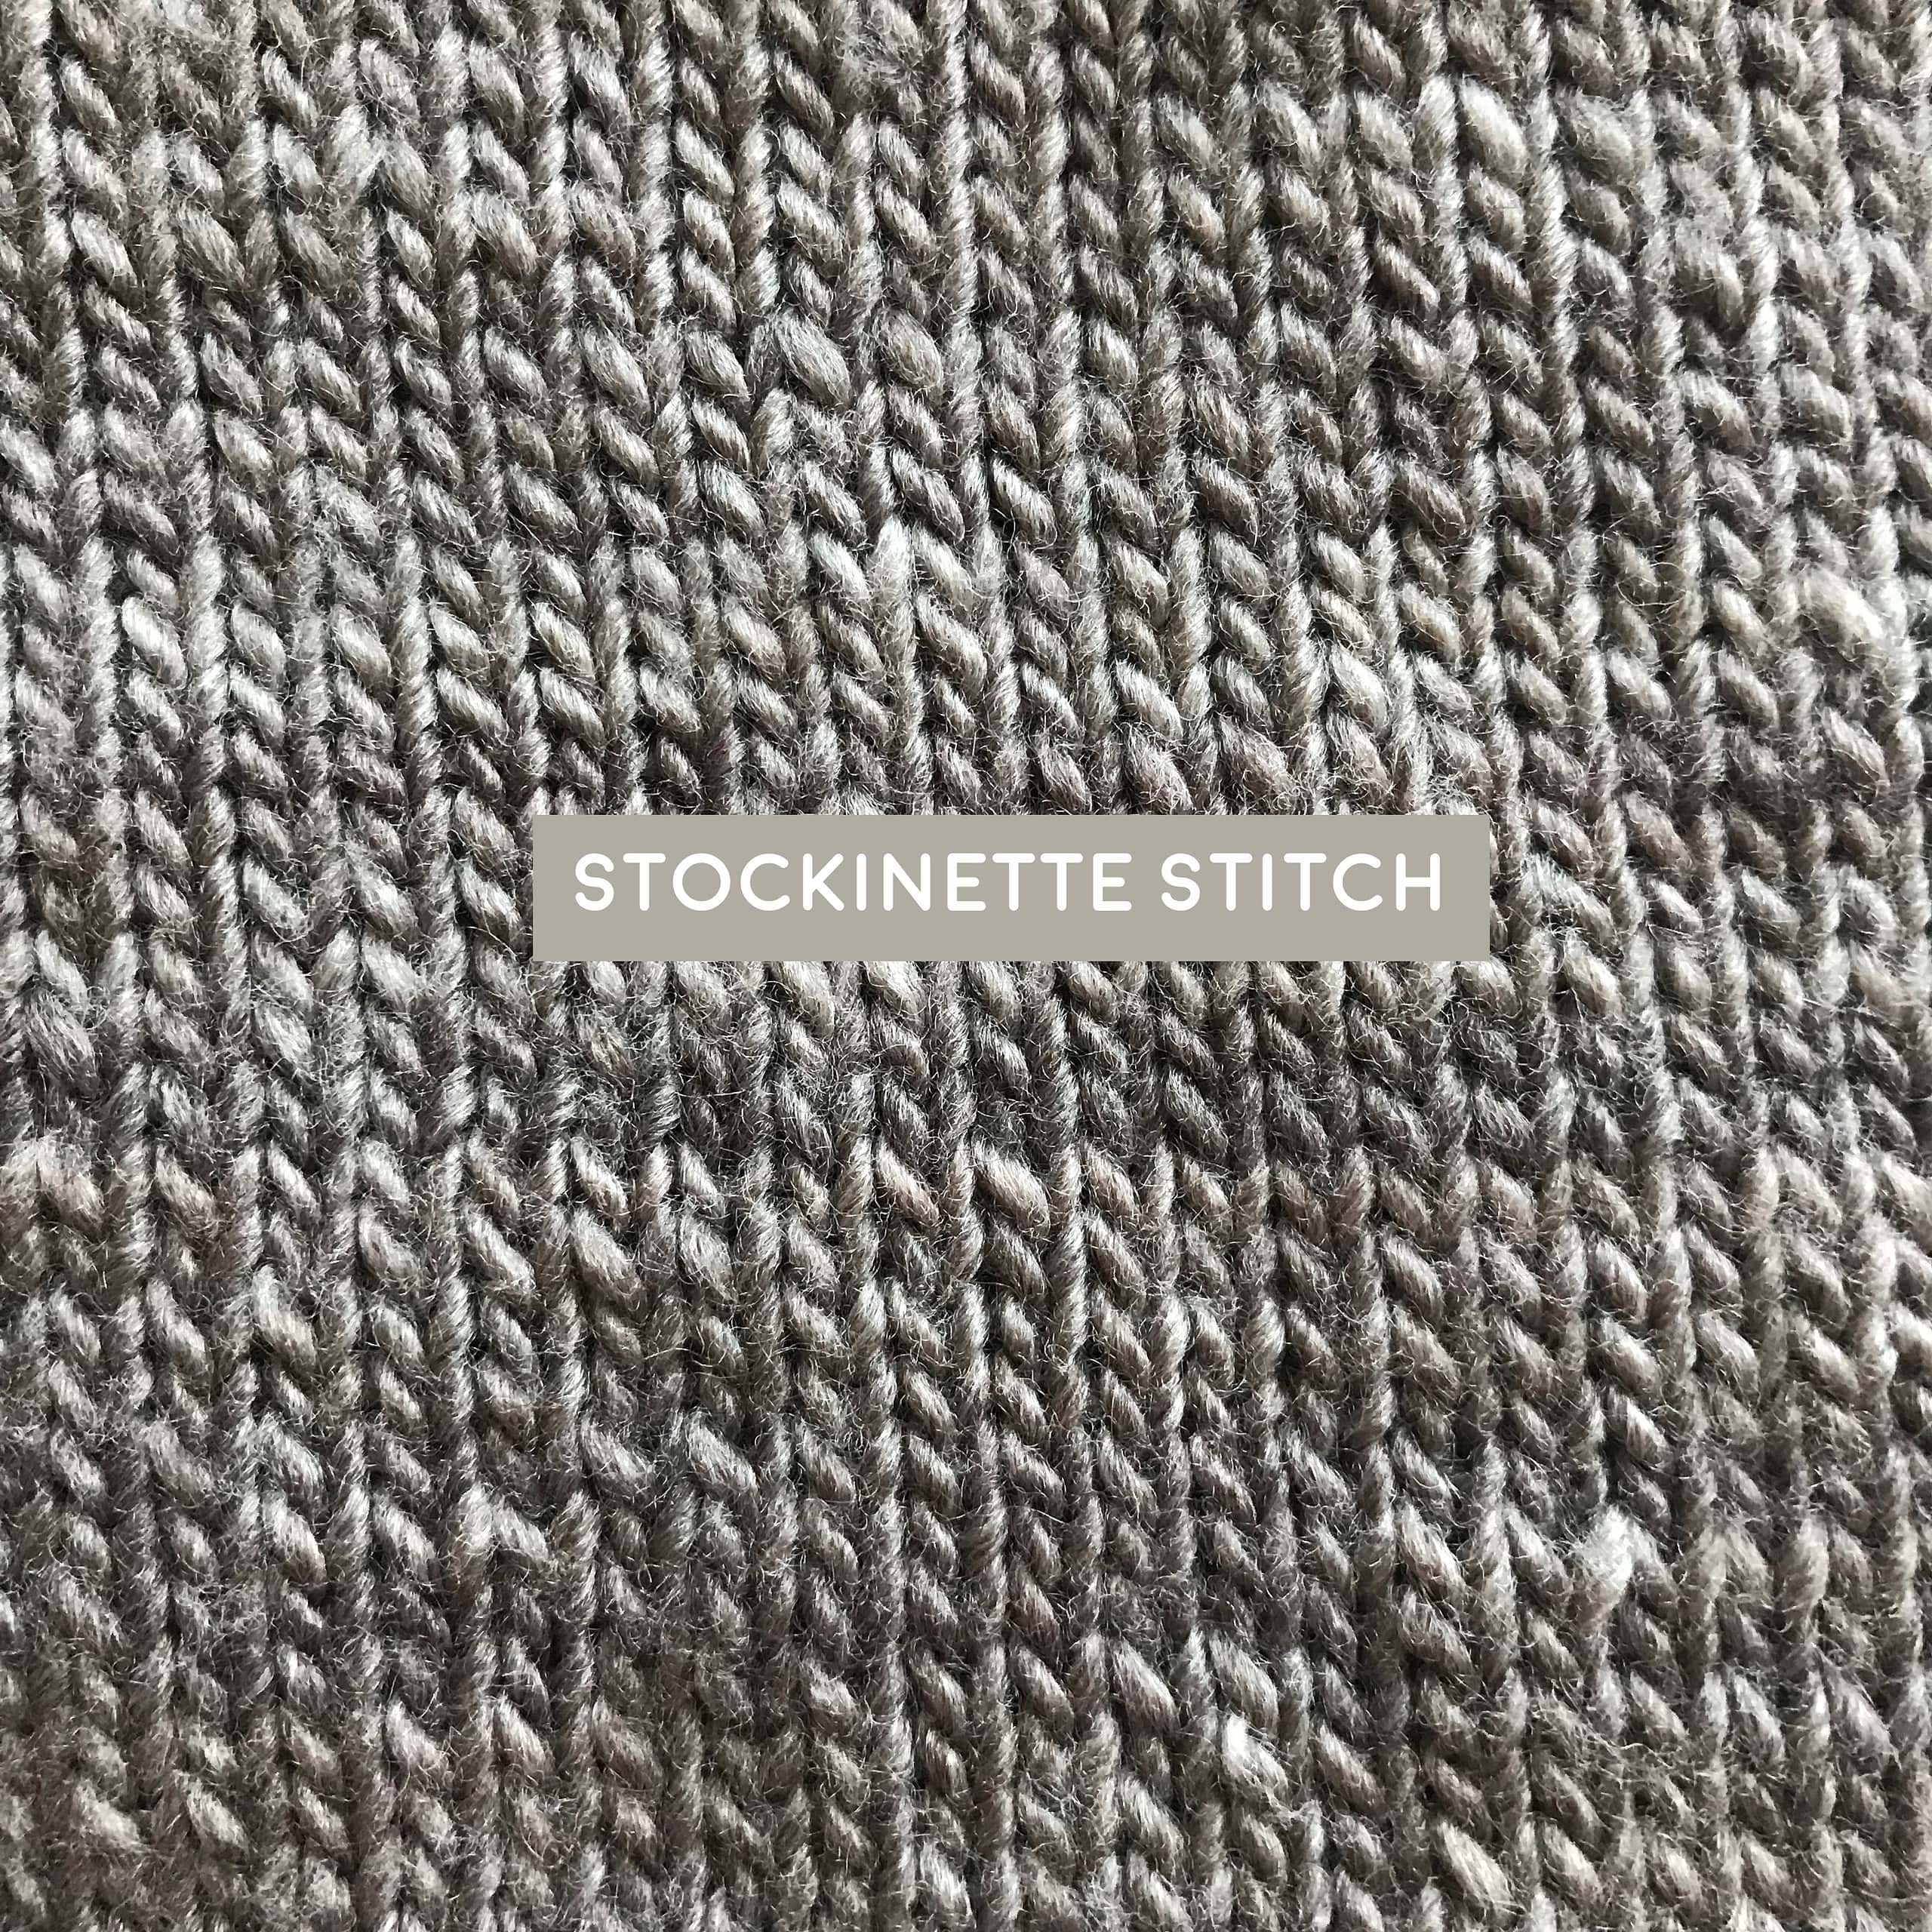
"Stockinette Stitch" is another common knitting stitch requiring only the knit and purl stitch. So once you've mastered the classic knit and purl stitches, you can create Stockinette Stitch - it's just that easy! Unlike Garter Stitch, however, Stockinette Stitch creates a less dense fabric that is more flexible, thin, and lightweight.
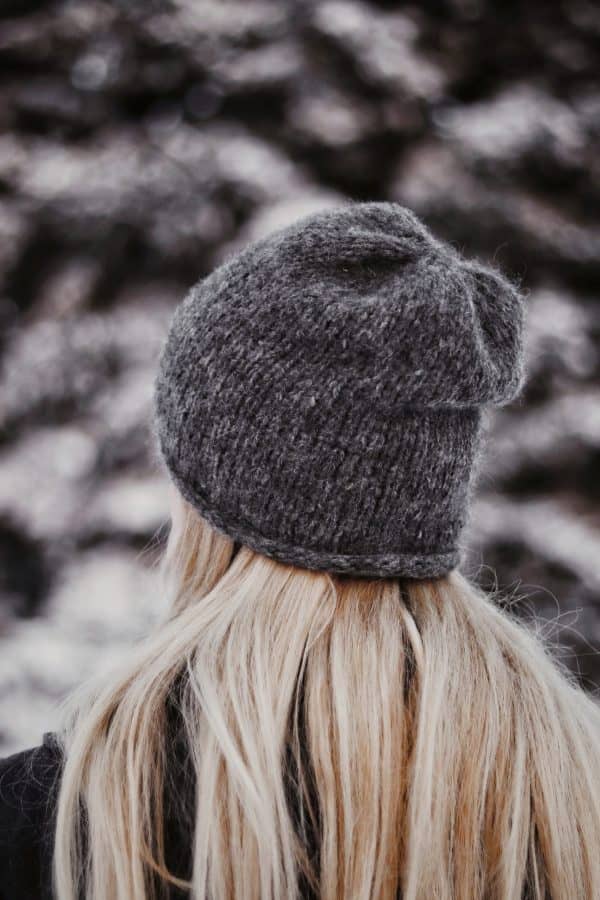
Knit In The Round: If you cast on stitches onto circulars and join in the round and then knit every stitch in the round, you will end up with Stockinette Stitch. This is precisely why some of the Darling Jadore sweater designs such as The Comfort Sweater are completely covered in Stockinette Stitch -- because the sweater is worked in the round on circulars, and every row is knitted. Another example is The Hadley Beanie.
Knitting Flat: Alternatively, if you are knitting a flat project (such as a scarf), then to create Stockinette Stitch, you will need to alternate one knit row with one purl row. An example would be The Favorite Scarf.
The "Right Side" of Stockinette Stitch consists of neat little "v-shaped" stitches; the "Wrong Side" of Stockinette Stitch is called "Reverse Stockinette Stitch" and has a similar appearance to Garter Stitch. This side is equally as beautiful and you can see it shown all over The Harlowe Sweater and The Fleur Beanie.
PATTERNS THAT USE STOCKINETTE STITCH

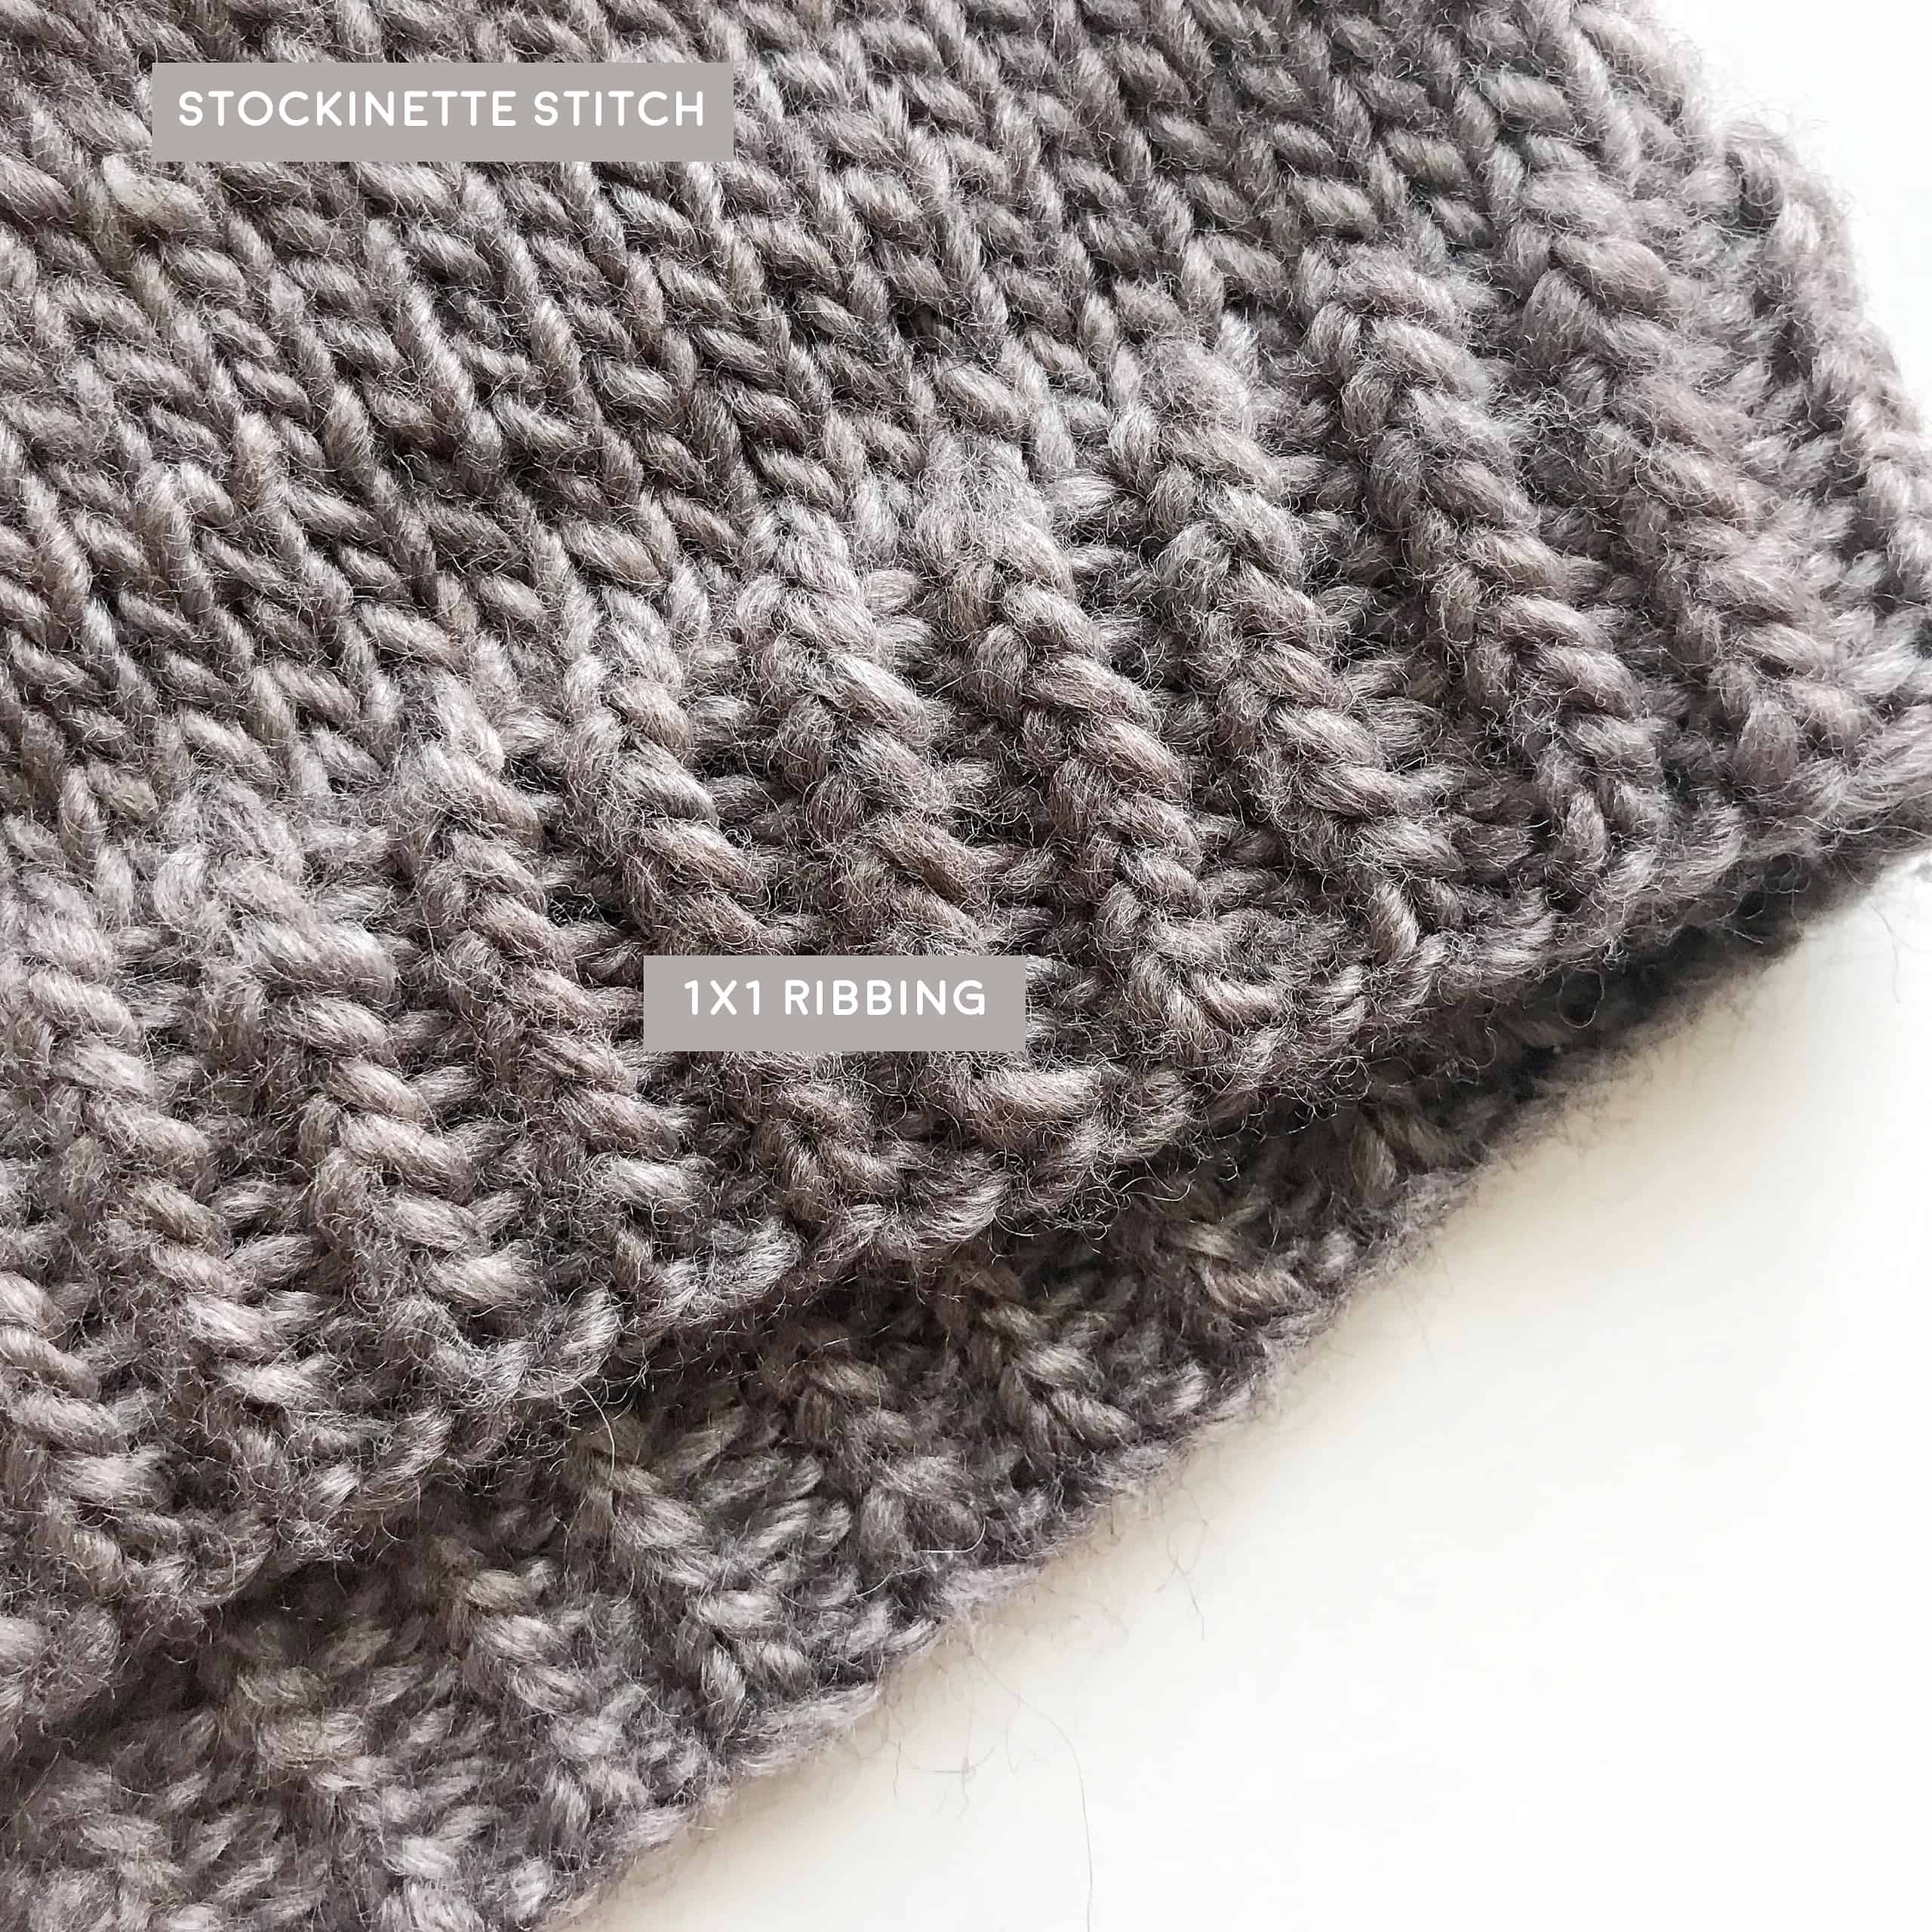
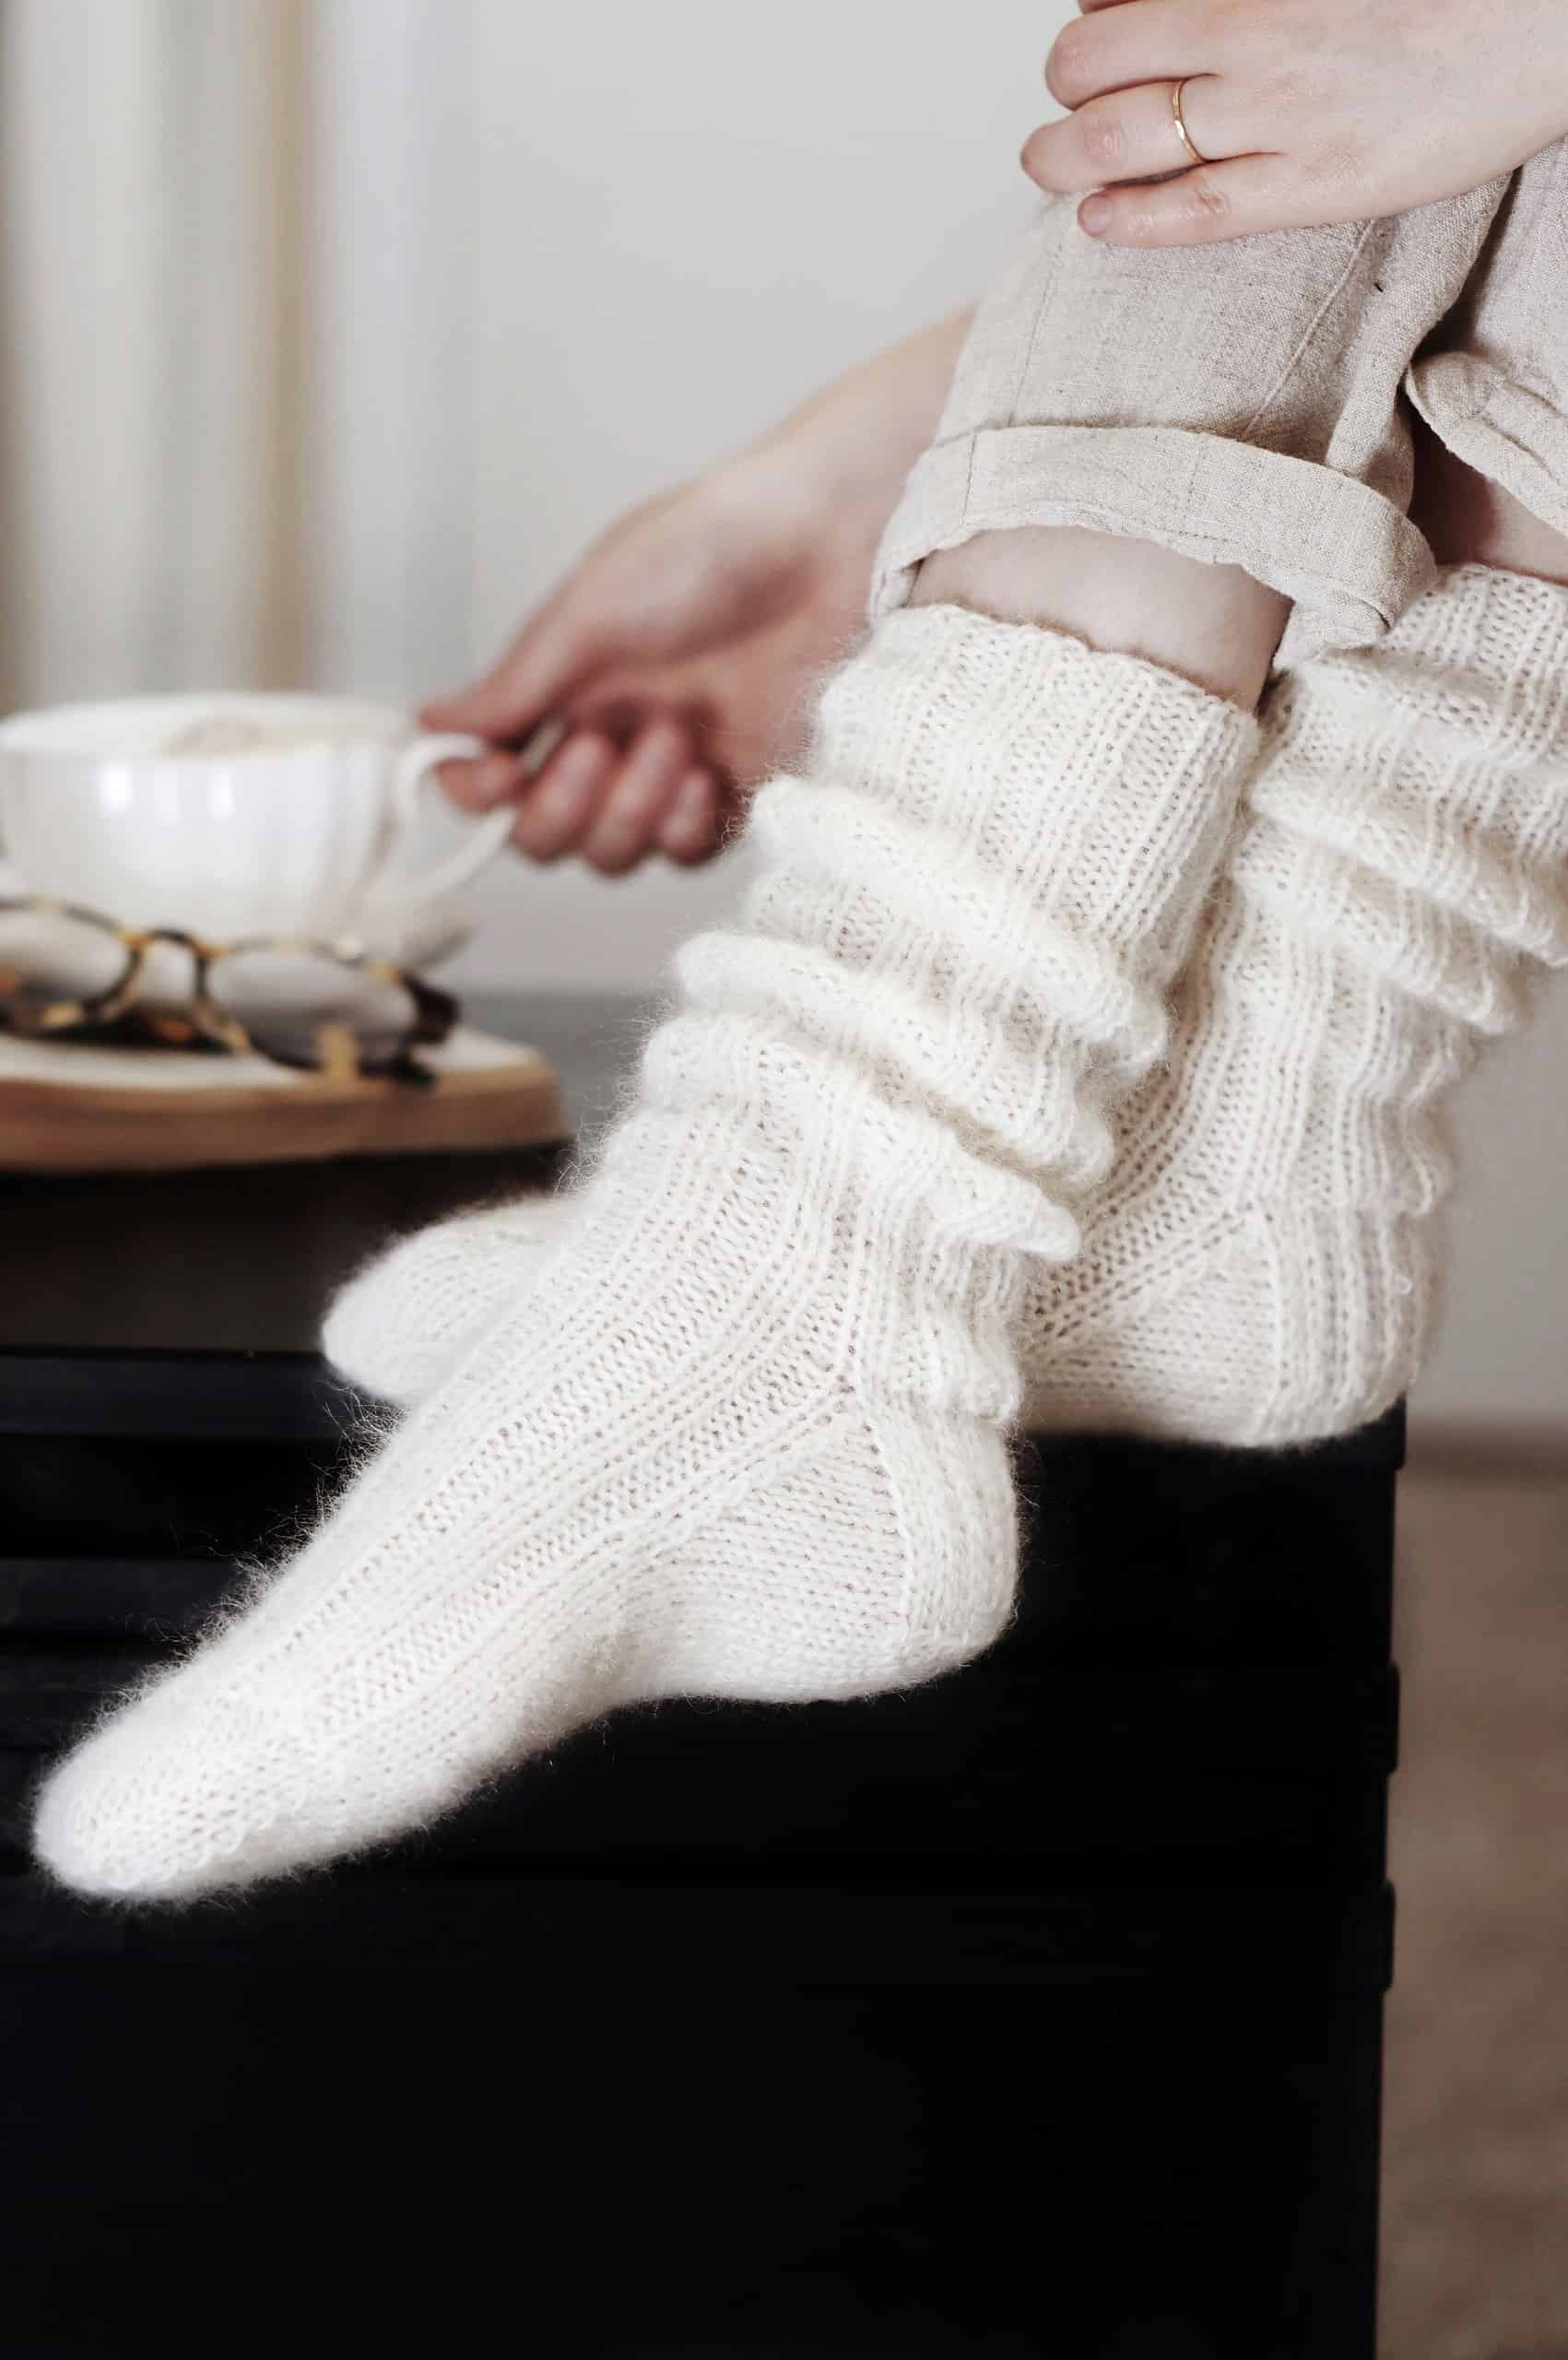
"Ribbing" is simply an alternating combination of knit and purl stitches in sequence. The most common is called a "1x1 Ribbing", in which one stitch is knitted, and the next immediate stitch is purled, and then the pattern is repeated for a few rows. This will create the appearance of vertical ridges that are oftentimes used in places such as at the neck or collar of a sweater or the cuffs of sweater sleeves. Above is a photo of the bottom of The Posy Sweater, which is completed with a lovely 1x1 ribbed edge. You can also see this 1x1 Ribbing on the brim of many hats, such as The Lakewood Hat.
There is also a "Twisted Ribbing" where one or both stitches are worked "through the back loop" of the stitch. In the photo above, it shows a 1x1 Twisted Ribbing.
There are many other styles of ribbing you can create in knitting, such as a "2x2 Ribbing", which is made by simply knitting two stitches, followed by purling two stitches. You can experiment with the classic knit and purl stitches in sequence like this and create beautiful ribbing designs on many different knitwear!

Similar to "casting on", "binding off" is just a knitting term to ending a project or ending a certain number of stitches midway into a project, and essentially removing those "dead" stitches from your knitting needles. Think of cast-on stitches as "live" stitches that are continually being worked and knitted, and think of bind off stitches as "dead" stitches that can no longer be worked or knitted. There are many different ways of binding off -- some allow for a stretchy edge, some create a straight edge, etc. Below is a classic, standard bind off technique that can be used in every single Darling Jadore pattern. Of course, you are always welcome to bind off whichever method you prefer, but we at Darling Jadore have designed all our patterns to be appropriate for the classic bind off technique demonstrated below.
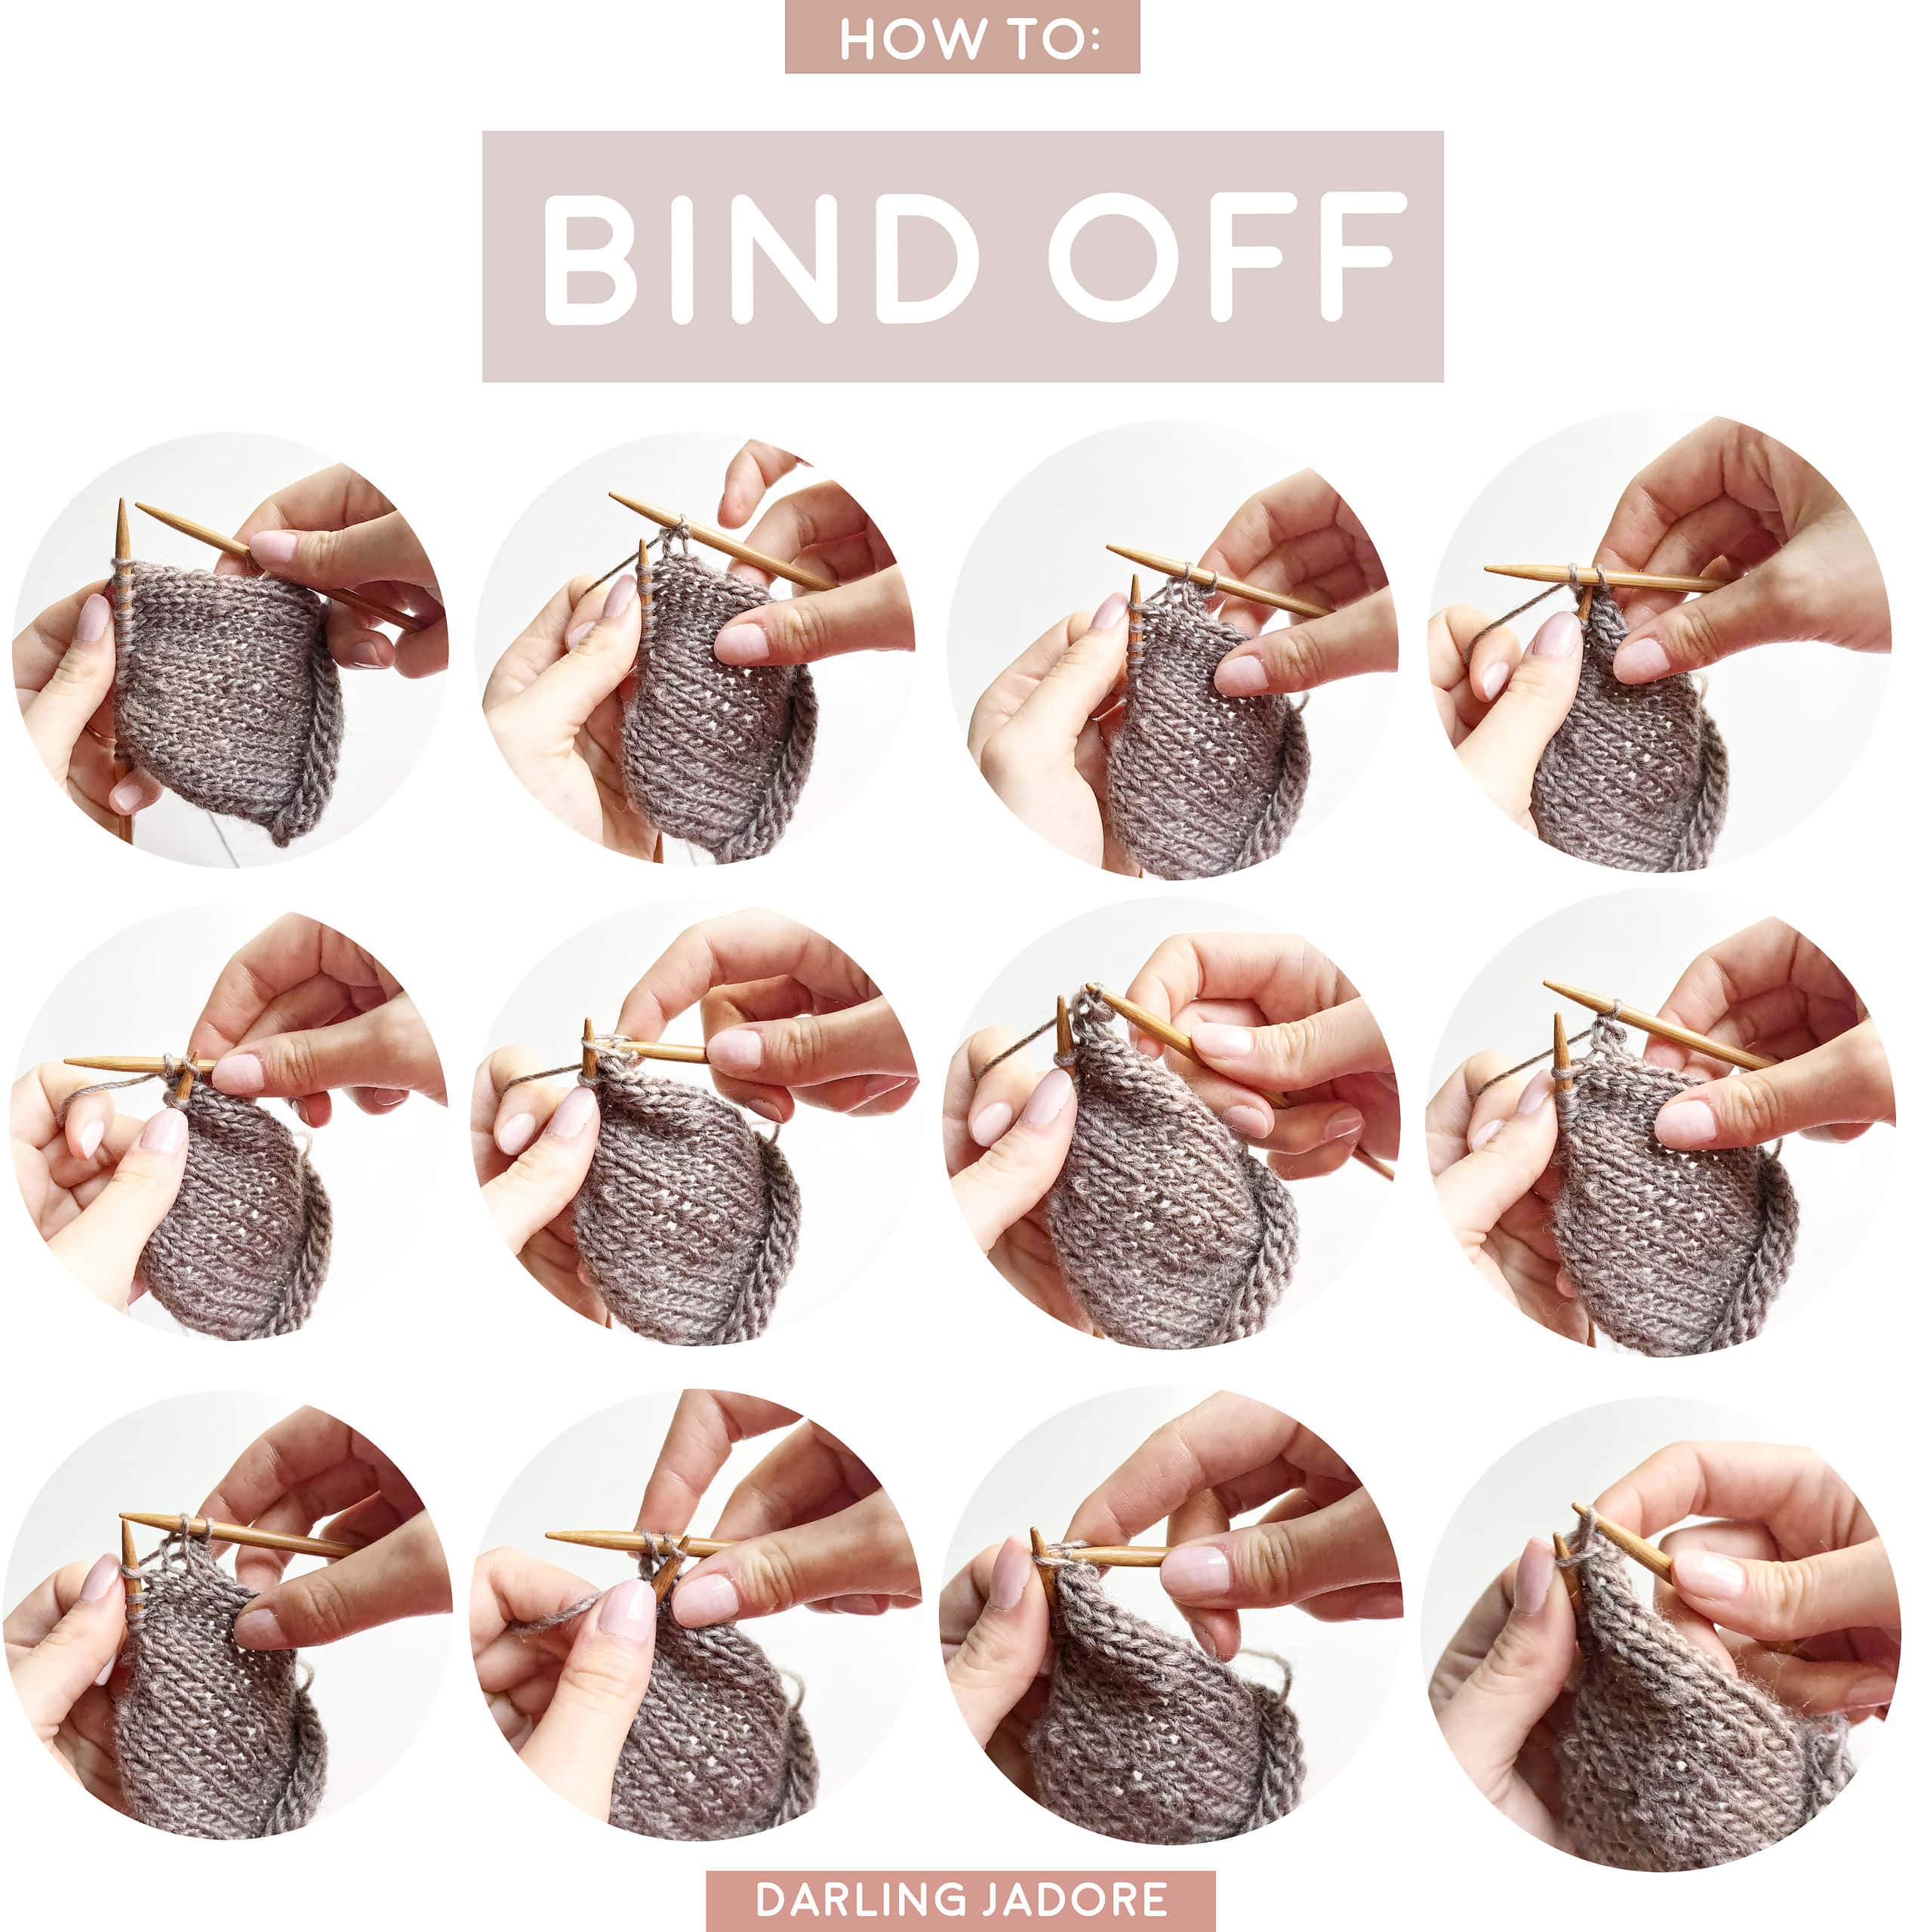
BINDING OFF: THE METHOD
This bind off technique can be used for all Darling Jadore knitting patterns and it creates a straight edge. For a "looser" bind off (that creates a slightly more stretchy edge), you can follow the instructions while keeping the tension on your knitting needles much looser. Alternatively, if your bind off edge is coming after a series of ribbing you can simply "bind off in ribbing" by knitting the knit stitch, then purling the purl stitch, and slipping the first stitch over the second, and following in this ribbing sequence across.
STEP ONE: Hold your knitting needles as if to knit, with your working yarn behind your work.
STEP TWO: Knit two stitches.
STEP THREE: Using the tip of your left knitting needle, slip the first stitch on your right knitting needle over the second stitch (closest to the tip) on your right knitting needle, by inserting your left knitting needle into the stitch left to right, and essentially pulling that stitch up and over the other one. You are now left with one stitch on your right knitting needle.
STEP FOUR: Knit another stitch.
STEP FIVE: Repeat Step Three.
STEP SIX: Repeat Step Four.
Continue on in this manner, repeating steps five and six. At any given time, you will always have two stitches on your right knitting needle which you will decrease (by slipping that second stitch over the first) and then be left with one stitch again. You will repeat this bind off technique all the way across the edge until all your stitches are off your knitting needles. When you've reached the last stitch left on your right knitting needle, you will gently slip that stitch off your knitting needle, insert the tail-end of your yarn through the loop on that stitch, and tighten it to close.

When following a knitting pattern, you are sometimes required to increase some knit stitches, to accommodate shaping or lacework. This might sound complicated, but the designer has already mathematically figured out where the stitches will need to be increased, so as a knitter following the pattern, you won't have to worry about that. All you need to do is know how to create these simple stitches so as to continue following along the knitting pattern properly. Below, I've demonstrated the increase knit stitches that are incorporated into Darling Jadore knitting patterns. They are all very simple techniques that can be easily mastered and allow the beautiful lacework to shine in The Glacier Scarf and The Tiramisu Shawl, as examples.

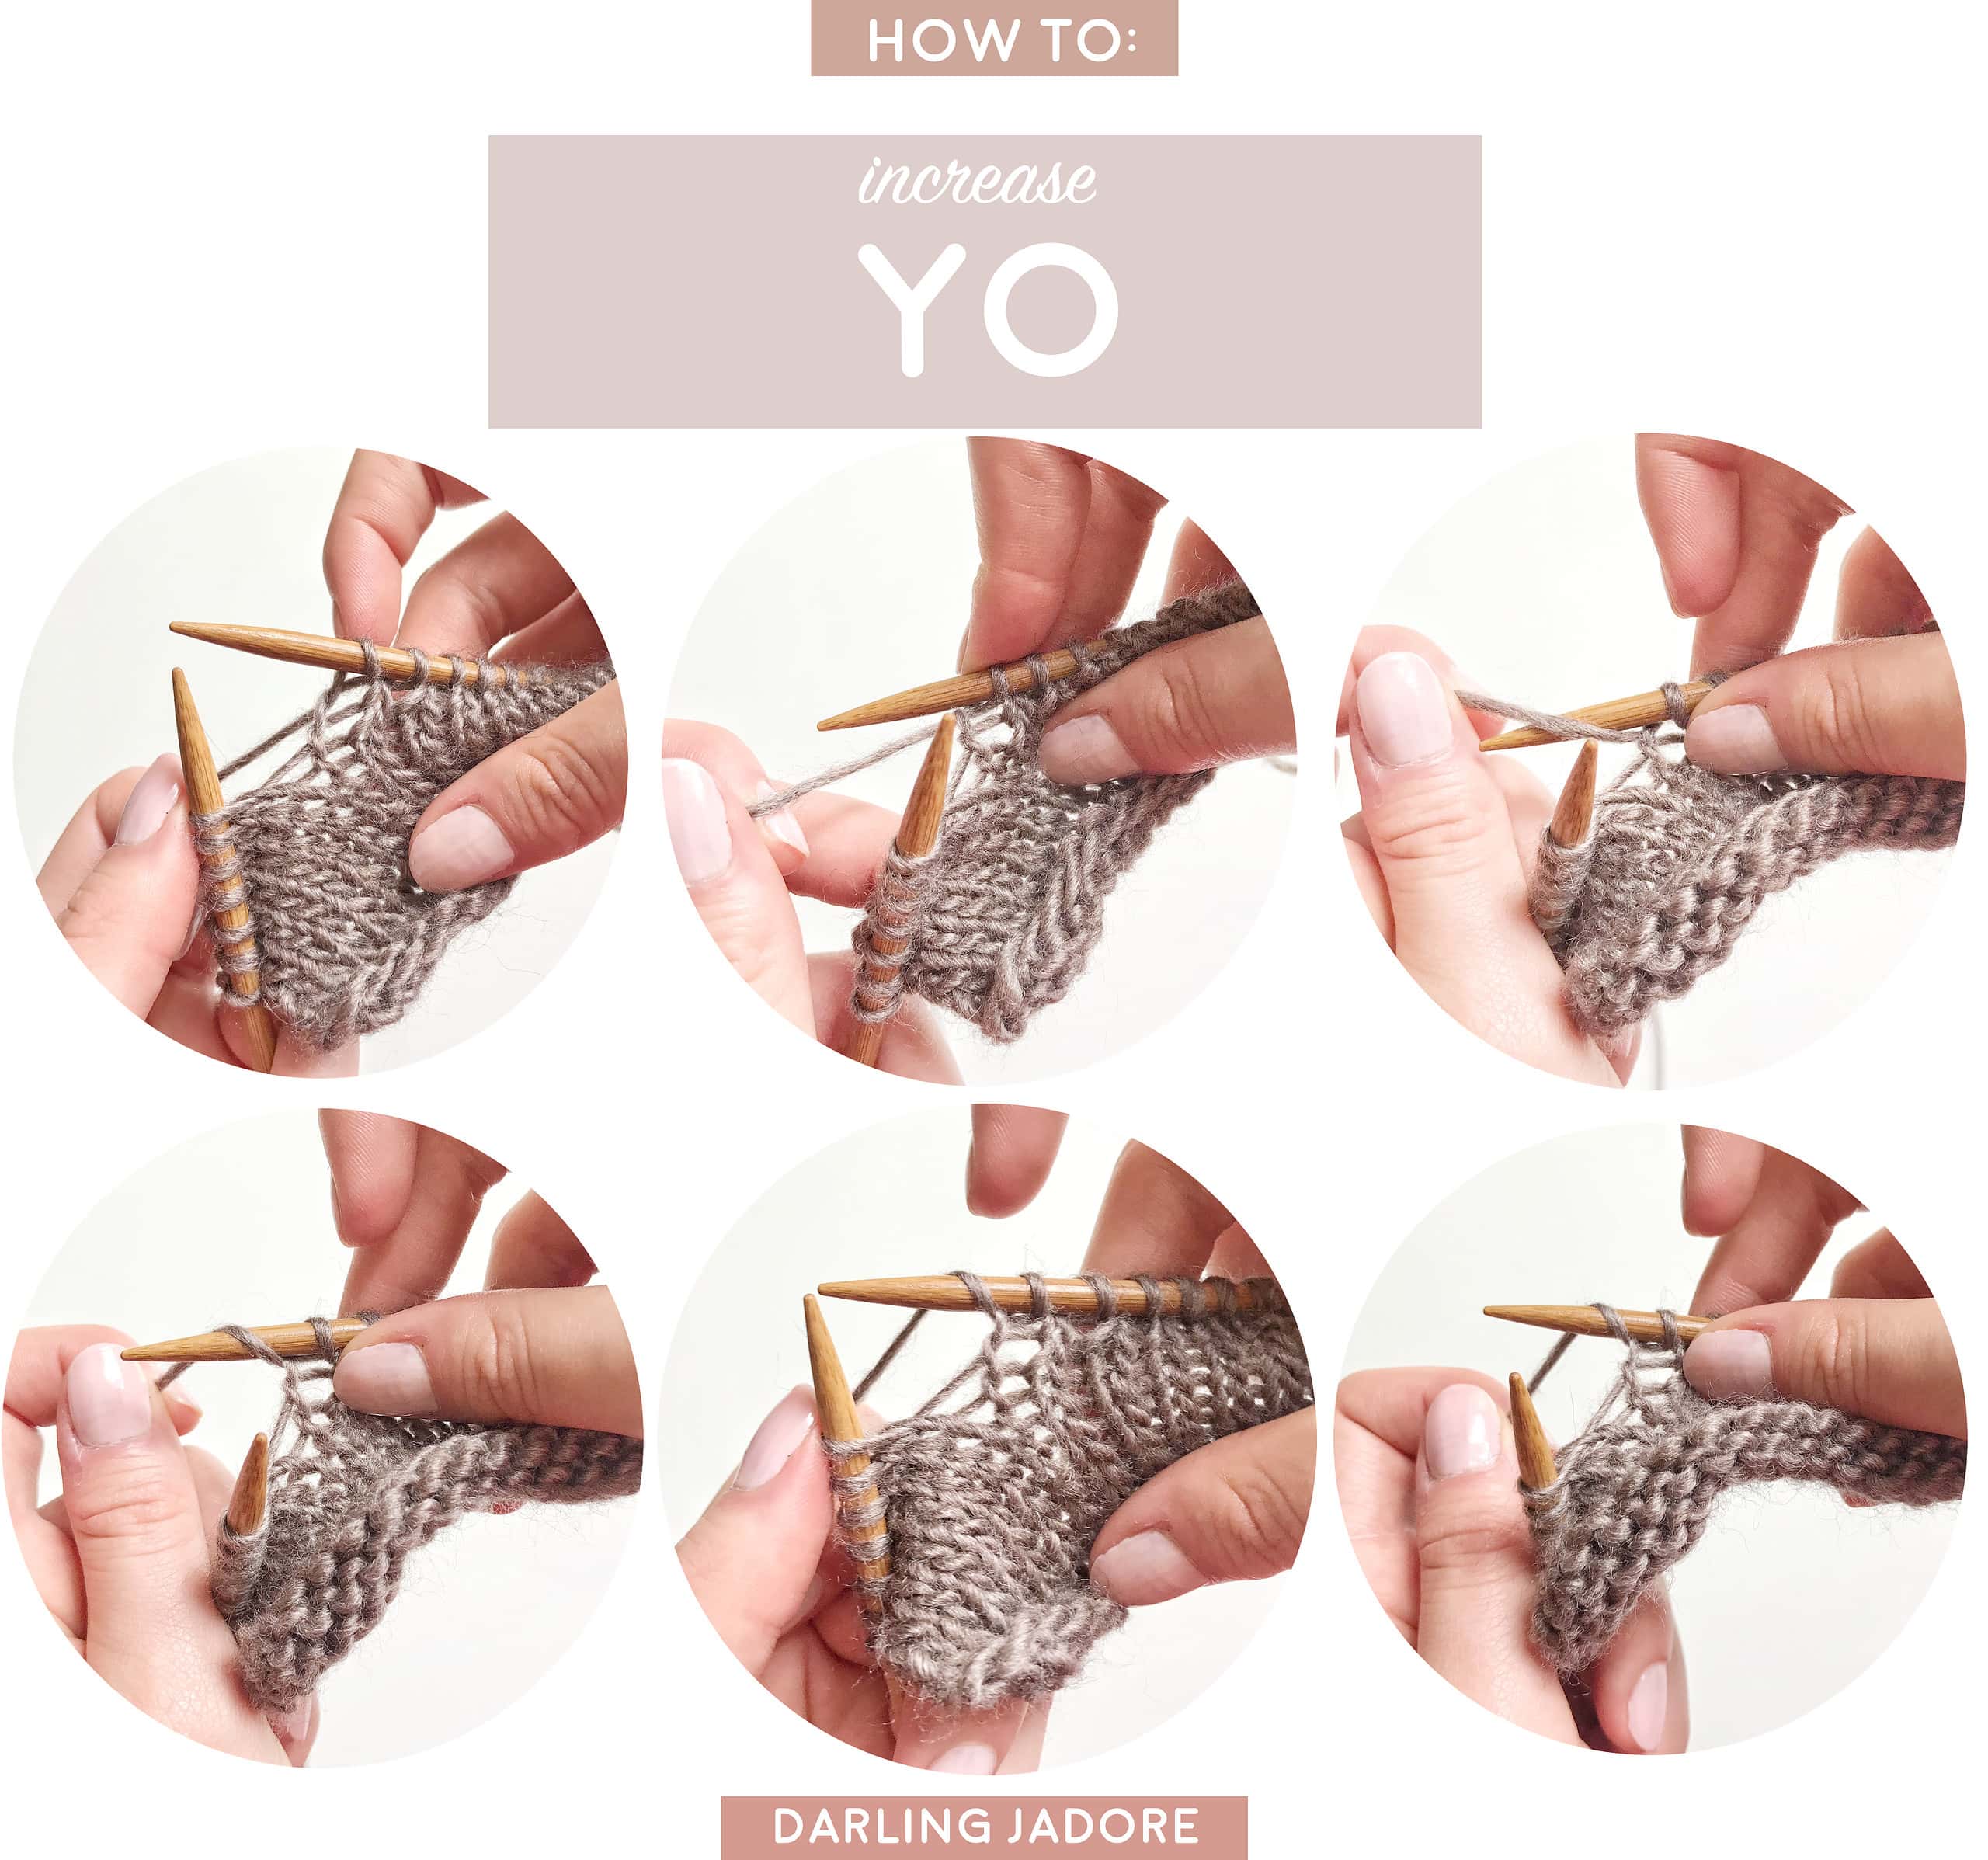
YARN OVER: THE METHOD
Yarning over is a super simple increase stitch where you will essentially create a little hole in your knitting. These little holes are often called "eyelets", and are easily seen on the body of The Ruska Shawl and The Tiramisu Shawl. This is one of the fastest methods to increase a stitch, but since it does create eyelets (i.e., little holes), as a designer, I have to be mindful where I place them in a design. I usually like these yarn over increases to be incorporated into a lacework design because it not only will blend in if I want it to, but it can also add to the overall lace appearance.
STEP ONE: Holding your needles as if to knit, with your working yarn behind your work, bring your working yarn between your two knitting needles.
STEP TWO: Then bring the working yarn up and over your right knitting needle, and hold to the back of your work again. Work your next stitch(es) as described in the pattern.
Sometimes, a pattern will require you to make two yarn overs back to back. In that case, you will simply repeat steps one and two again, just wrapping the yarn around the right needle as many times as stated. When you work your way back through the row, you'll notice tiny little eyelet holes where you increases were made.

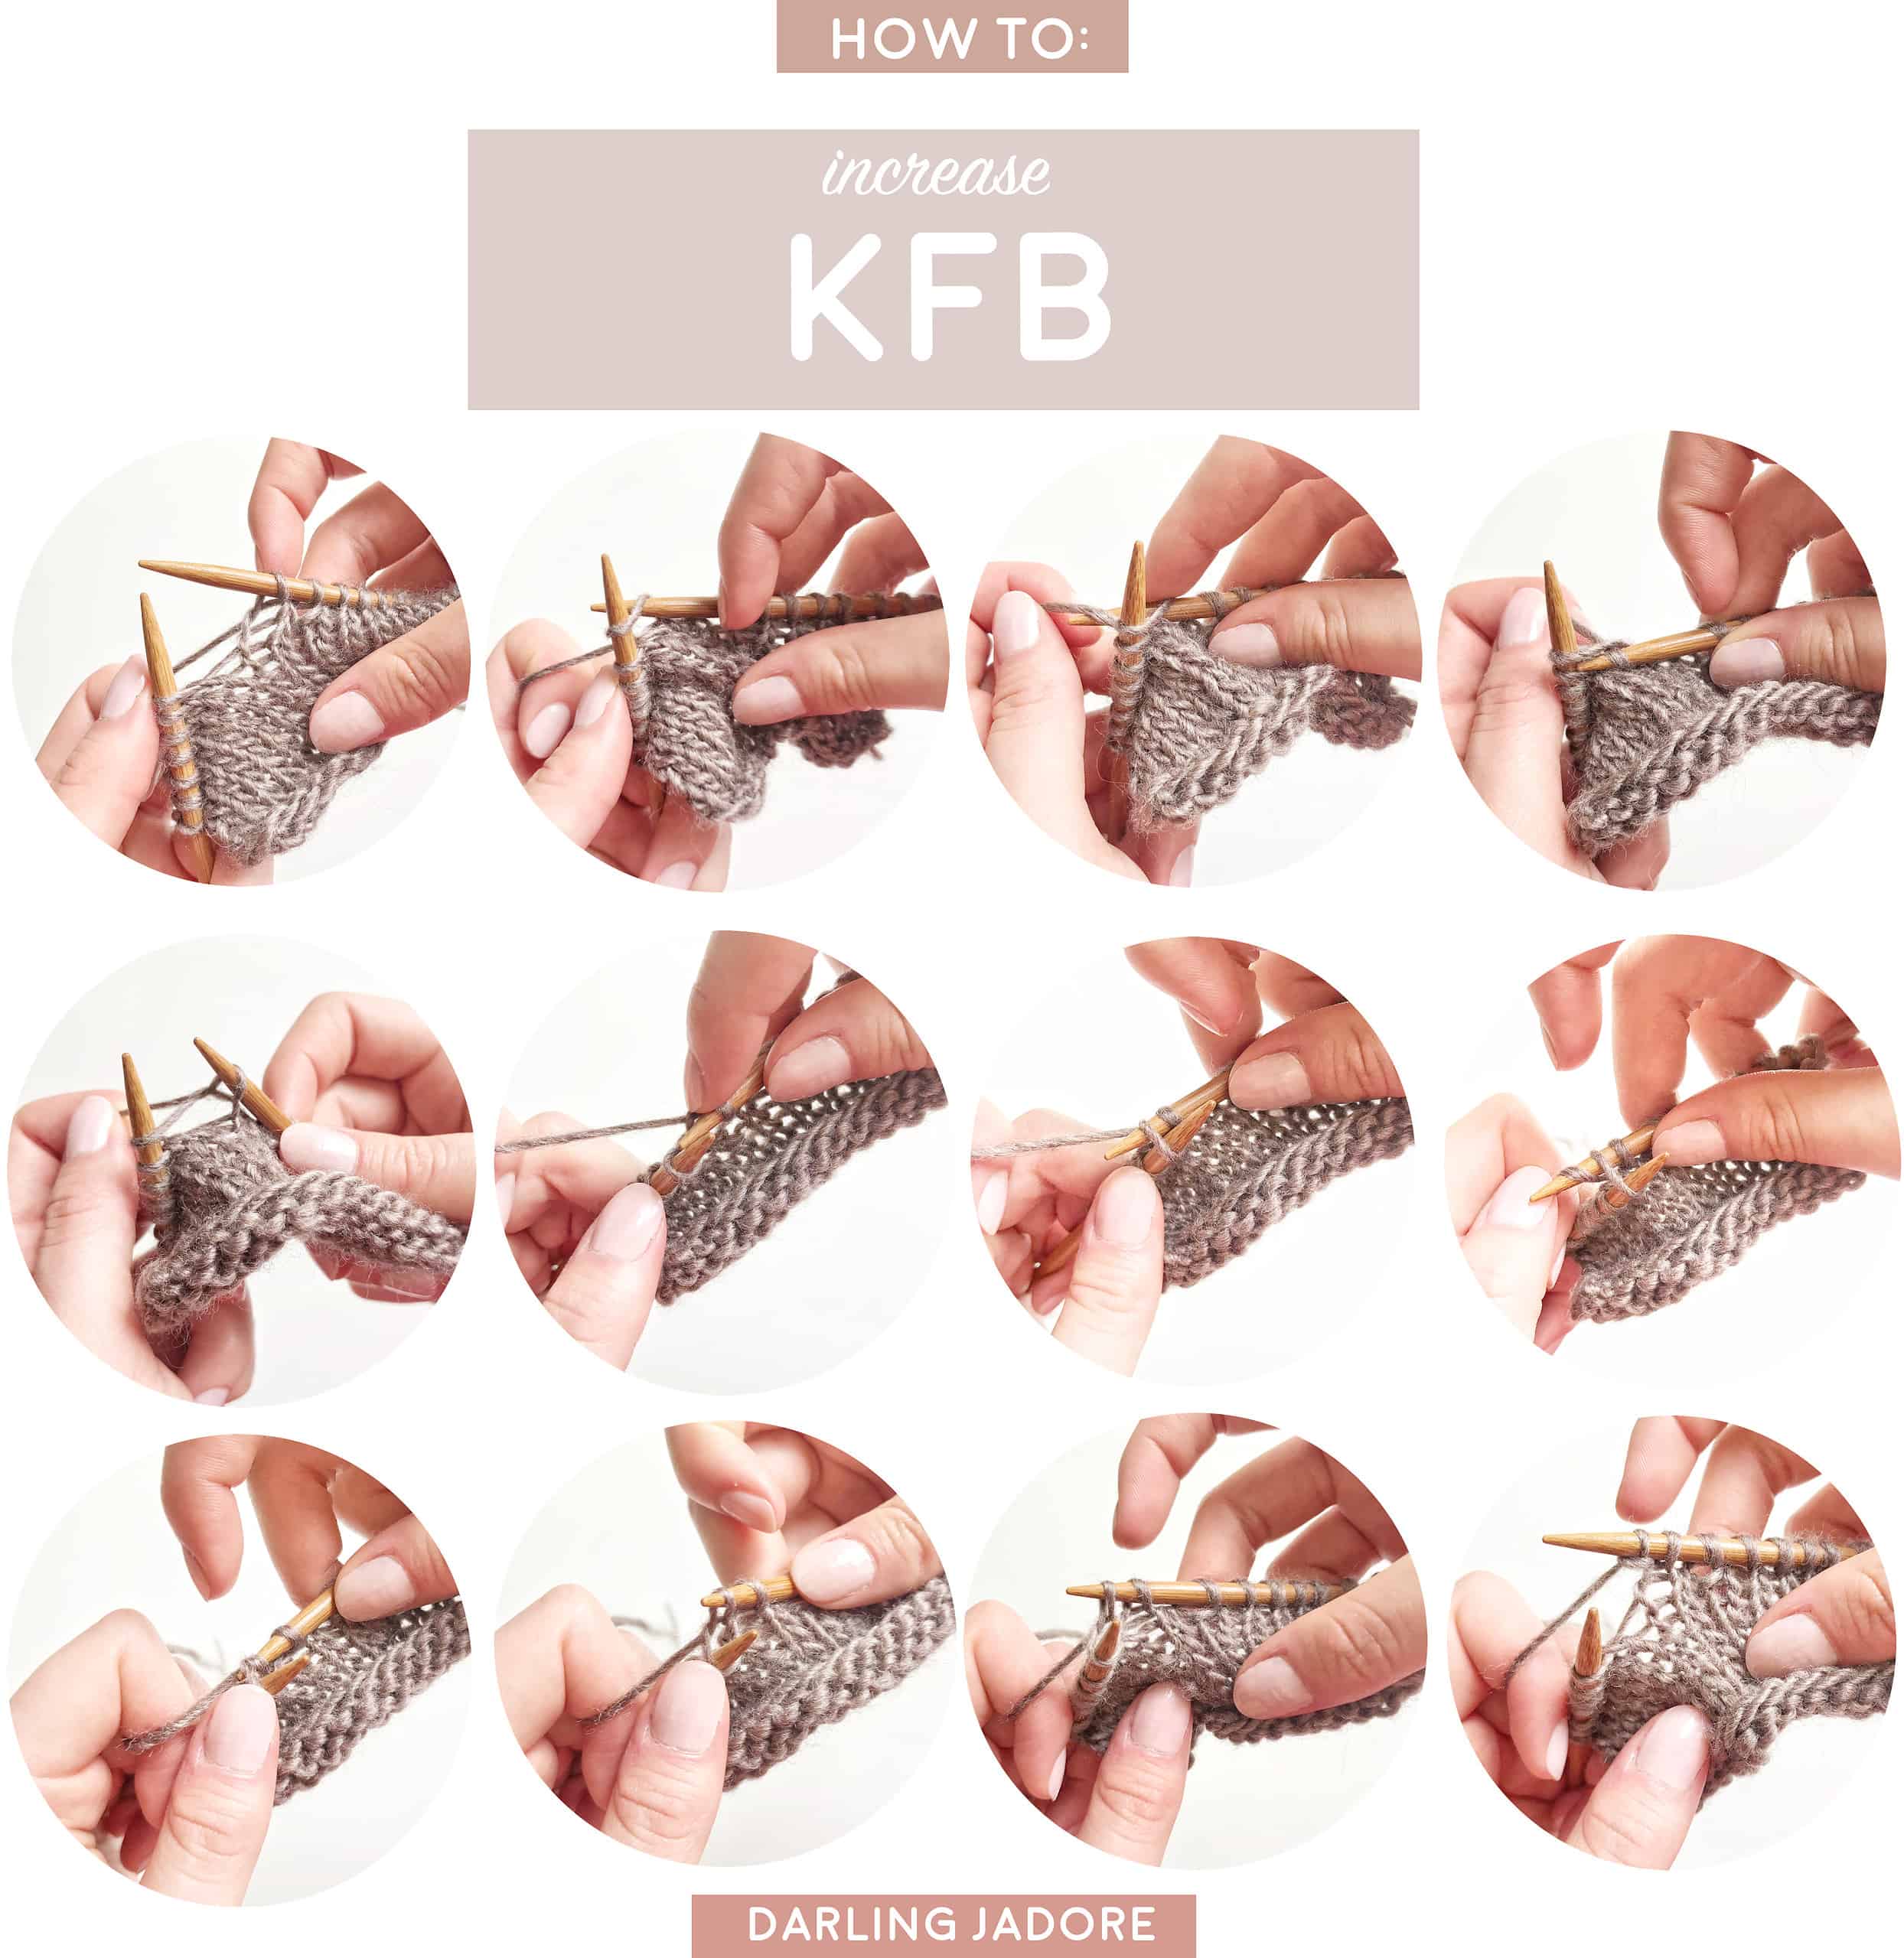
KNIT FRONT BACK: THE METHOD
Knitting into the front and back of the same stitch is another way to increase a knit stitch, and it will leave a tiny little bump in your work where that increase was made. Unlike the yarn over technique shown above, KFB doesn't leave an eyelet hole. KFB also doesn't lean a certain way (we'll get to that later), but it does create a little bump, which sometimes doesn't look good in a pattern, so I'm also mindful where I incorporate KFBs in a design.
STEP ONE: Hold your needles as if to knit, with the working yarn behind your work. Insert your right knitting needle into the next stitch on your left knitting needle as if to knit it.
STEP TWO: Knit that stitch as normal (bringing the yarn to the front from the left side of the right knitting needle, and then up and over the right knitting needle, then bringing the tip of your right knitting needle with its wrap of yarn through the loop on the left needle to the front), but keep that stitch on the left knitting needle.
STEP THREE: With that knitted stitch still on the left knitting needle, bring your right knitting needle behind the left knitting needle, while keeping the working yarn behind your work still.
STEP FOUR: Insert your right knitting needle into the back of that same stitch, from right to left, front to back.
STEP FIVE: Wrap your working yarn up and over your right needle tip.
STEP SIX: Gently pull your right knitting needle through that loop, dropping that stitch off your left knitting needle.
When you observe your right knitting needle, you will clearly see two stitches, once looks like a normal knit stitch, and the other looks like a purl stitch (with a little bump).
RIGHT & LEFT LEANING INCREASE STITCHES
Now that you've tackled a couple of the basic increase knitting stitches above, there are a couple more increase stitches I use in mainly my sweater designs, such asThe Hawthorn Sweater, The Comfort Sweater, and other top-down raglan style sweater for the yoke. These increase stitches appear as if they are "leaning" to either the left or right, and can make a big difference in the overall appeaarance of the final design. In other words, these increase stitches are strategically placed to create a shape in a design.

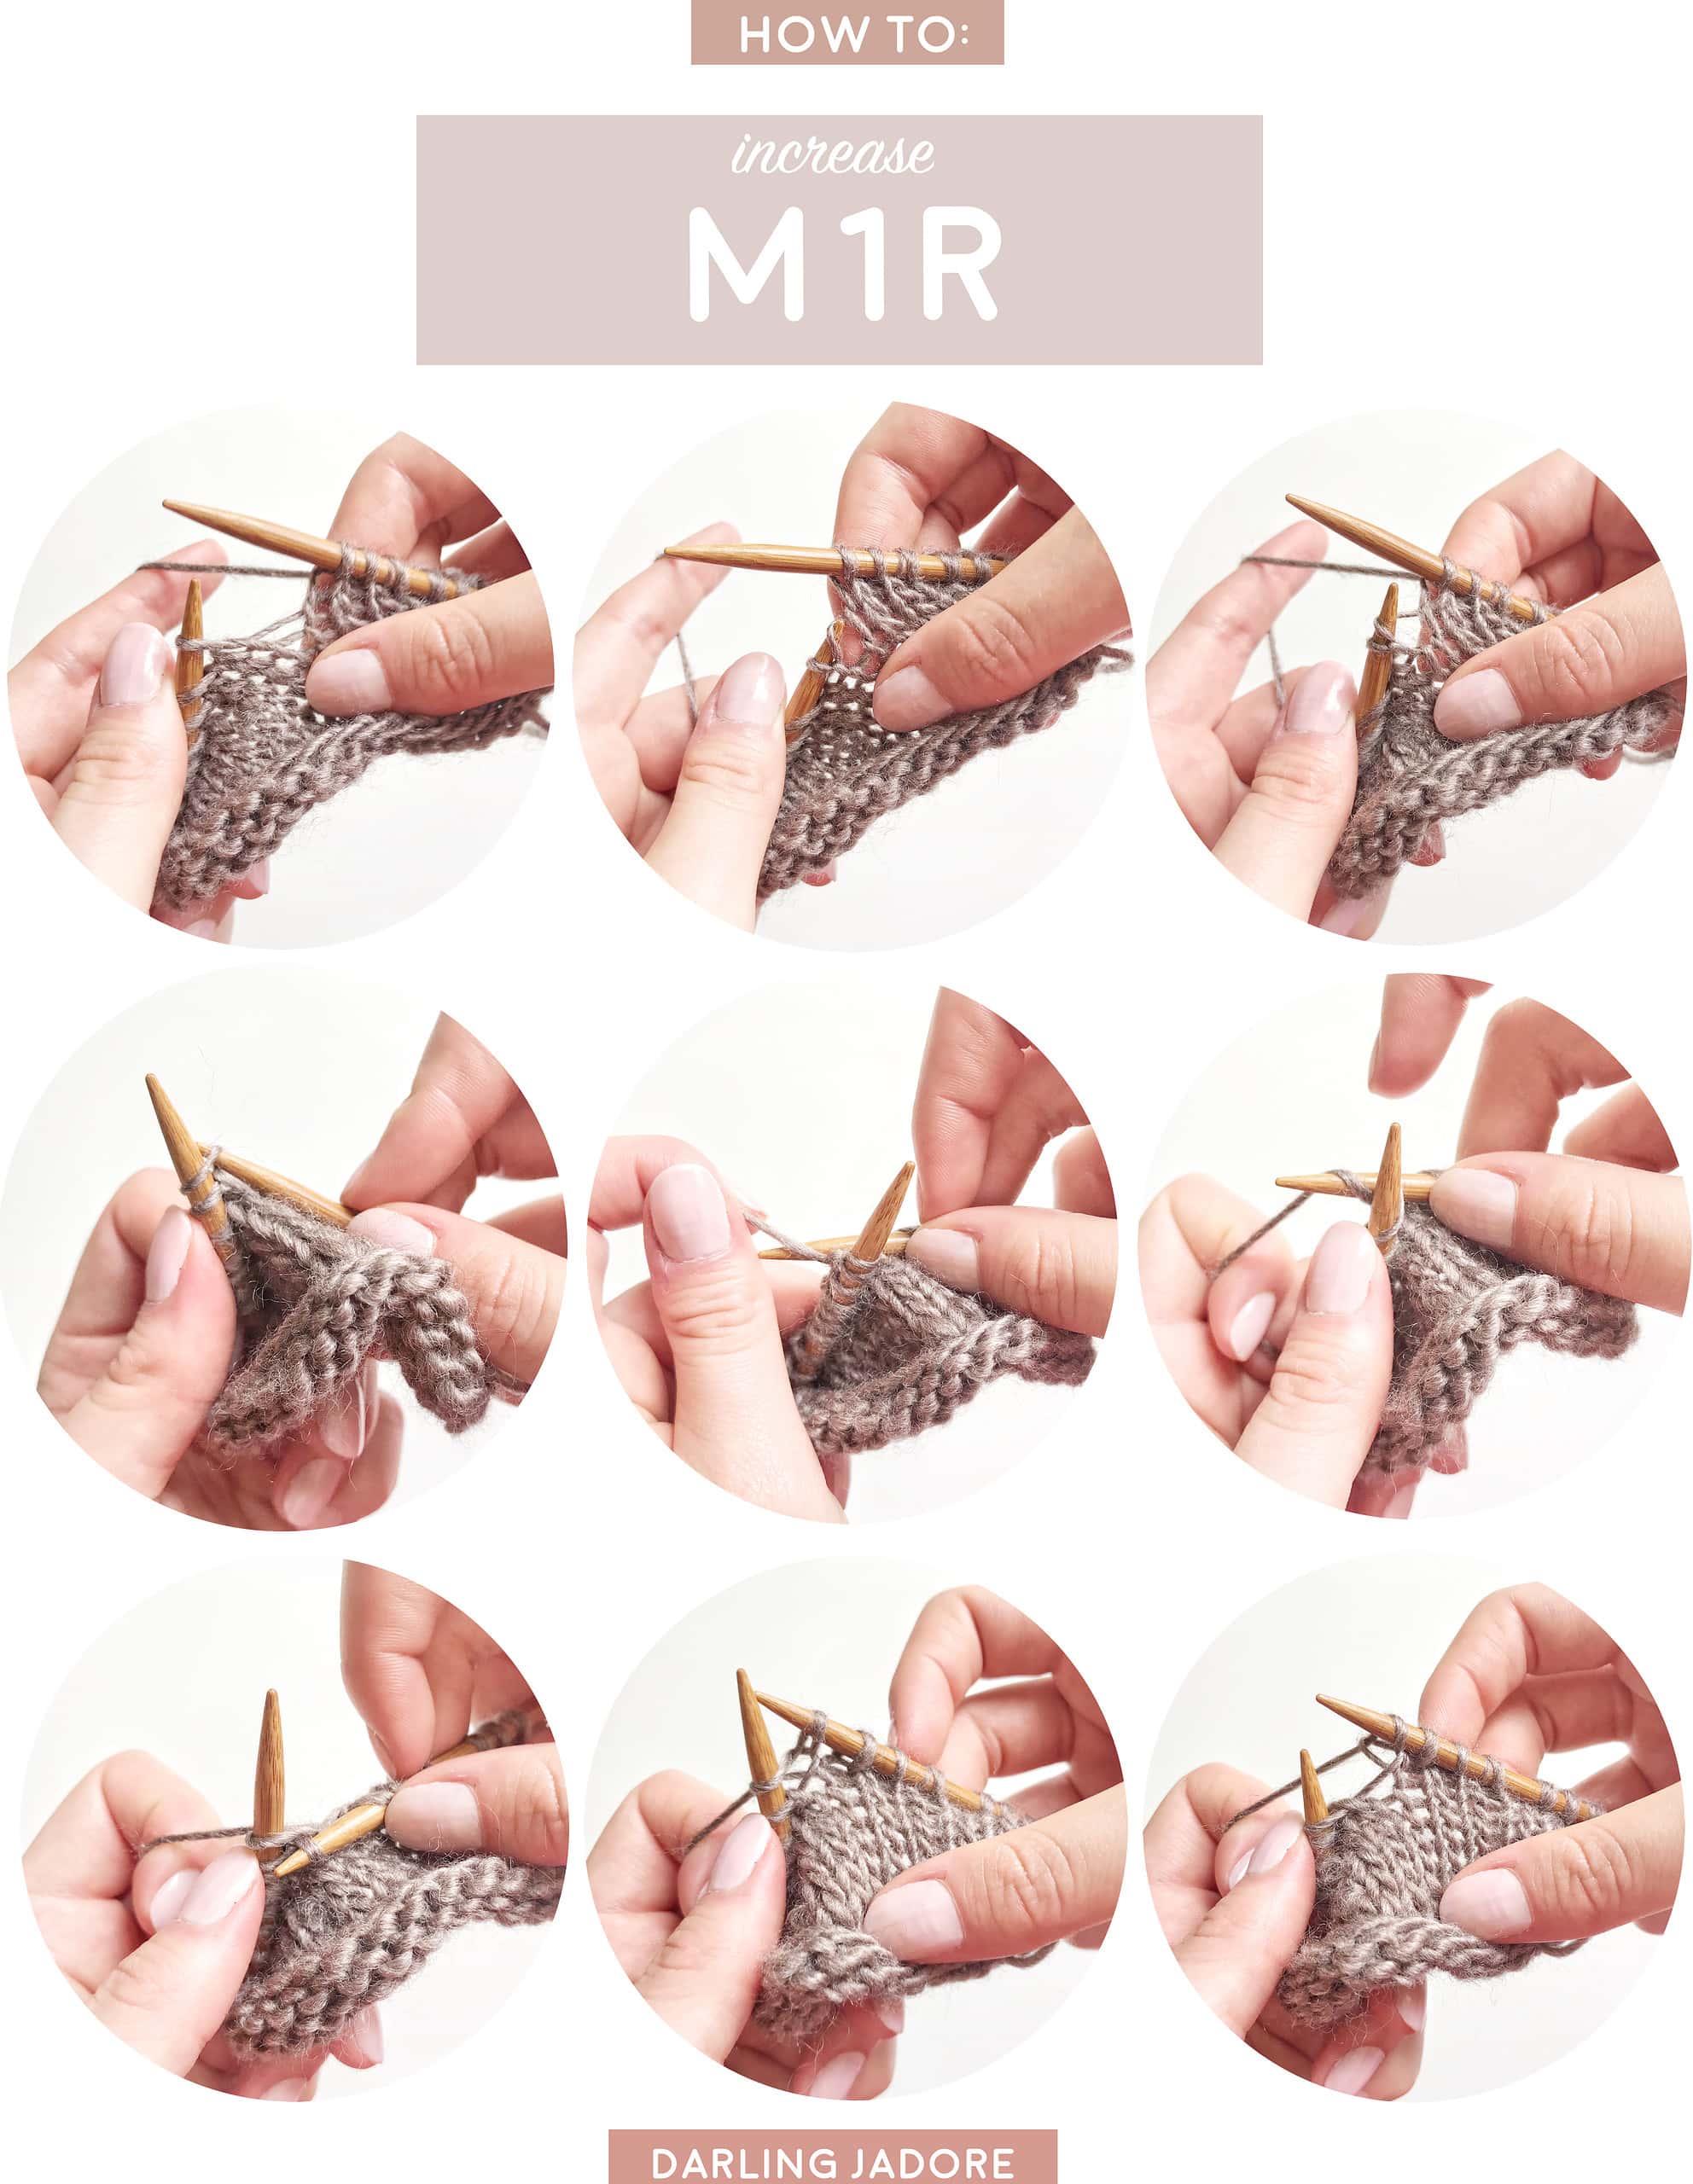
MAKE ONE RIGHT: THE METHOD
To M1R (make one right) increase knit stitch, you will increase one stitch so that that increased stitch will appear as if it is leaning right. This is really helpful for designs like the yoke of a raglan sweater, and produces a clean increase without any eyelet hole like the Yarn over, and no extra "bump" like for KFB.
STEP ONE: Hold your knitting needles as if to knit, with your working yarn behind your work. Between the first stitch on your left knitting needle and the first stitch on your right knitting needle, you will notice a horizontal bar.
STEP TWO: With your left knitting needle, pick up that horizontal bar from the back to the front, and place it on your left knitting needle.
STEP THREE: With your right knitting needle, knit the horizontal bar you picked up. Insert your need into the front of that stitch, wrap the yarn from the back, up and around the needle, and pull through the loop.
STEP FOUR: Gently slip that stitch off your left knitting needle. You will see the increased stitch on your right knitting needle.
You won't see it right away, but later on in your work, you will see that this increase stitch appears to be leaning to the right. If worked in repetition, like for the yoke of a raglan sweater, all M1R increases will have a prominent right lean to them.

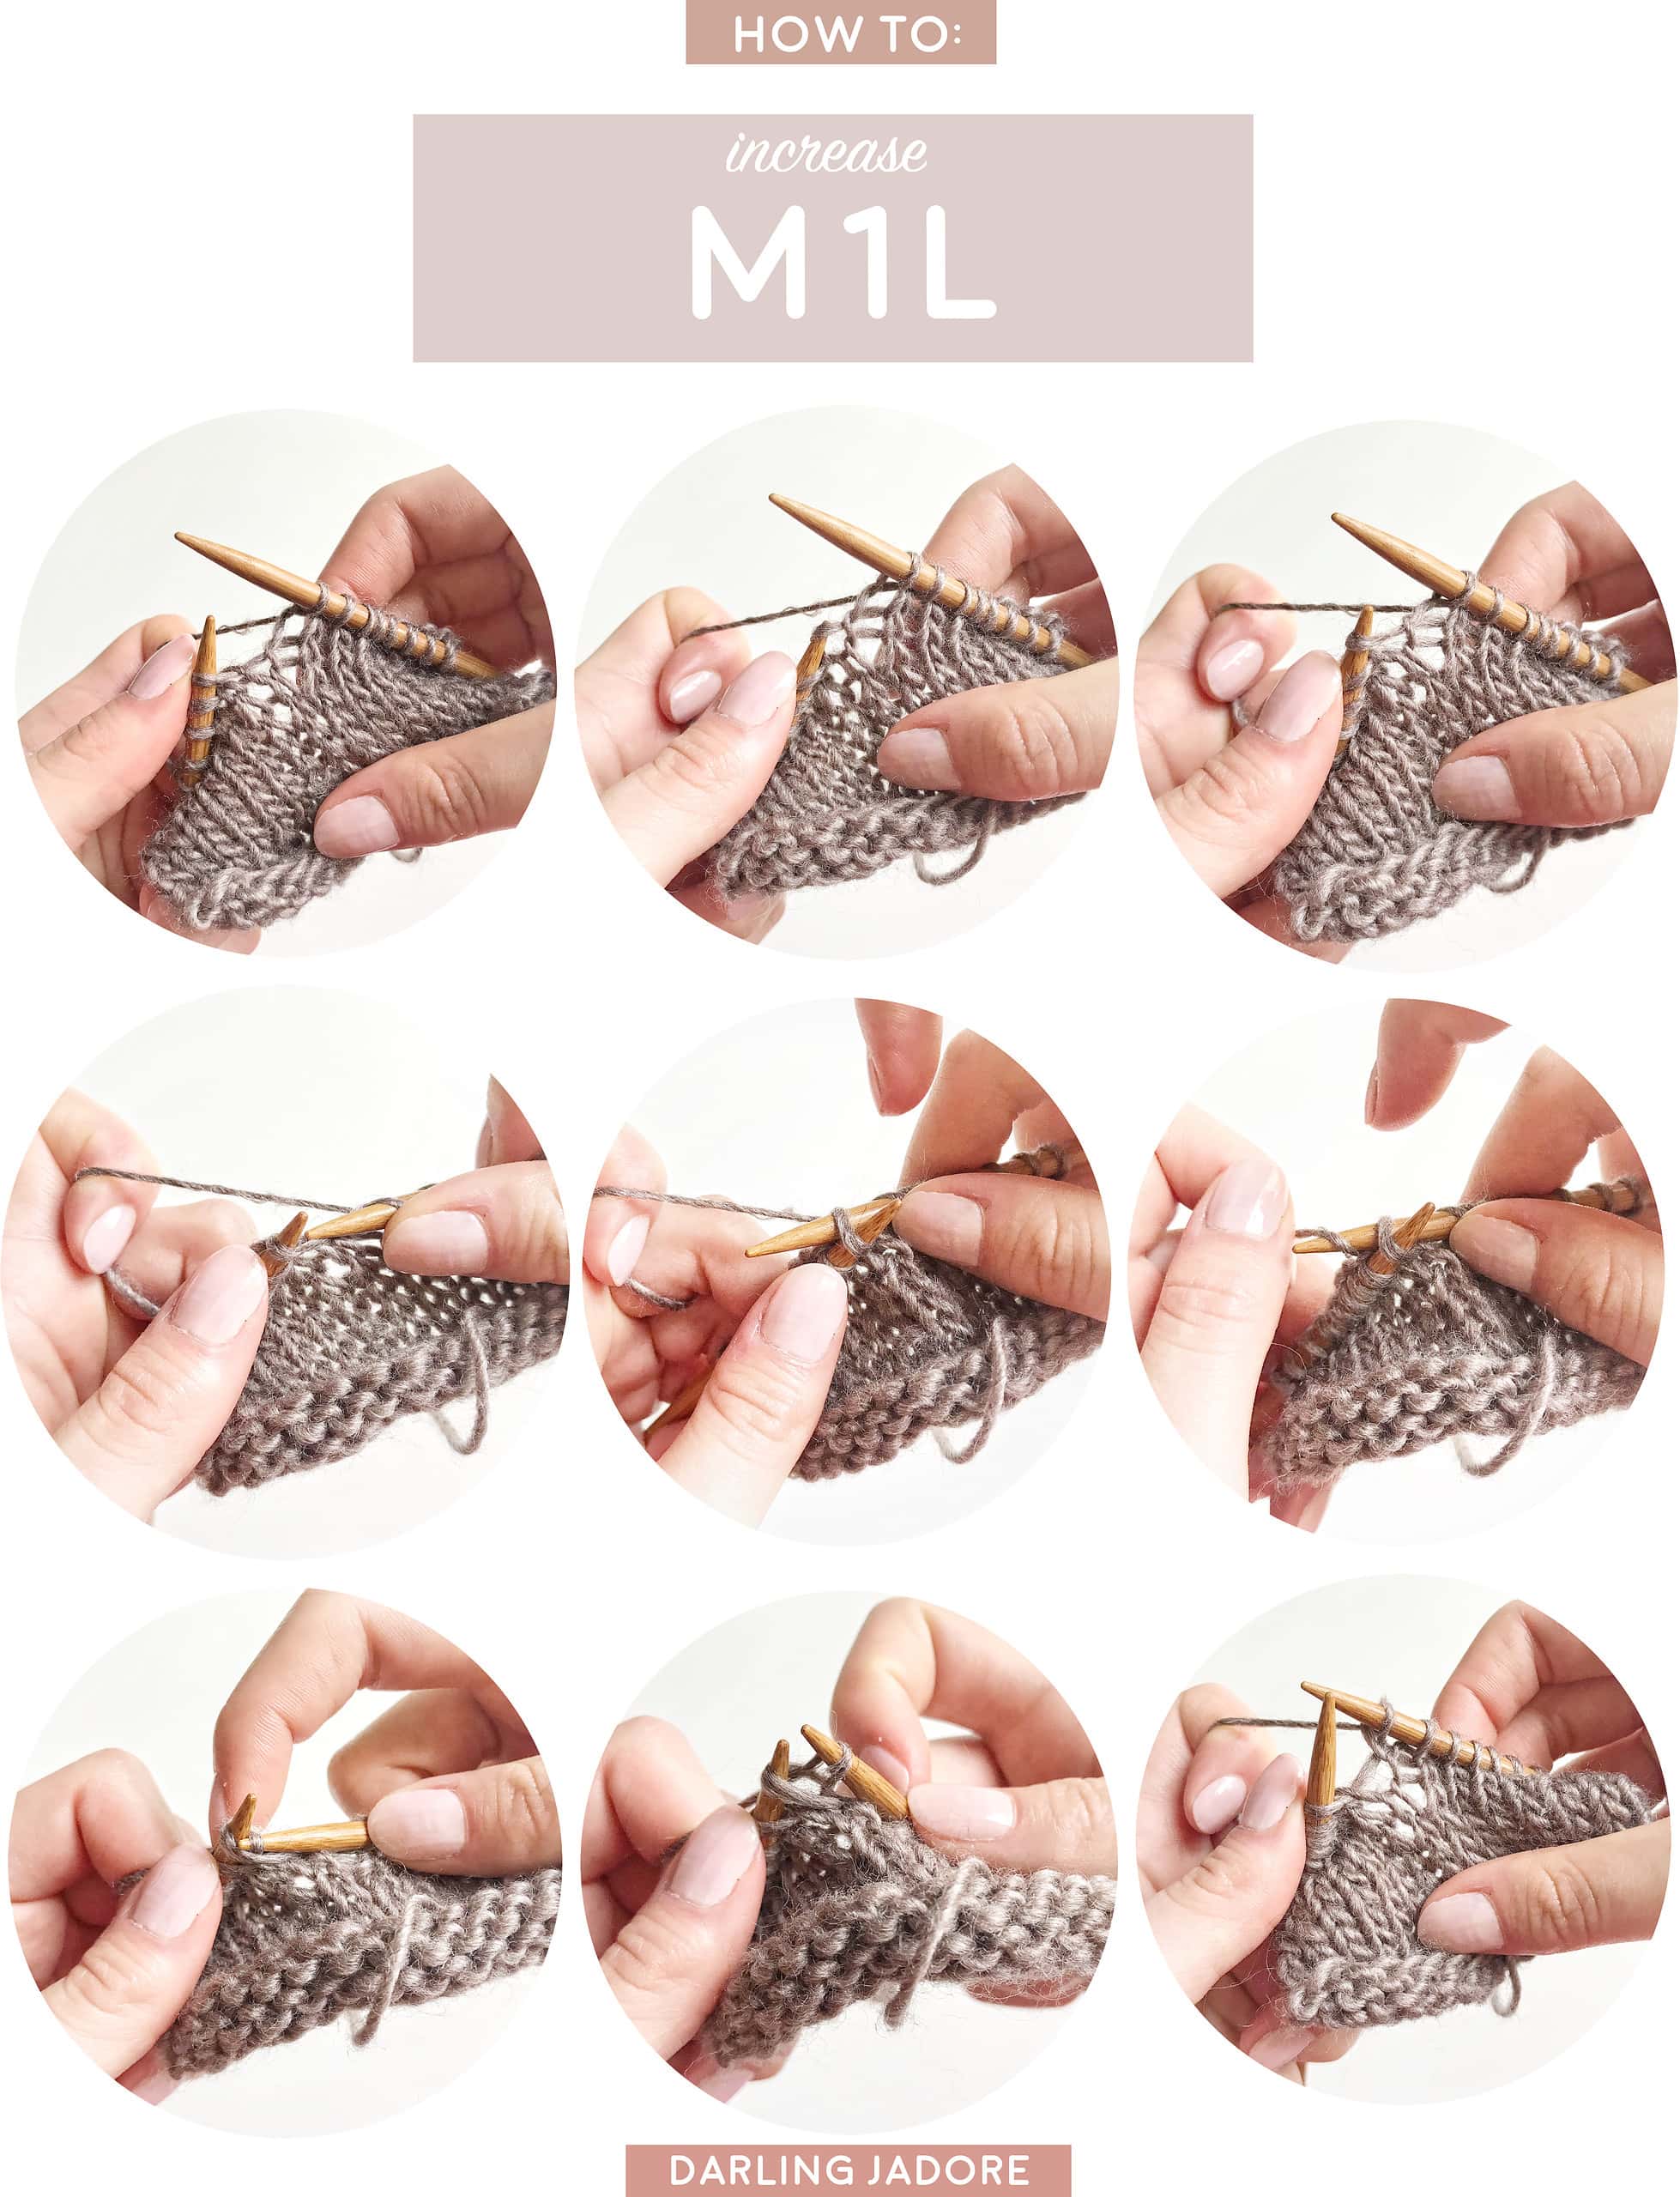
MAKE ONE LEFT: THE METHOD
To work a M1L (make one left) increase knit stitch, you will follow the same formula to M1R, except for a few minor changes. The end result is an increase stitch that will appear to be left-leaning, which just like M1R, looks very nice in the yoke of a raglan sweater or other similar designs.
STEP ONE: Hold your knitting needles as if to knit, with your working yarn behind your work. Between the first stitch on your left knitting needle and the first stitch on your right knitting needle, you will notice a horizontal bar.
STEP TWO: With your left knitting needle, pick up that horizontal bar from the front to the back, and place it on your left knitting needle.
STEP THREE: With your right knitting needle, knit the horizontal bar you picked up. Insert your need into the back loop of that stitch, wrap the yarn from the back, up and around the needle, and pull through the loop.
STEP FOUR: Gently slip that stitch off your left knitting needle. You will see the increased stitch on your right knitting needle.
You won't see it right away, but later on in your work, you will see that this increase stitch appears to be leaning to the left. If worked in repetition, like for the yoke of a raglan sweater, all M1L increases will have a prominent left lean to them.

Similarly to increasing knit stitches, a designer will incorporate decrease knit stitches into a pattern to affect the look and shape of the overall design. This essentially means that the total number of stitches on your needles is decreased. Decrease stitches can greatly help with garment shaping, like at the ends of a sleeve where it meets the cuff for sweaters like The Cloud Sweater, and can also be used to close up the top of a hat, like The Lakewood Hat, to close up the top of mittens like The Cappuccino Mittens, or even incorporated into pretty knit lacework designs, where stitches are increased and then decreased immediately to leave the same number of stitches on your needles, such as the gorgeous lace details on the body of The Ruska Shawl. Another representation of decreased stitches is clearly seen in The Harlowe Sweater, which requires making decrease stitches to shape the v-neck.

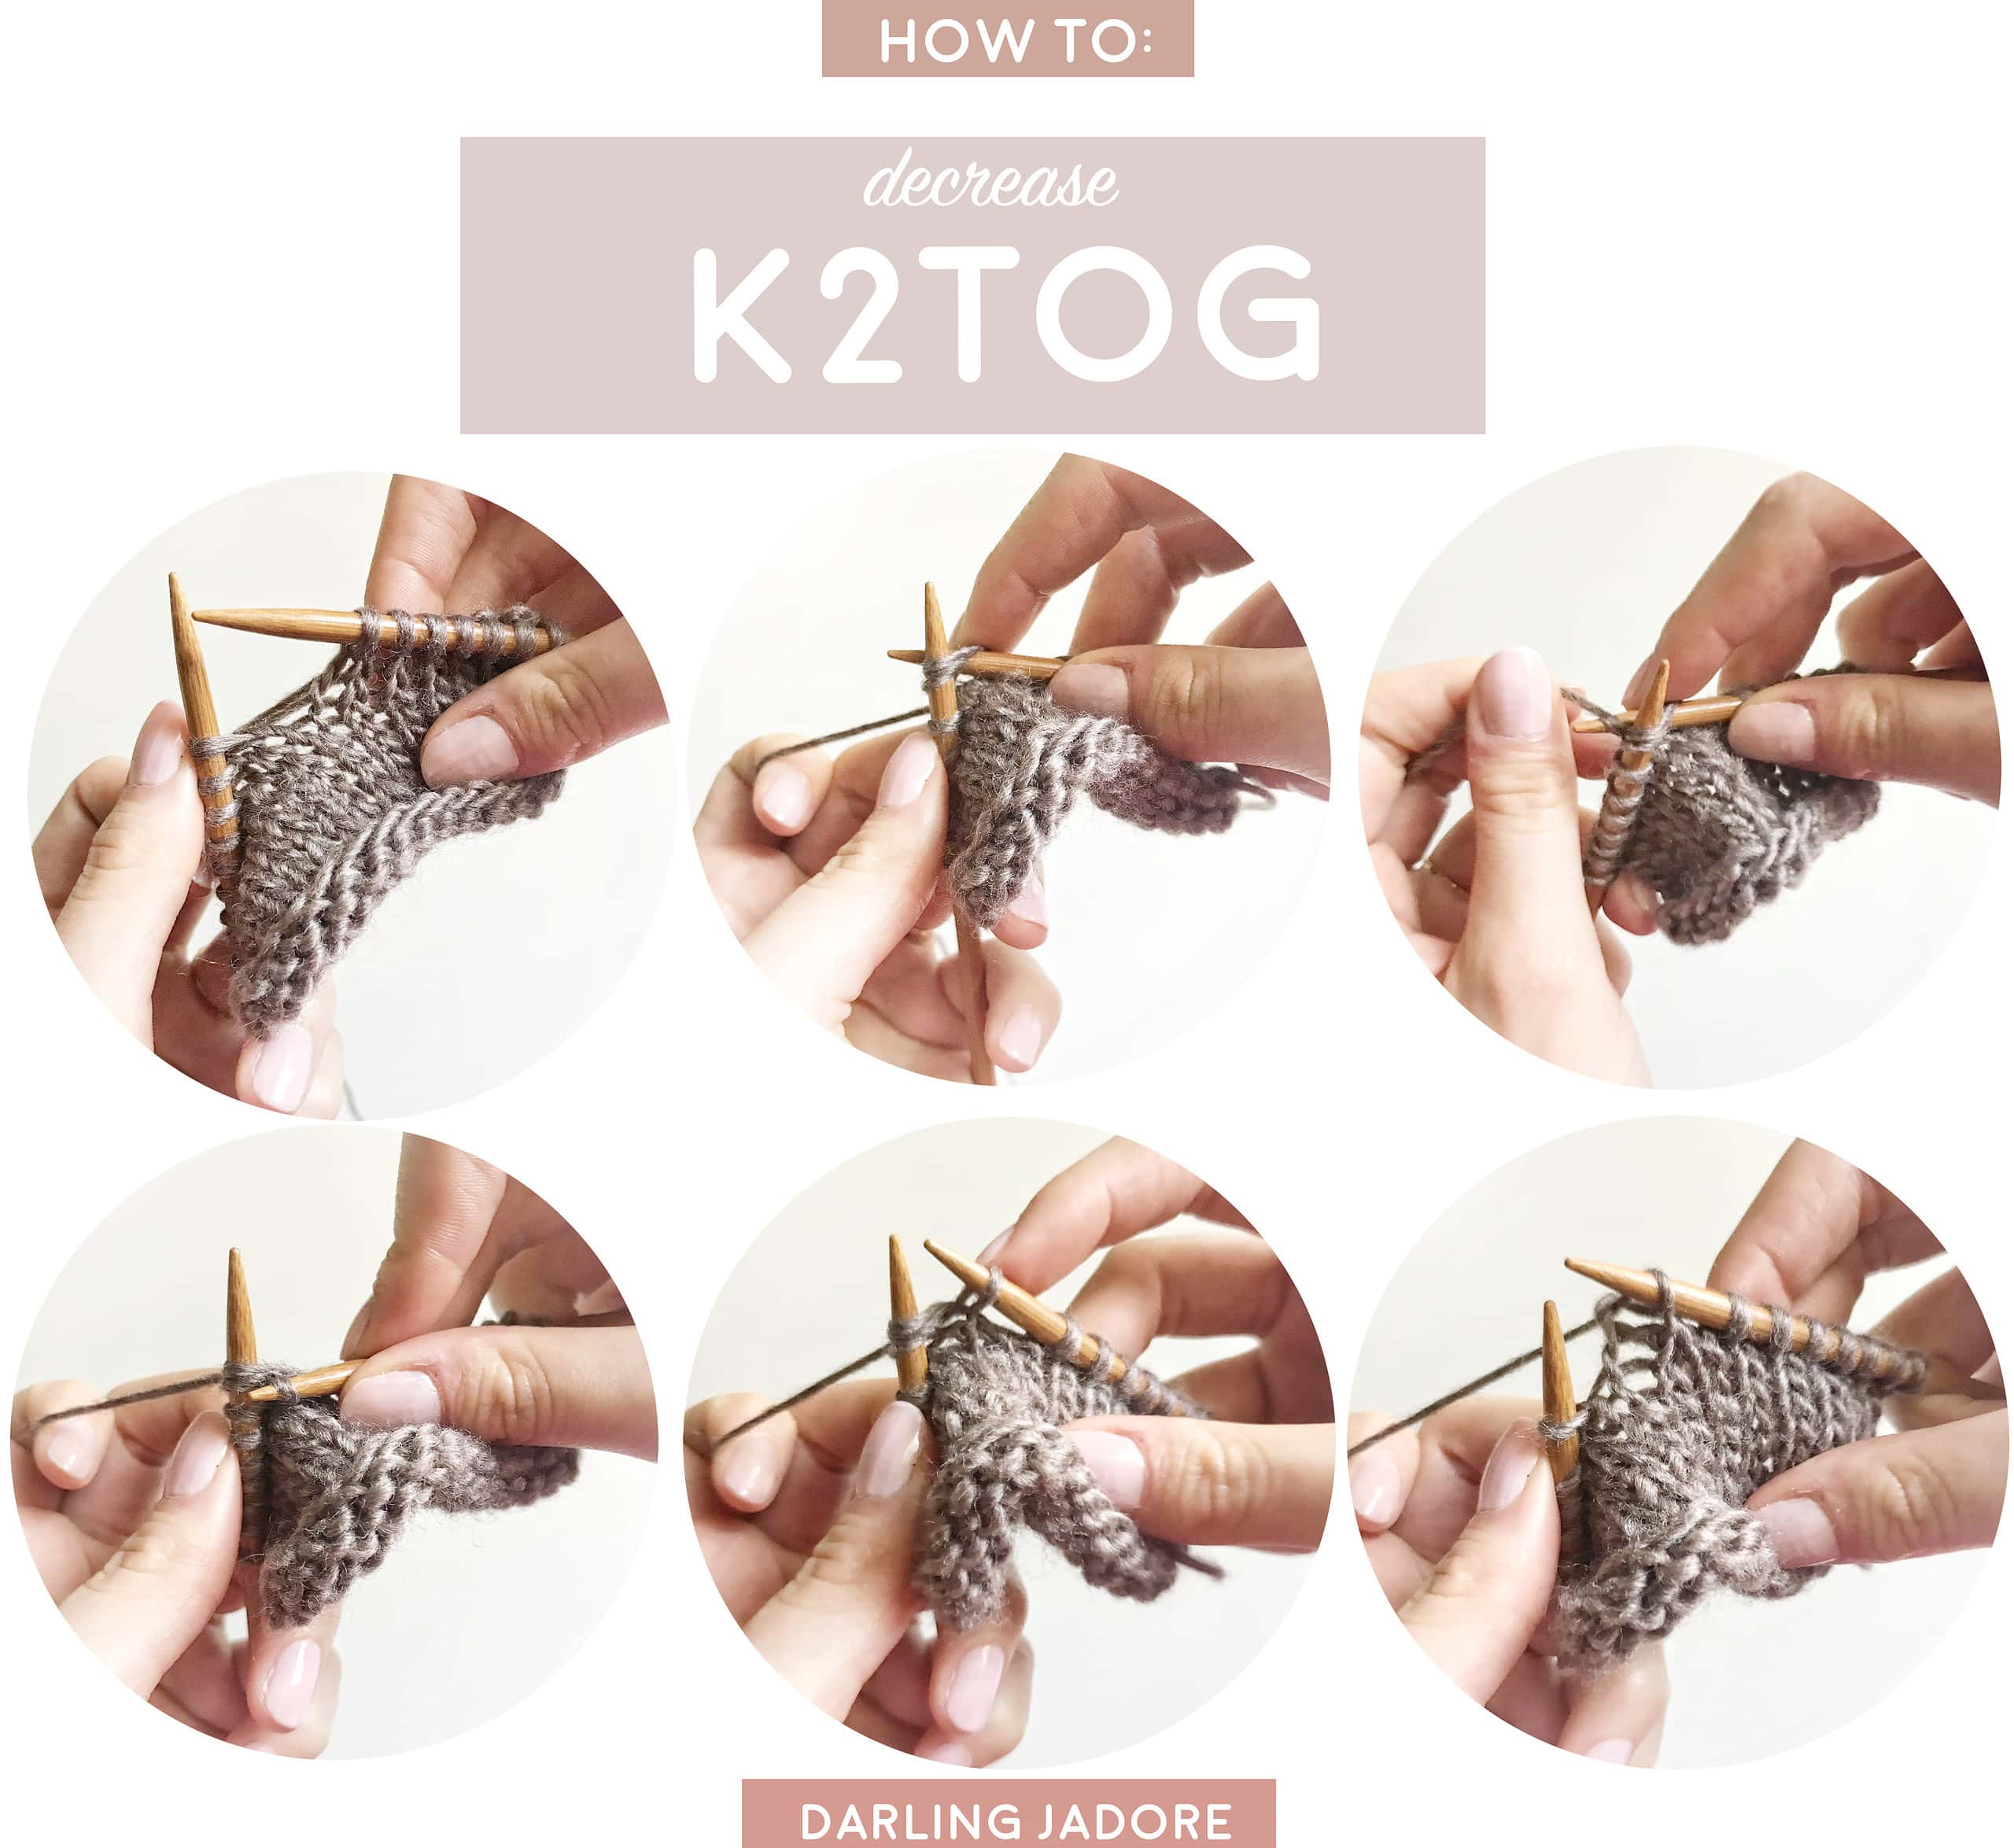
K2tog (knit two stitches together) is a right-leaning decrease knitting stitch that is exactly like the knit stitch, except instead of knitting just one stitch, you will be knitting two stitches together, essentially turning two stitches into one, thus decreasing one stitch. It is a quick and simple way to decrease a stitch, but it leans to the right. So for a designer, I am mindful where I place a K2tog in a knitting pattern to ensure that its right lean is appropriate for the overall design.
STEP ONE: Hold your needles as if to knit, with the working yarn behind your work.
STEP TWO: Insert your right knitting needle into the next two stitches on your left knitting needle from the left to the right, back to front, as if to knit them. You will be treating these two stitches as if they were one.
STEP THREE: Wrap the working yarn under, up, and around your right knitting needle.
STEP FOUR: Gently pull the tip of your right knitting needle out through the loop, keeping the yarn wrapped around it, and drop it off your left knitting needle.

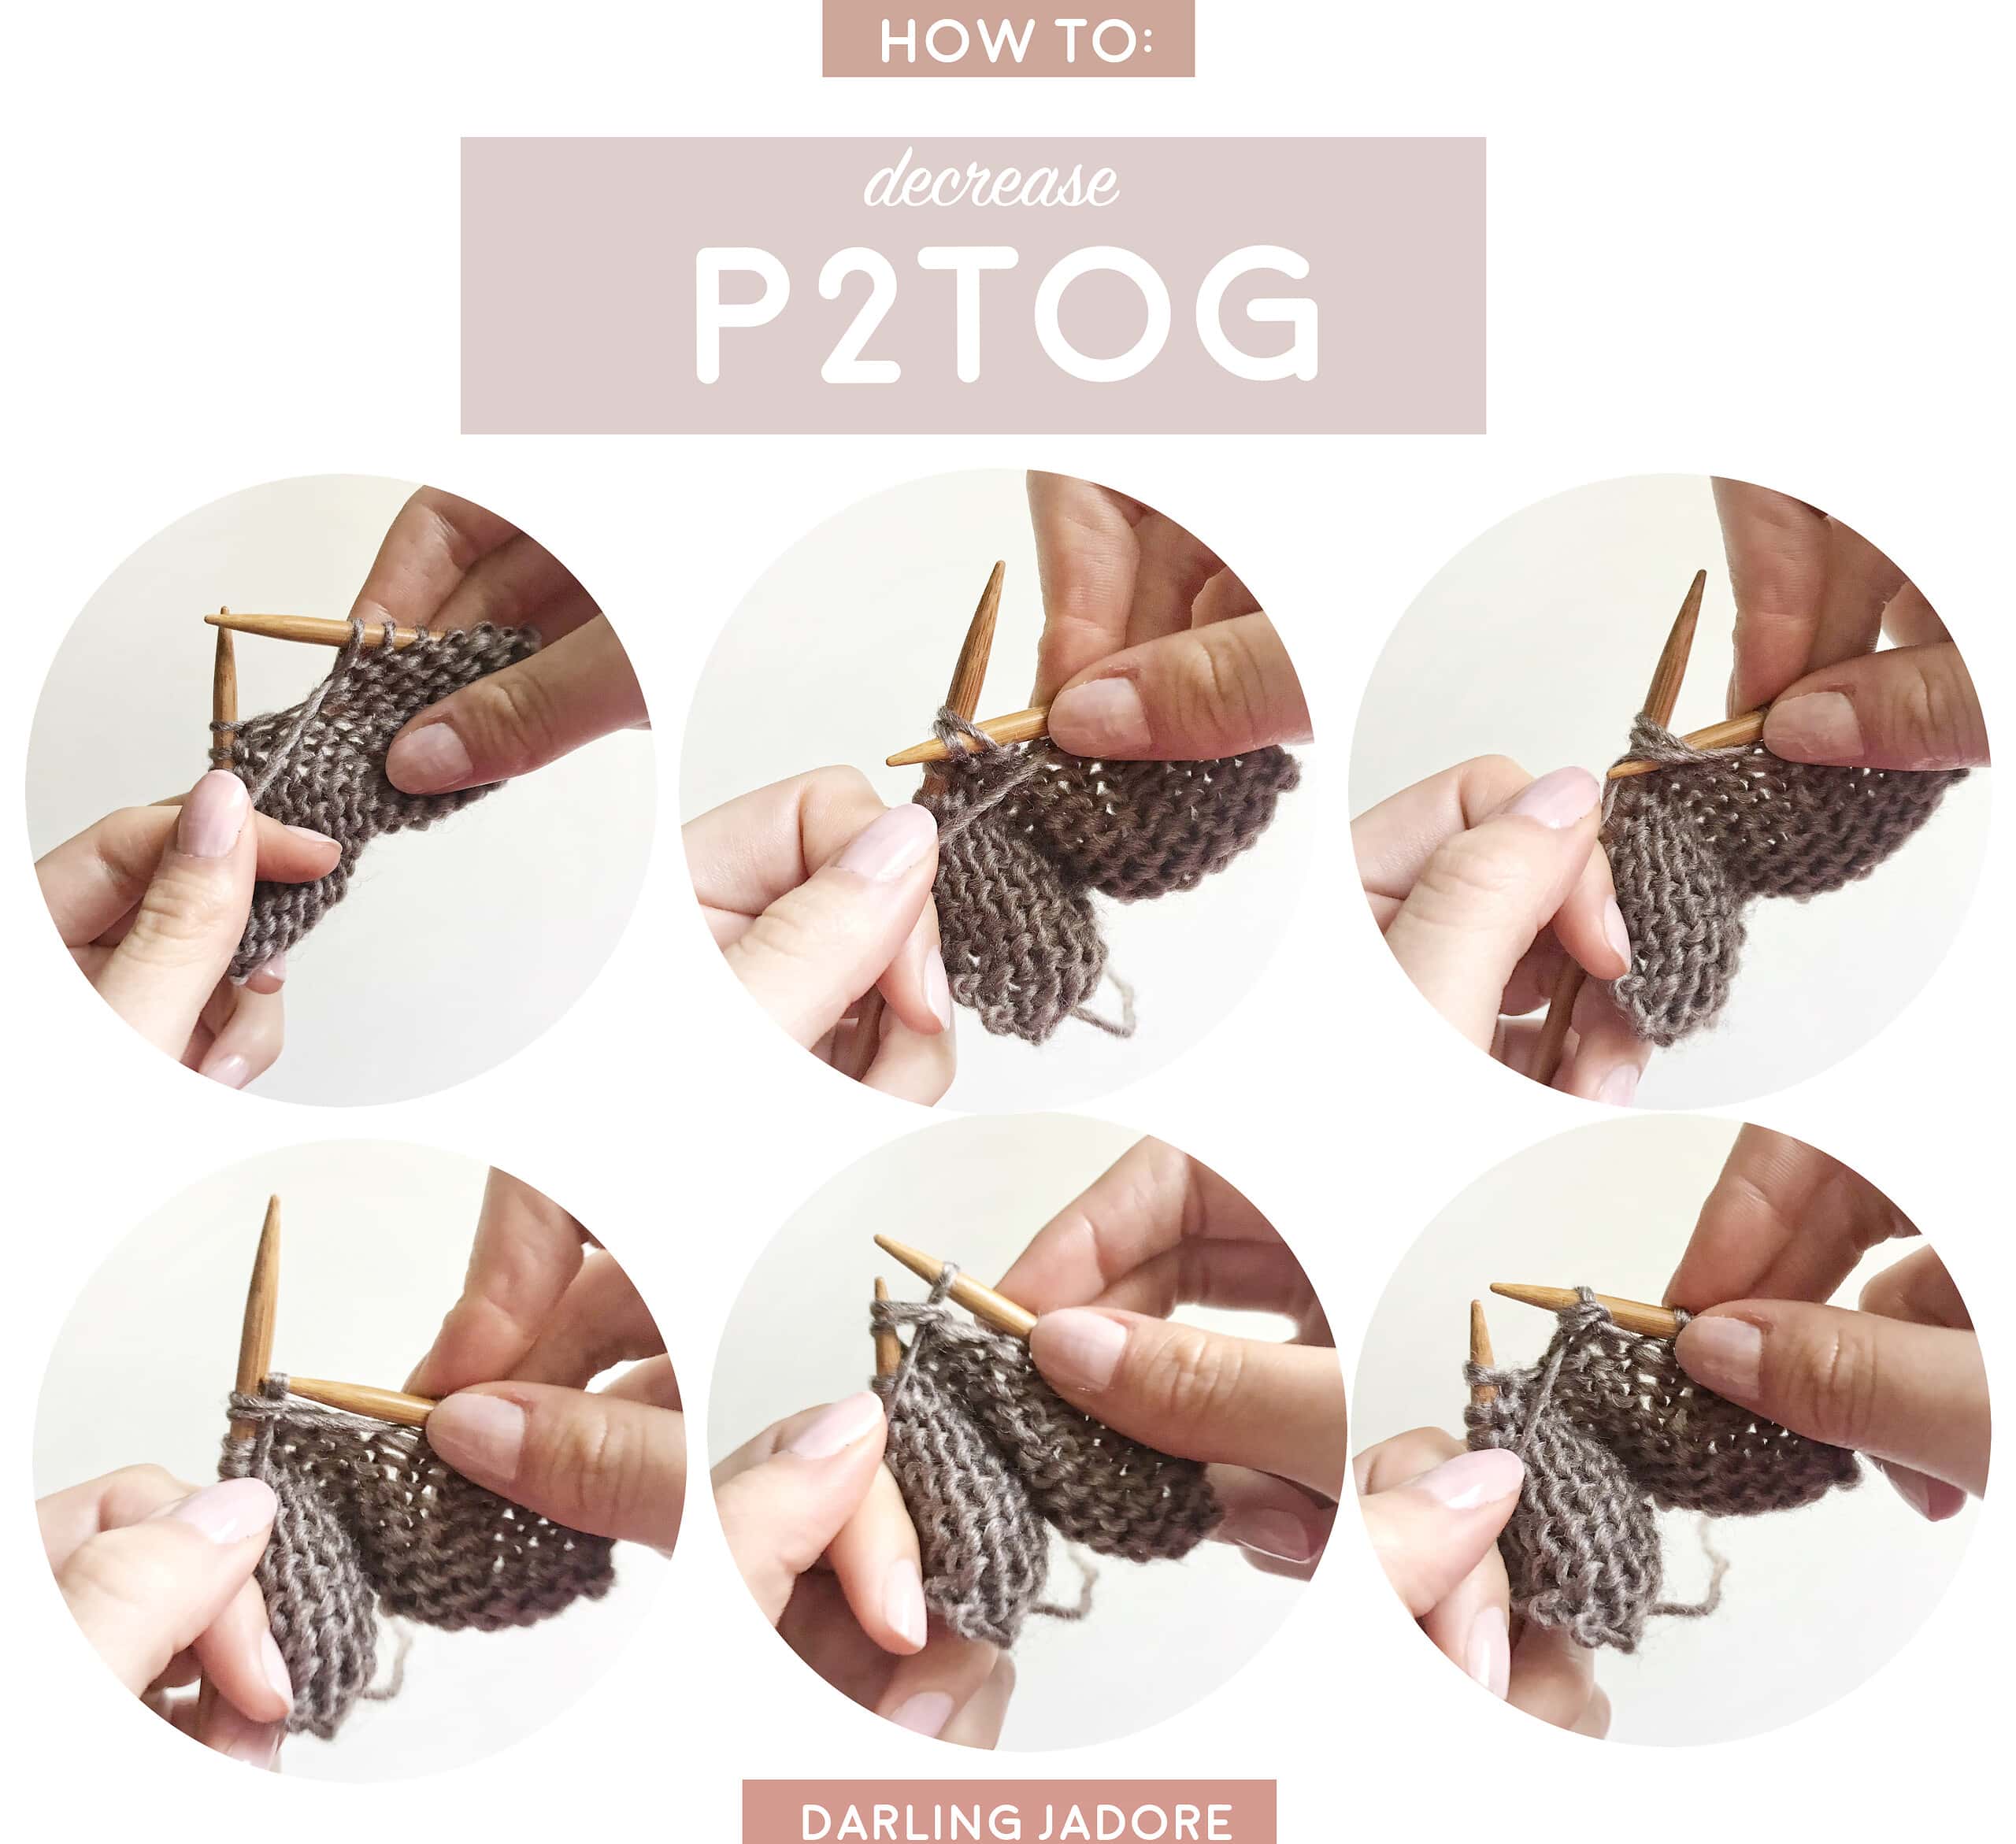
PURL TWO STITCHES TOGETHER: THE METHOD
P2tog (purl two stitches together) is a right-leaning decrease knitting stitch that is exactly like the purl stitch, except instead of purling just one stitch, you will be purling two stitches together, essentially turning two stitches into one, thus decreasing one stitch. This stitch is usually worked on the purl side of work or on the reverse stockinette stitch side of the work because it is more discrete. It is a quick and simple way to decrease a stitch, but it leans to the right. So for a designer, I am mindful where I place a P2tog in a knitting pattern to ensure that it's right lean is appropriate for the overall design.
STEP ONE: Hold your needles as if to purl, with the working yarn in the front of your work.
STEP TWO: Insert your right knitting needle into the next two stitches on your left knitting needle from the right to the left, back to front, as if to purl them. You will be treating these two stitches as if they were one.
STEP THREE: Wrap the working yarn under, up, and around your right knitting needle.
STEP FOUR: Gently pull the tip of your right knitting needle out through the loop, keeping the yarn wrapped around it, and drop it off your left knitting needle.

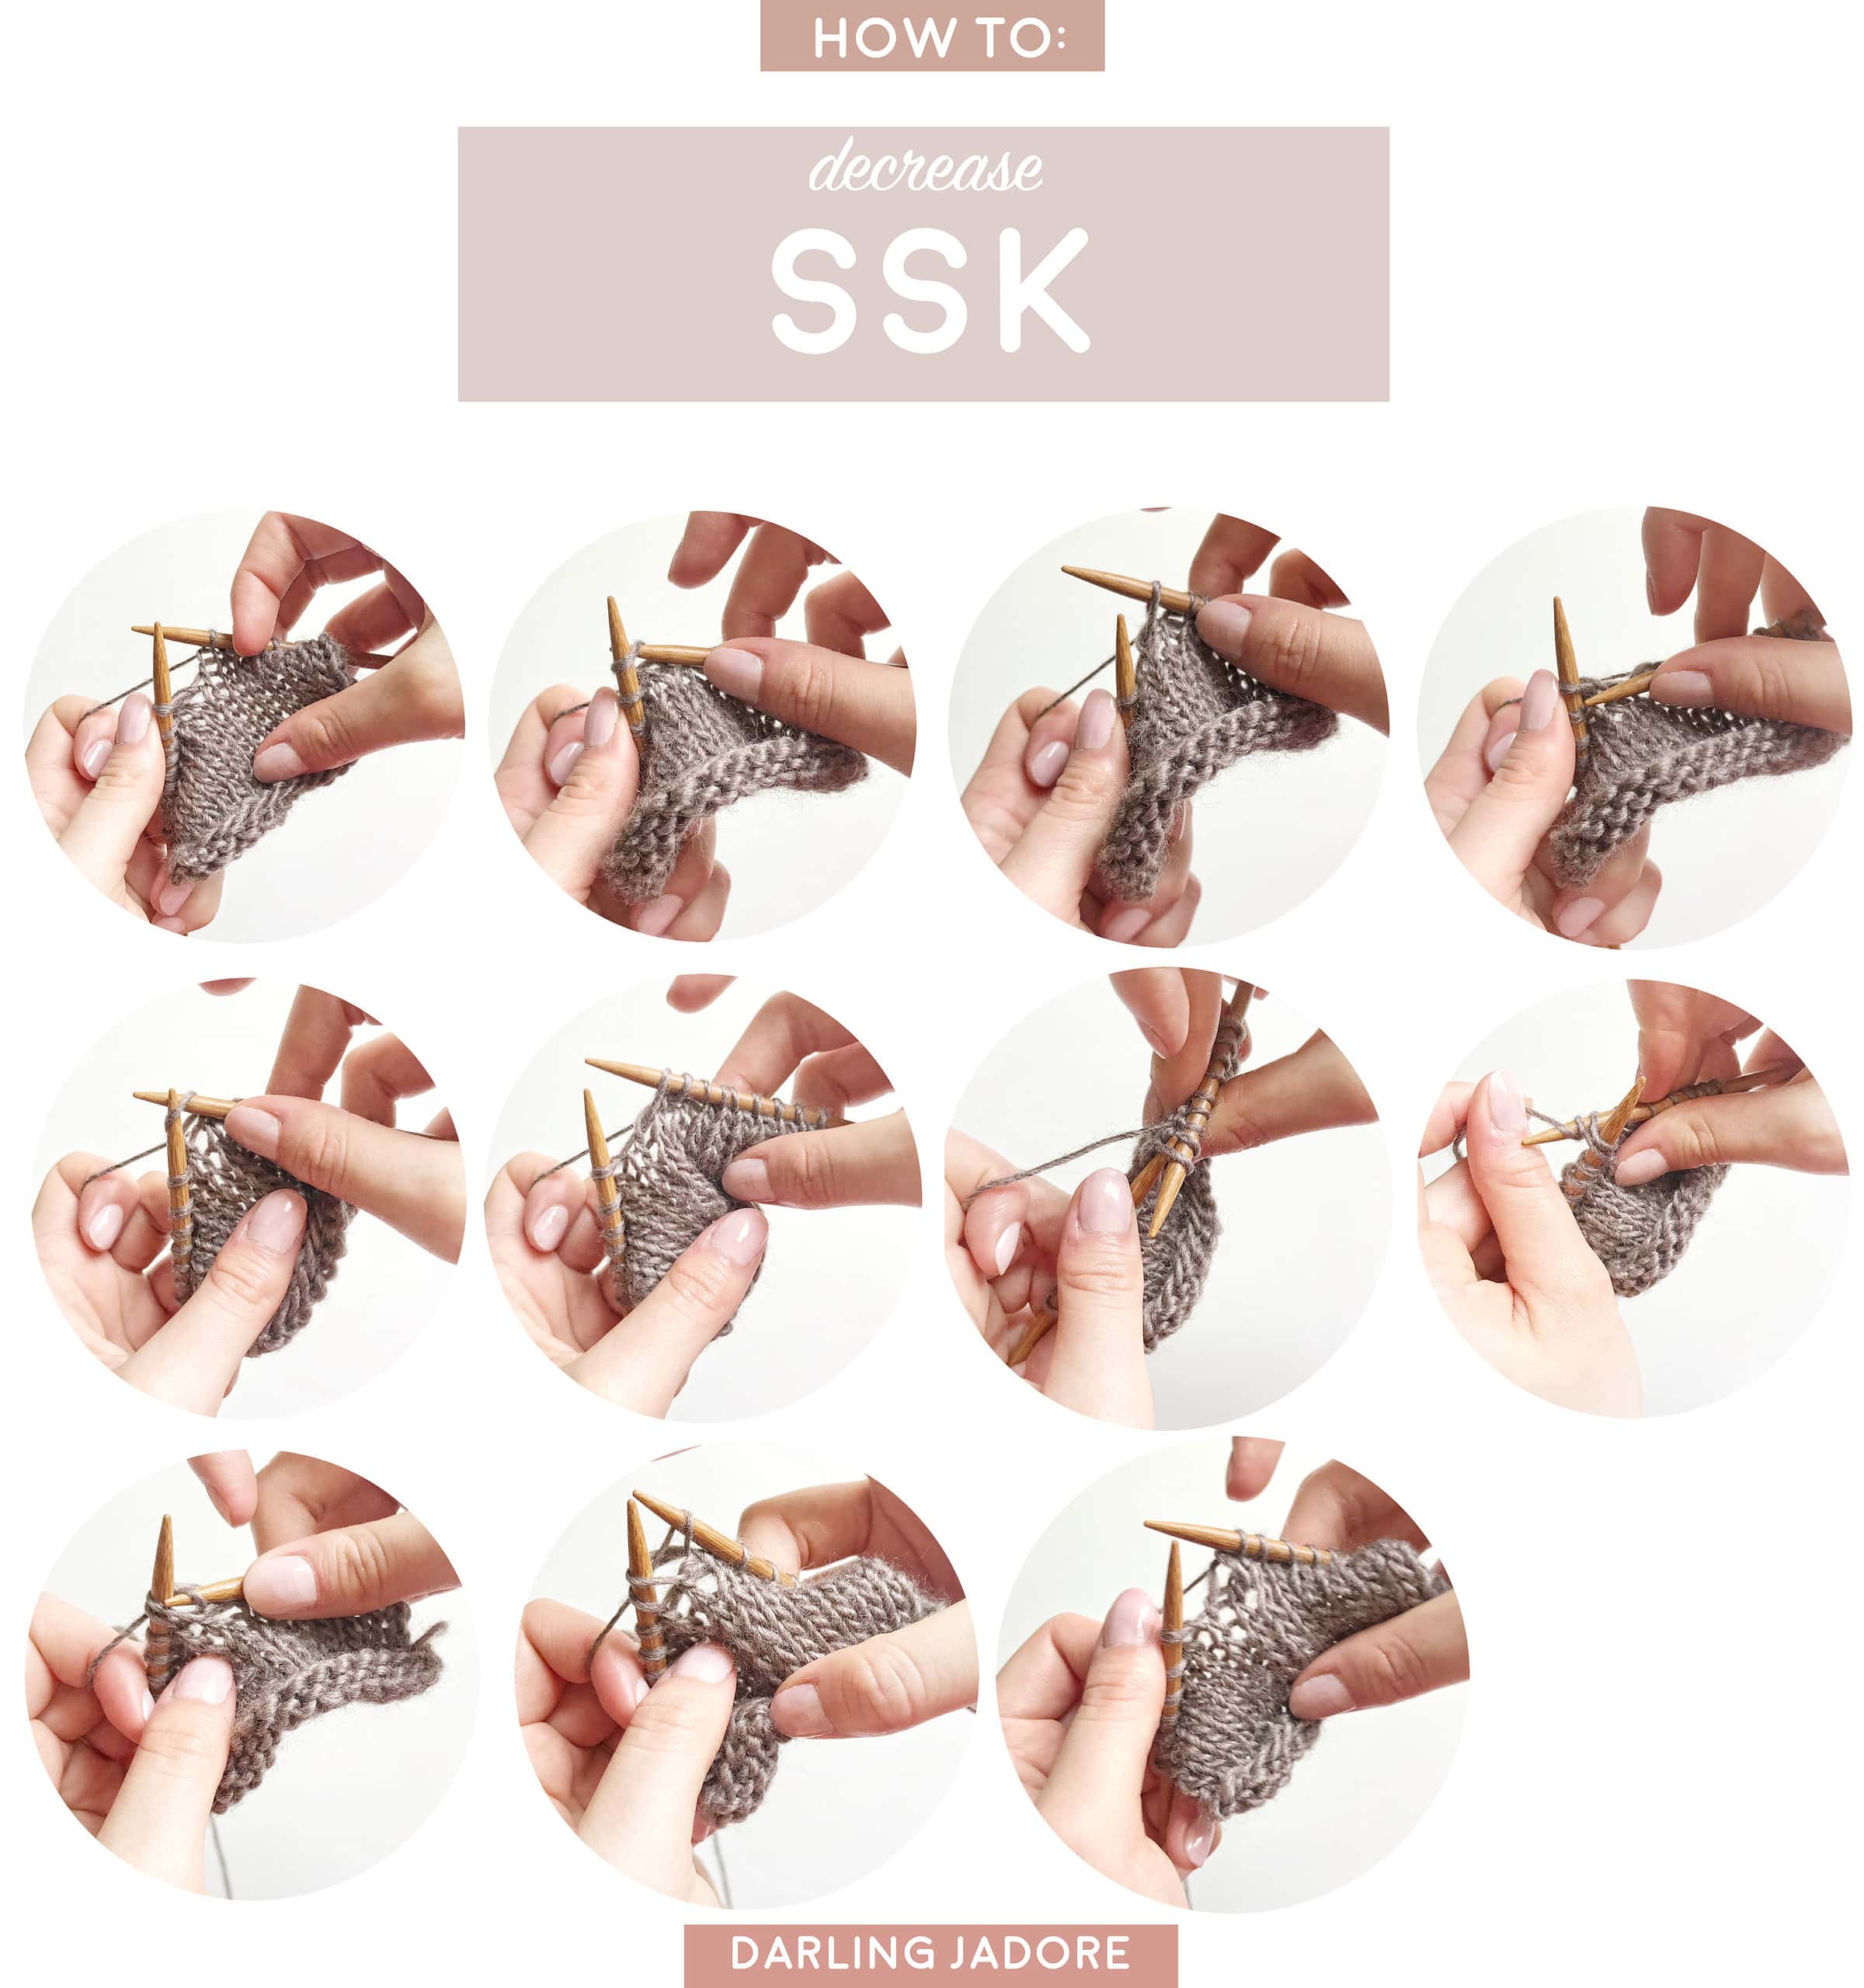
SLIP SLIP KNIT: THE METHOD
Slip, slip, knit (aka: "SSK") is a decrease knitting stitch that has a left-leaning slant to it. Like most decrease knit stitches, they are often used to shape a garment or accessory, or used in lacework in combination with other knit stitches to create a motif or other design element. It consists of slipping two stitches, then knitting those two stitches together. It is a quick and simple way to decrease a stitch, but it leans to the left. So as a designer, I am mindful where I place an SSK in a knitting pattern to ensure that it's right lean is appropriate for the overall design.
STEP ONE: Hold your needles as if to knit, with the working yarn behind your work.
STEP TWO: Insert the tip of your right knitting needle into the first stitch on your left knitting needle knit-wise (meaning left to right, front to back, forming a "T" with your needles).
STEP THREE: Instead of knitting that stitch, simply slip it from your left to right knitting needle.
STEP FOUR: Repeat steps one through three once more.
STEP FIVE: Insert your left knitting needle into the fronts of these two stitches, and the knit them together (wrap the working yarn up and around your right knitting needle, pull the needle through the loop, and lift that stitch off your left knitting needle).

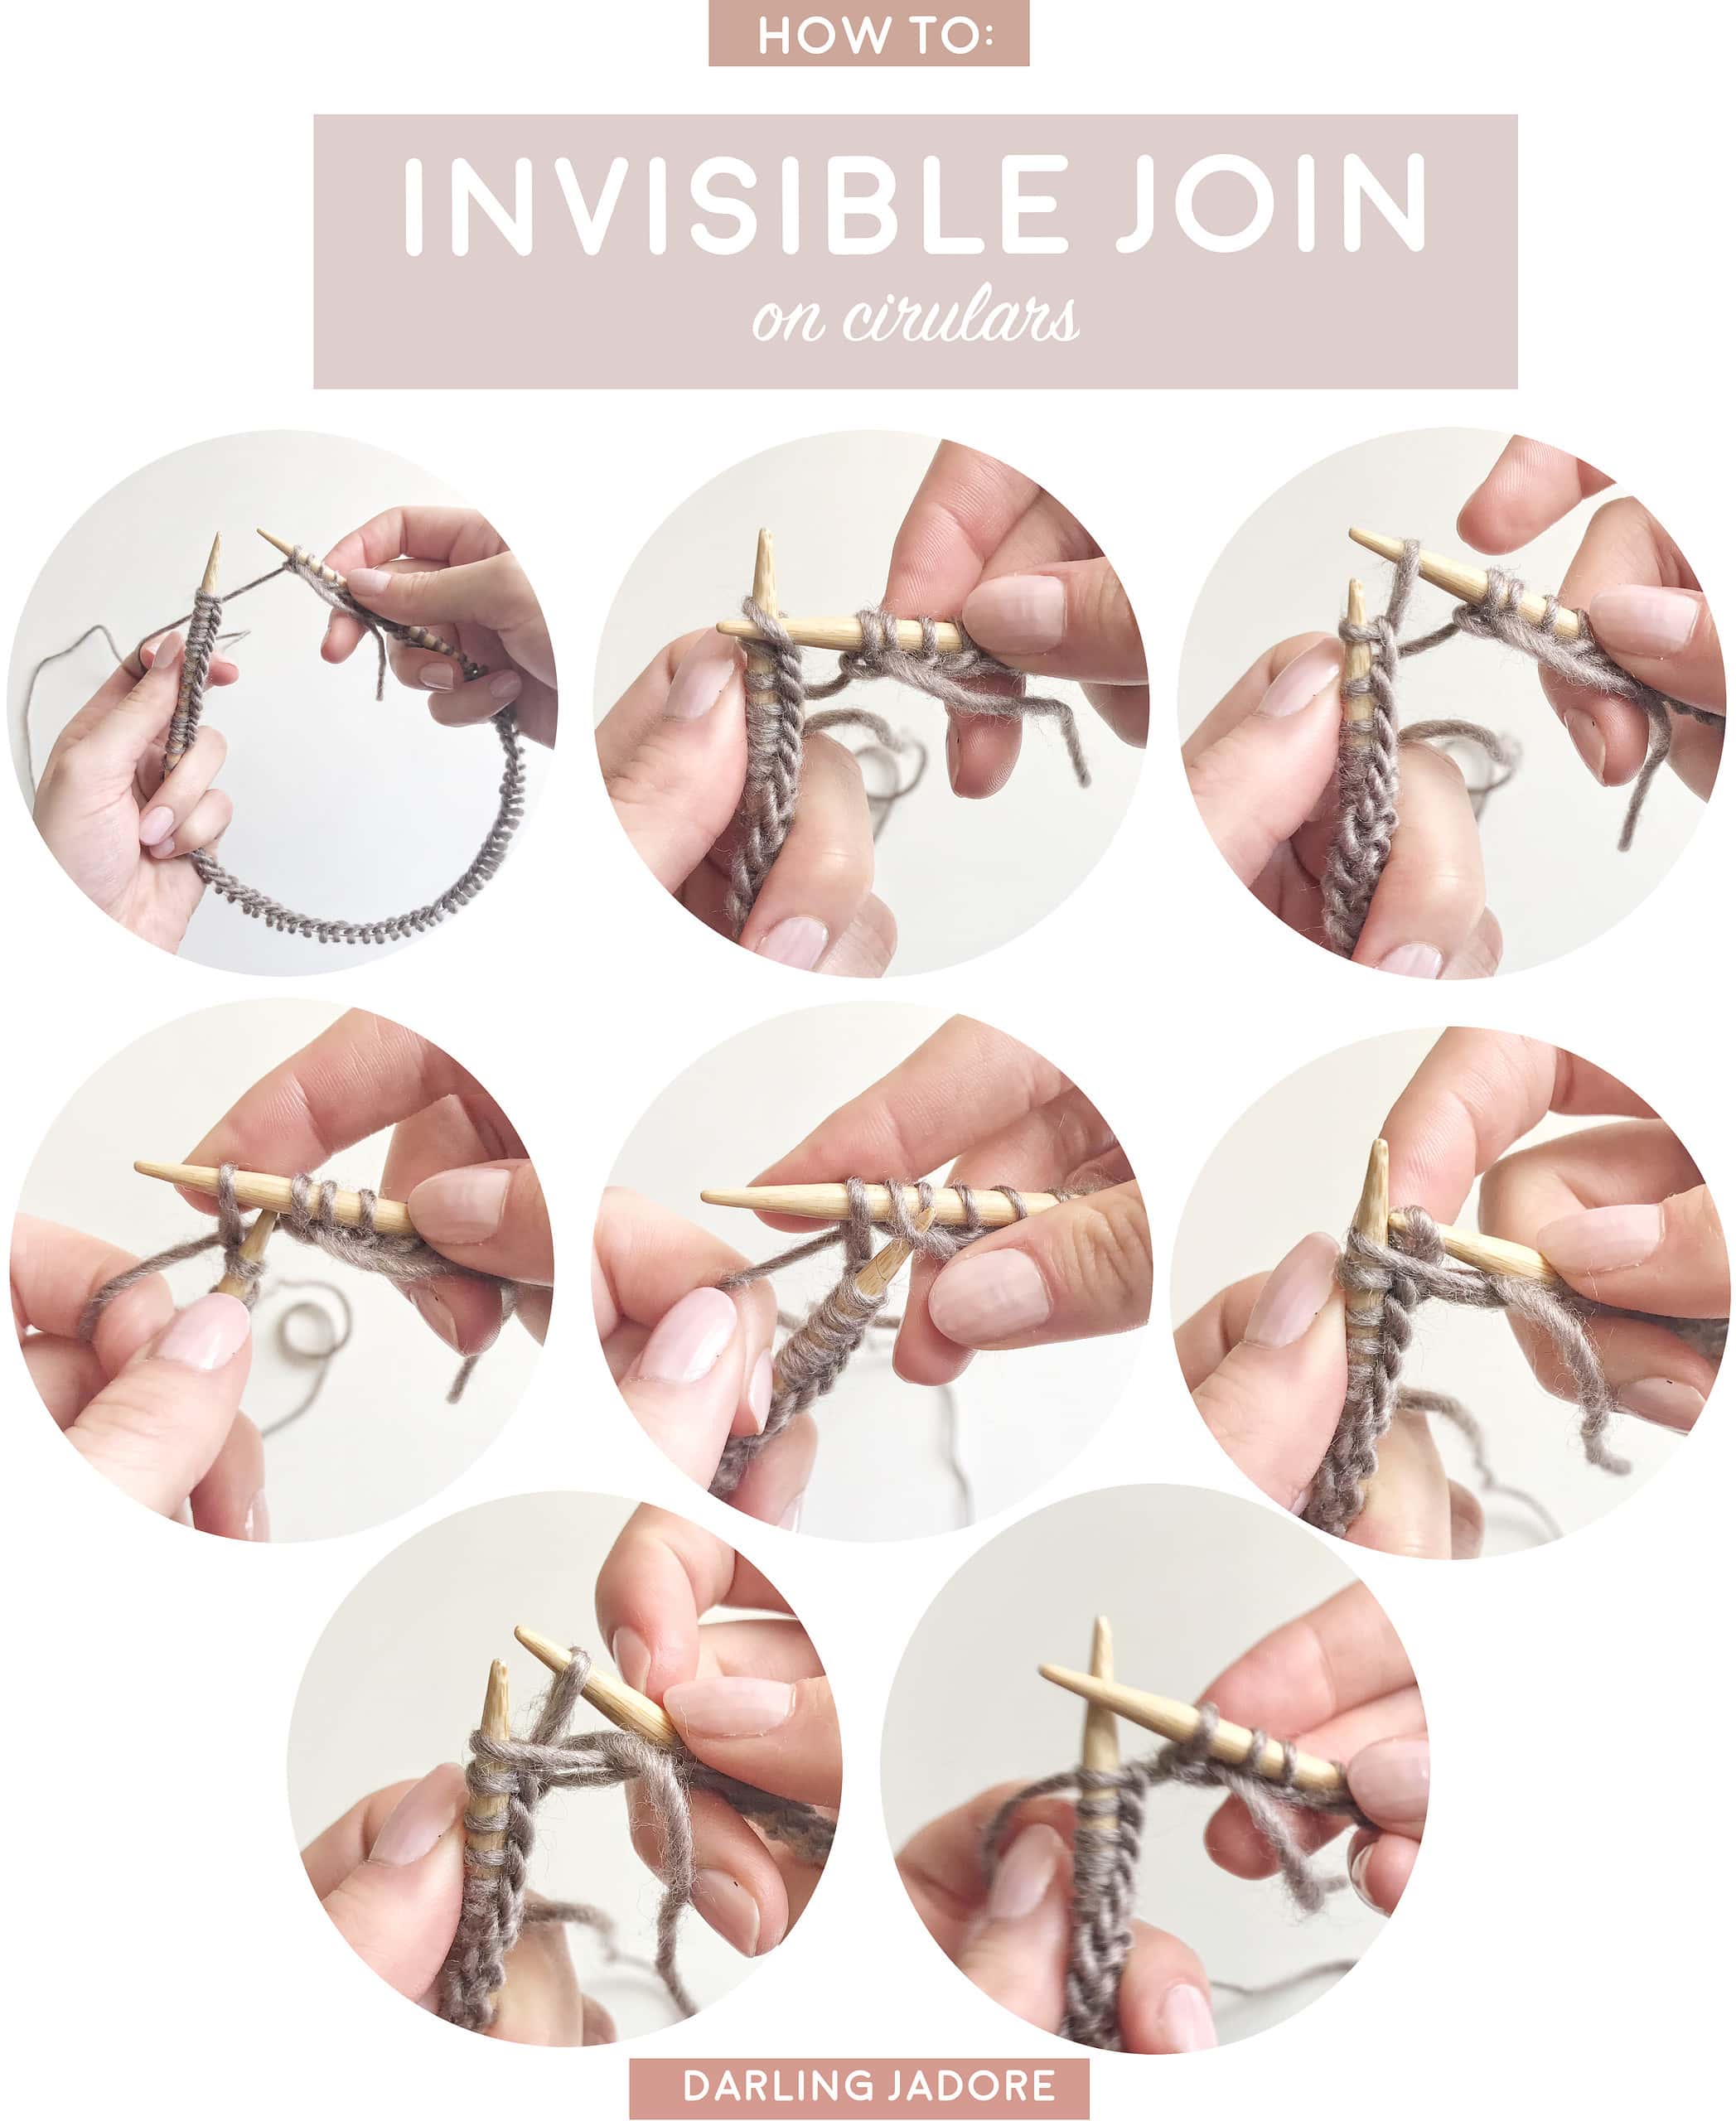
INVISIBLE JOIN ON CIRCULARS: THE METHOD
Invisible joining in the round is a wonderful technique to add to your knitting repertoire because it allows you to seamlessly join your cast on stitches in the round, without it being noticeable where you joined. With designs and patterns that require circular knitting needles like hats and beanies that are worked from the bottom brim up, you can oftentimes see a little "seam" right where the knitters joined in the round. While this seam isn't very noticeable to non-knitters and novice knitters, it is still visible and, in my opinion, shows a lack of expertise in the designer. One thing to keep in mind before trying this technique, is that you will need to cast on one extra stitch required by the pattern, since you will essentially be decreasing one stitch when performing the invisible join. You can see how to invisibly join in the round on DPNs here.
All Darling Jadore designs that are knitted in the round use the Invisible Join Technique so that the seam is virtually invisible, making for a cleaner, more professional-looking join. I highly recommend trying this technique to see the difference for yourself!
STEP ONE: Be sure to have one extra stitch cast onto your needles before beginning the invisible join process. Hold your needles as if to knit, with the working yarn behind your work.
STEP TWO: With your right knitting needle, slip your right needle into the first stitch on your left needle front to back, right to left.
STEP THREE: With your left knitting needle, slip the second stitch on your right knitting needle over the first stitch on your right knitting needle, then slip that stitch off your left knitting needle.
STEP FOUR: Tighten the stitch on your needle by pulling gently on your working yarn and tail end. You will have decreased one stitch on your needles and invisibly joined in the round.
From here, you can continue on with however the pattern states. It is suggested to place a stitch marker down to mark the end of the round prior to knitting any more stitches, because it is difficult to see where the end of the round is located, since you've invisibly joined.
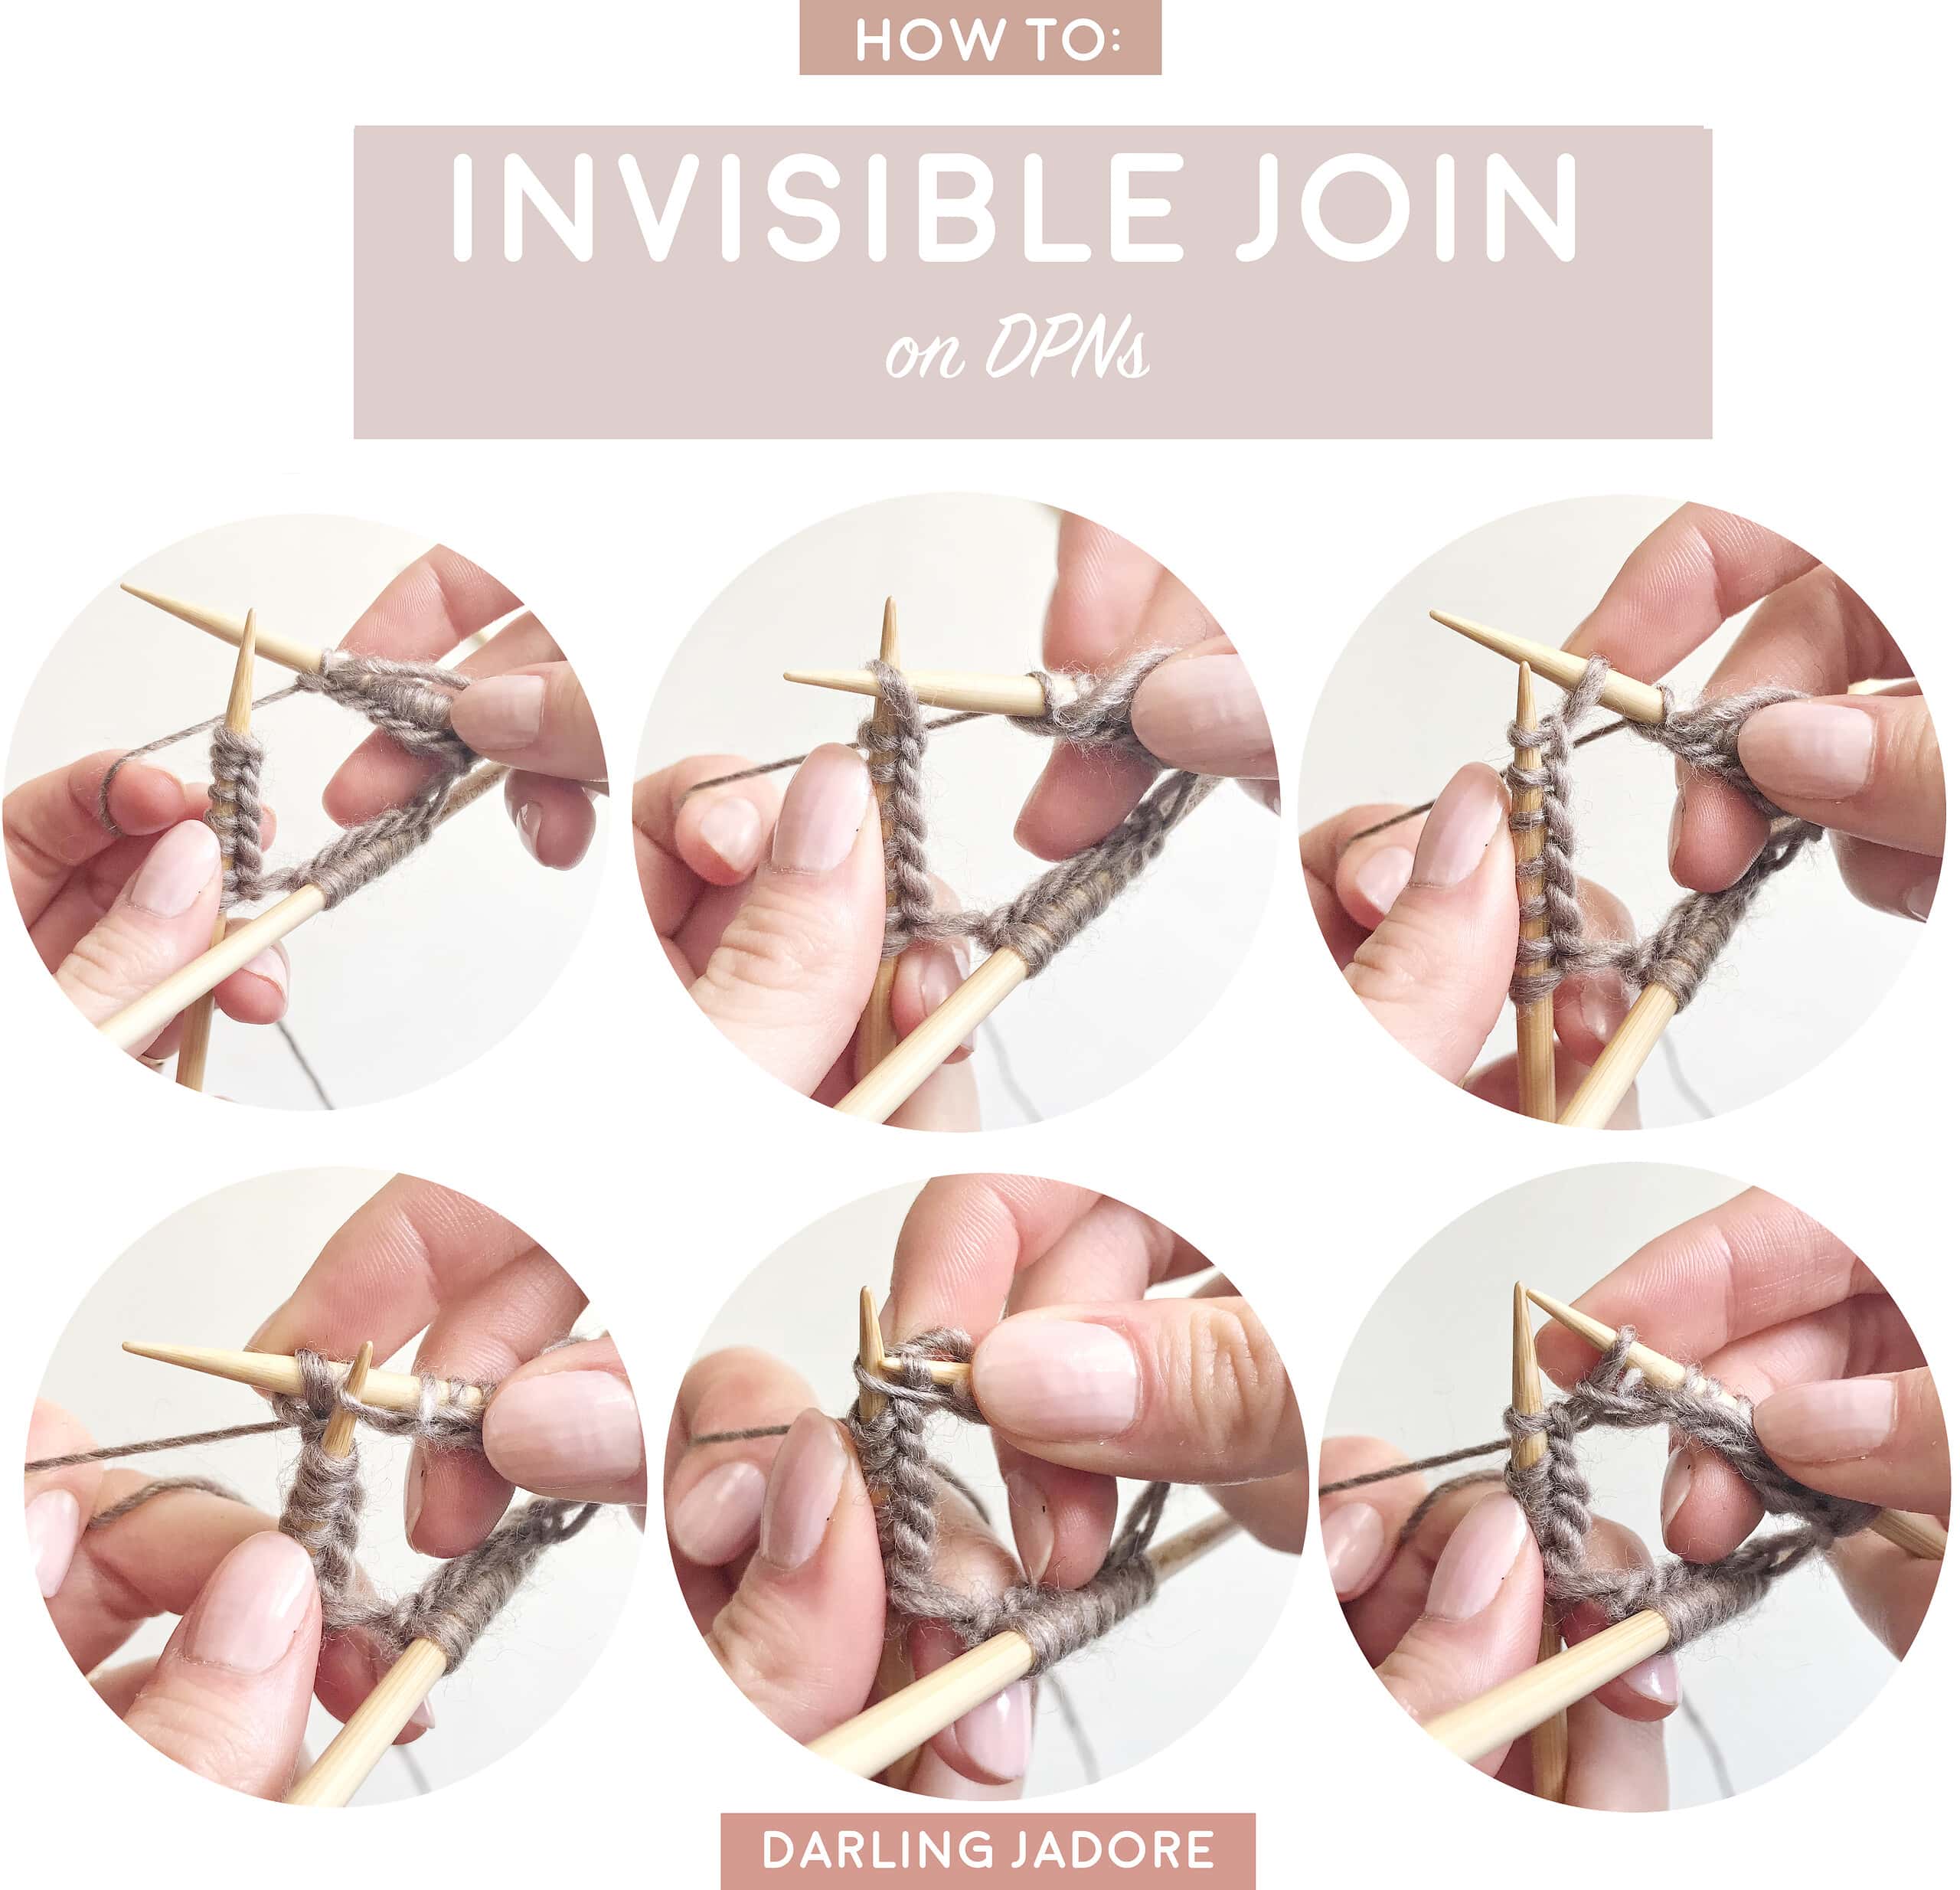
Invisible joining in the round is a wonderful technique to add to your knitting repertoire because it allows you to seamlessly join your cast on stitches in the round, without it being noticeable where you joined. With designs and patterns that require utilizing double-pointed knitting needles (aka: "DPNs"), like mittens and smaller circular or tubular-shaped designs, you can oftentimes see a little "seam" right where the knitters joined in the round. While this seam isn't very noticeable to non-knitters and novice knitters, it is still visible and, in my opinion, shows a lack of expertise in the designer. One thing to keep in mind before trying this technique, is that you will need to cast on one extra stitch required by the pattern, since you will essentially be decreasing one stitch when performing the invisible join. The same process applies for the invisible join technique demonstrated above on circular knitting needles.
STEP ONE: Be sure to have one extra stitch cast onto your needles before beginning the invisible join process. Hold your needles as if to knit, with the working yarn behind your work.
STEP TWO: With your right knitting needle, slip your right needle into the first stitch on your left needle front to back, right to left.
STEP THREE: With your left knitting needle, slip the second stitch on your right knitting needle over the first stitch on your right knitting needle, then slip that stitch off your left knitting needle.
STEP FOUR: Tighten the stitch on your needle by pulling gently on your working yarn and tail end. You will have decreased one stitch on your needles and invisibly joined in the round.
From here, you can continue on with however the pattern states. It is suggested to place a stitch marker down to mark the end of the round prior to knitting any more stitches, because it is difficult to see where the end of the round is located, since you've invisibly joined.

Below is a link to our YouTube Playlist entitled "BASICS | TUTORIALS", where we compiled an entire playlist where you can watch all our videos on different knitting stitches and techniques in one go. Easy peasy!

A WORD ON BLOCKING
Blocking is a step taken after you've finished knitting your item. It's a process of getting the completed item wet via steam or water, and then gently stretching and redistributing stitches. "What's the point?", you might be asking. Blocking a finished item makes the fabric lay flatter, helps the stitches to loosen up and soften, allows the item to have a better drape and overall appearance, and can also aid in gently stretching the fabric to be more comfortable. For lacework projects like some shawls, blocking can actually be an essential step to making the shawl lay flat or for certain lace parts (such as a pointed edge on a shawl) to actually be, well, pointed. Other projects such as fair-isle or stranded-knitting projects like The Cypress Beanie can greatly benefit from blocking because it allows the fabric (and the floats in the back of the fair-isle kitted item) to stretch and look neater overall. In other words, sometimes after you've completed a pattern, your item might not resemble the photos of the finished item at all prior to blocking; and it's the blocking process that allows your finished piece to look like the photos.
There's many knitters and crocheters who actually don't block their finished items at all - and that's fine sometimes! Some items like hats and beanies with simple stitch patterns don't usually require blocking. Many beginner who are comfortable knitting and crocheting only simple items (think chunky knit scarves, cowls, and beanies using super thick yarn and big needles or crochet hooks) don't need to block their items because their items contain no intricate stitches, lace, etc.
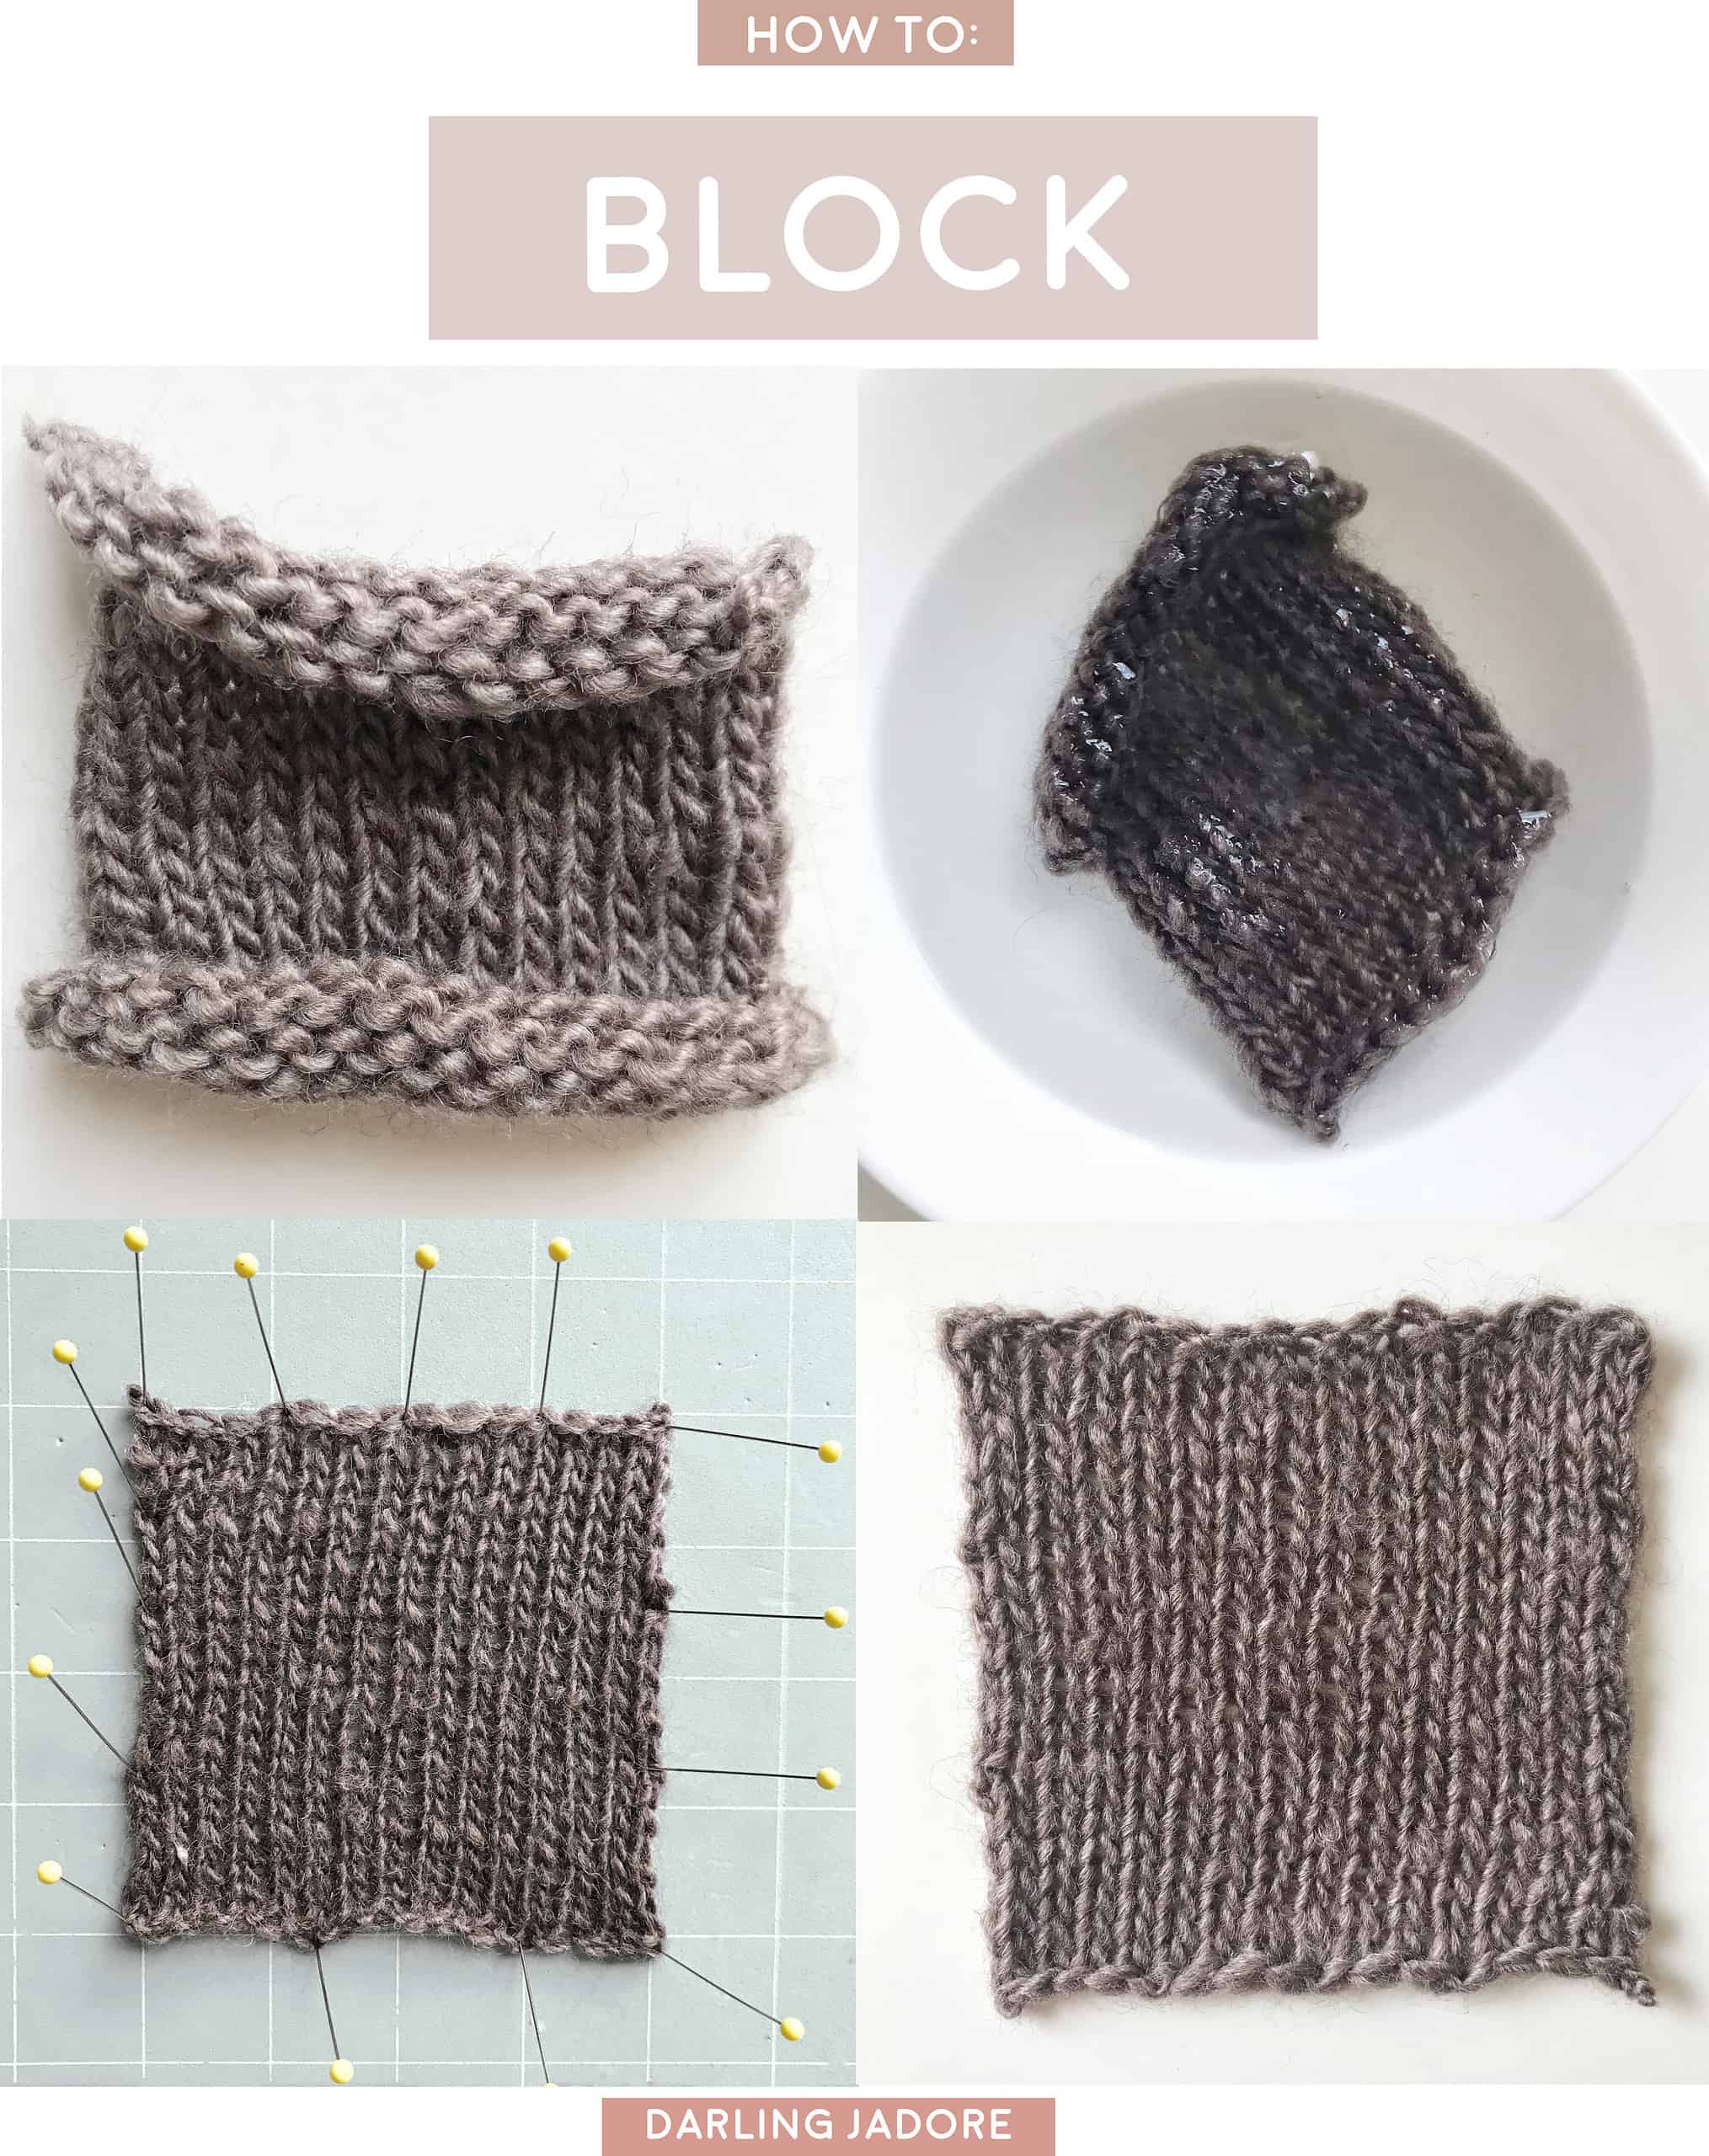
But even a simple pattern like Stockinette Stitch (in which one side is knitted and the other side is purled) tends to curl up. You can clearly see this in the photos above where I knitted a swatch of Stockinette Stitch, which curled up when it was completed. This is very common for Stockinette Stitch designs, and sometimes the pattern is supposed to curl up, but most of the time, the designer wants the edges of the finished design to lay flat. After a quick soak in water and pinned on blocking mats, however, the swatch laid nice and flat and will remain like that until I need to wash it again.
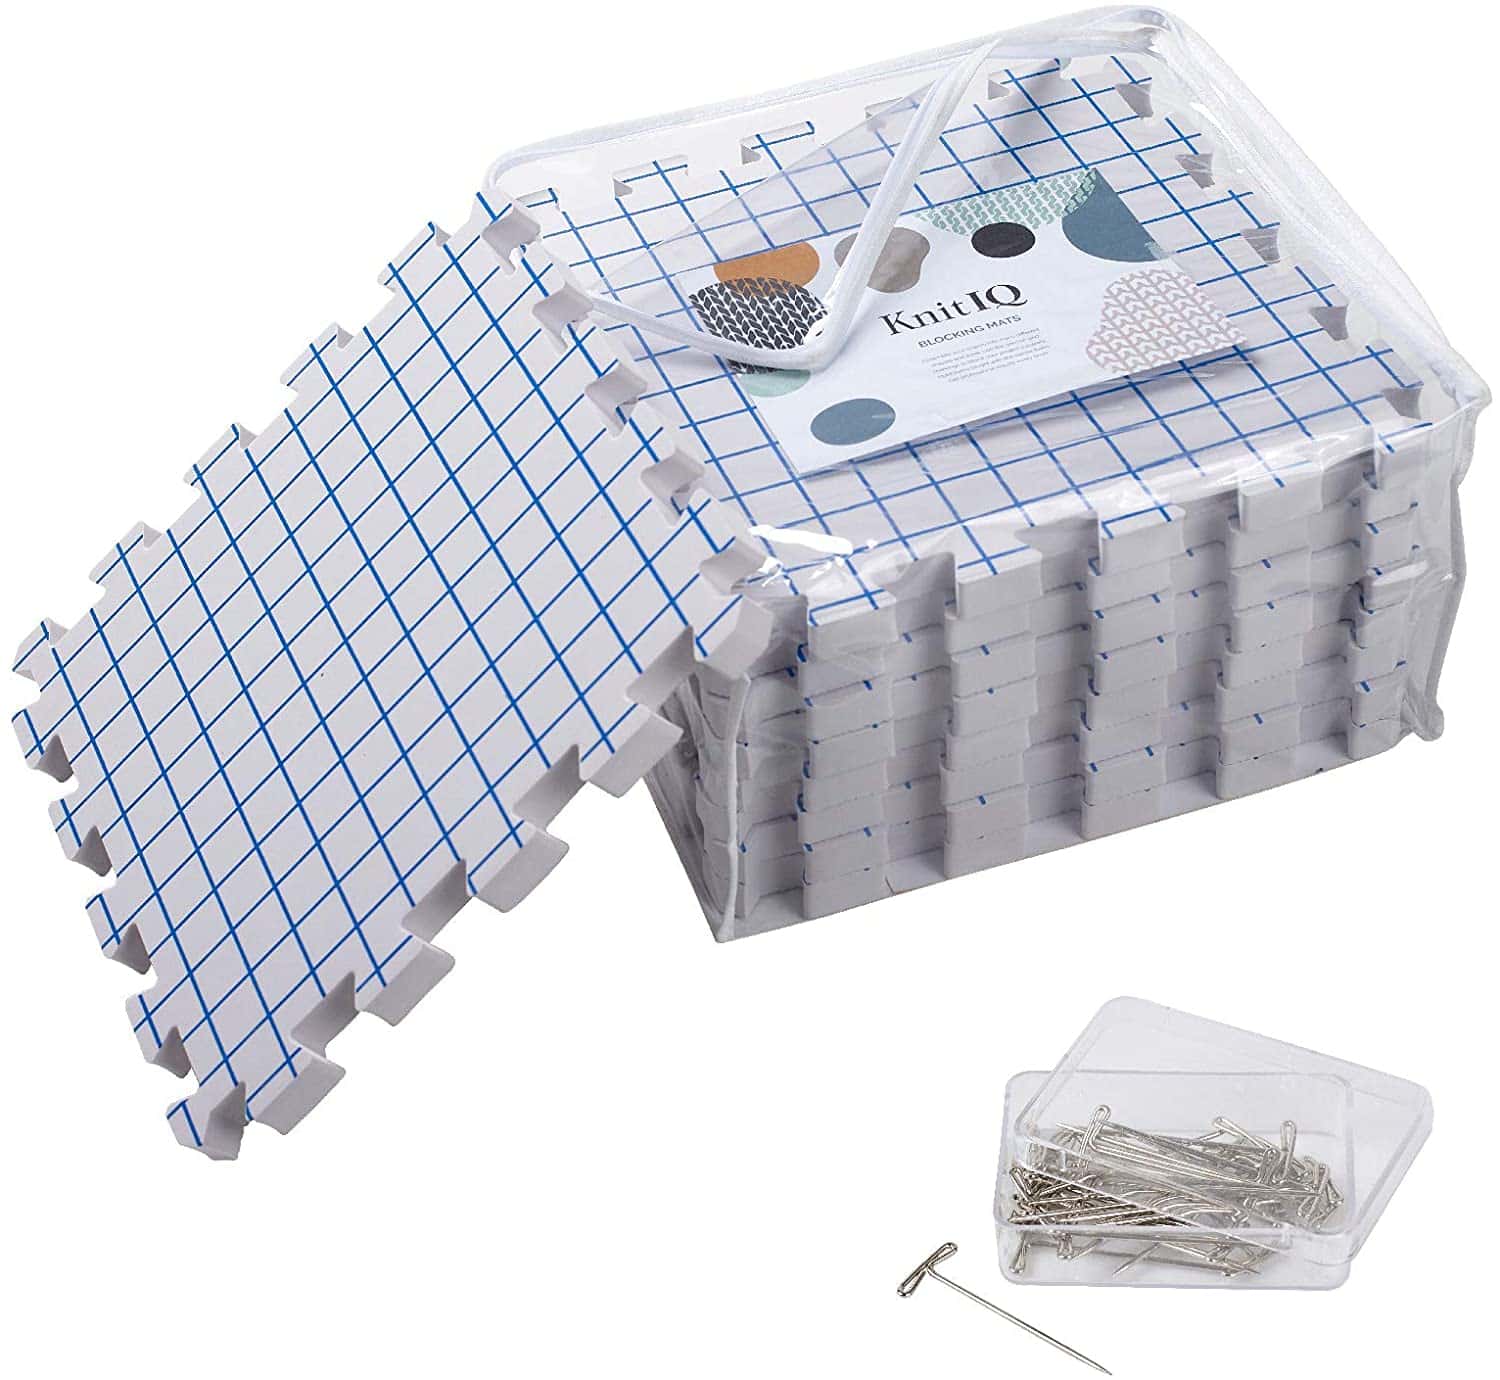
Blocking is actually a really simple process, but requires a little patience because of the drying time. In all Darling Jadore patterns, there is a section dedicated to Blocking and Care, in which I discuss blocking techniques required by or suggested for the finished design; however, many of our designs do not require any blocking at all! If, however, a pattern requires blocking or you feel inclined to block, here's how we suggest it be done. Keep in mind that you'll need a water bowl, basin, or sink, blocking mats (or a flat surface), and rust-free blocking pins.
STEP ONE: Soak your finished item in luke-warm to warm water with a squirt of fabric softener or a specific yarn shampoo and conditioner made for yarn. Make sure the basin you are soaking it in gives the item enough room to move around a little.
STEP TWO: Swish your item around a little in that basin with your hand, to make sure the entire item is wet and the fabric softener is evenly distributed. Let the item soak for at least 20 minutes, but I generally soak mine between 30-45 minutes.
STEP THREE: Remove the item from the water basin and *gently* squeeze it to get as much water out of it as possible. It's not suggested to twist it while getting it out, or stretching the fabric any more than necessary. You can also lay the item flat on top of a towel and then gently roll up the towel with the item inside and squeeze it.
STEP FOUR: Lay the item flat right-side up onto blocking mats (or whatever surface you are using for it to dry on) and using rust-free pins, begin pinning the item down into the shape the finished item is supposed to be in. For example, if you knitted a crescent-shaped shawl, you will pin it down into a crescent shape, so that it will dry into that shape.
Then, you'll just allow your item to dry for a few hours or overnight and unpin it in the morning. The blocking process is an extra step, but definitely worth it. You will immediately notice a difference in the softness of the fabric, the way the item drapes better, and the overall appearance of stitch definition and lacework.
Another way of blocking your item if you aren't wanting to soak it is to steam-block it using an electric steamer. I've found this technique extremely useful for many different designs, and especially useful for smaller details on a design, such as tassels or pom-poms. Steaming out a finished knitted item will relax the stitches and the fabric and made the overall look and appearance of the garment nicer, and it will also make the item much softer too!

Once you've mastered the basics of knitting (e.g., casting on, knitting, purling, binding off, etc), you will now be able to apply all that knowledge to actually reading and following a knitting pattern. Darlng Jadore knitting patterns are premium, extensive documents filled with instructions of how to knit a particular item. All Darling Jadore knitting patterns come with a complete list of abbreviations that are used throughout the pattern, along with a stitch glossary with written text explaining how most stitches are worked, links to helpful videos and photos, and more. Additionally, every Darling Jadore knitting pattern includes a "Notes" or "Method + Other" section which will outline the key points of the pattern that the knitter will find helpful. For example, in these sections, the knitter will be informed of whether the knitting pattern is knitted in the round on circular needles or flat on straight needles, certain construction aspects of the item to be knitted, key points and details of the pattern, any tips and tricks that will improve the overall experience for the knitters, and information on adapting the pattern, e.g., make it smaller or larger. Additionally, "Plain English" is included in Darling Jadore knitting patterns as well to make the pattern much easier to comprehend and the overall experience for the knitter to be improved. In other words: we at Darling Jadore are extremely passionate about creating the highest-quality knitting patterns and crochet patterns that are extremely detailed, easy to understand and follow, and fun! Below is a list of most of the common knitting pattern abbreviations that you will find in Darling Jadore knitting patterns.
Example of an excerpt from a knitting pattern:
CO 8 sts.
Rows 1-3: *K1, p1, rep from * across.
Row 4: [k2tog]twice, k1, ssk, p1. [5 sts rem]
Explanation of the above excerpt:
Cast on eight stitches
For Rows 1 through 3, knit one stitch, purl one stitch, knit one stitch, purl one stitch, knit one stitch, purl one stitch, knit one stitch, purl one stitch.
For Row 4, knit two stitches together twice in a row (decreasing two stitches total), then knit one stitch. Then work one slip, slip, knit (ssk) decrease stitch, then purl one stitch. Five stitches now remain on your knitting needles

- CO: Cast on
- BO: Bind off
- St(s): Stitch(es)
- K: Knit
- P: Purl
- Rep: Repeat
- Rem: Remain
- Cont: Continue
- Patt: Pattern
- Approx: Approximately
- DPN(s): Double-pointed knitting needle(s)
- Beg: Beginning
- Inc(s): Increase(s)
- Dec(s): Decrease(s)
- Kfb: Knit front back (inc st)
- Knit into the front and back of the same st.
- Pfb: Purl front back (inc st)
- Purl into the front and back of the same st.
- K2tog: Knit two together (dec st)
- P2tog: Purl two together (dec st)
- ": Inch(es)
- Cm: Centimeter(s)
- Patt: Pattern
- 3x / 5x, etc: Three times / Five times
- Stock St: Stockinette Stitch(es)
- M1R: Make one right (inc st)
- M1L: Make one left (inc st)
- Sl: Slip a stitch
- Cont: Continue
- Sm(s): Stitch marker(s)
- Pm: Place stich marker
- Ssm: Slip stitch marker
- Ssk: Slip, slip knit (single left-leaning decrease)
- Slip 2 sts knit-wise; knit those 2 sts together through the back loops; single left-leaning decrease
- Tbl: Through the back loop
- Psso: Pass slipped stitch over
- Rnd(s): Round(s)
- RS: Right side of the work
- WS: Wrong side of the work
- LN: Left needle
- RN: Right needle
- Sl: Slip
- CN/CH: Cable needle/cable hook
- Prev: Previous
- Wyif: With yarn in front
- Wyib: With yarn in back
- Yo: Yarn over (inc st)
- Yd(s): Yard(s)

When reading and following a knitting pattern, you will also see some symbols such as asterisks, brackets and parenthesis. These symbols indicate how the instructions are to be worked, e.g., repeating the instructions a specific number of times. Below is a list of the most common knitting pattern terms we use in Darling Jadore knitting patterns.
- *: (Asterisk); Repeat the instructions following the asterisk as indicated within the knitting pattern. Example: *K1, p1, rep from * to end of rnd means to knit one stitch, purl one stitch, and then repeat from the * to the end of the round.
- ( ): (Parenthesis); Repeat the instructions located within the parenthesis as many times as indicated by the knitting pattern. Alternatively, it means to work all the stitches within the parenthesis within the same time and space. Example: (Sl1, k1, psso) means to slip one stitch, knit one stitch, and then pass that slipped stitch over the knitted stitch all in the same space.
- [ ]: (Brackets); Repeat the instructions located within the brackets for as many times as indicated by the number located immediately to the right of the brackets. Example: [k2tog]twice means to work a decrease over four stitches total by knitting two stitches together, and then knitting two more stitches together.

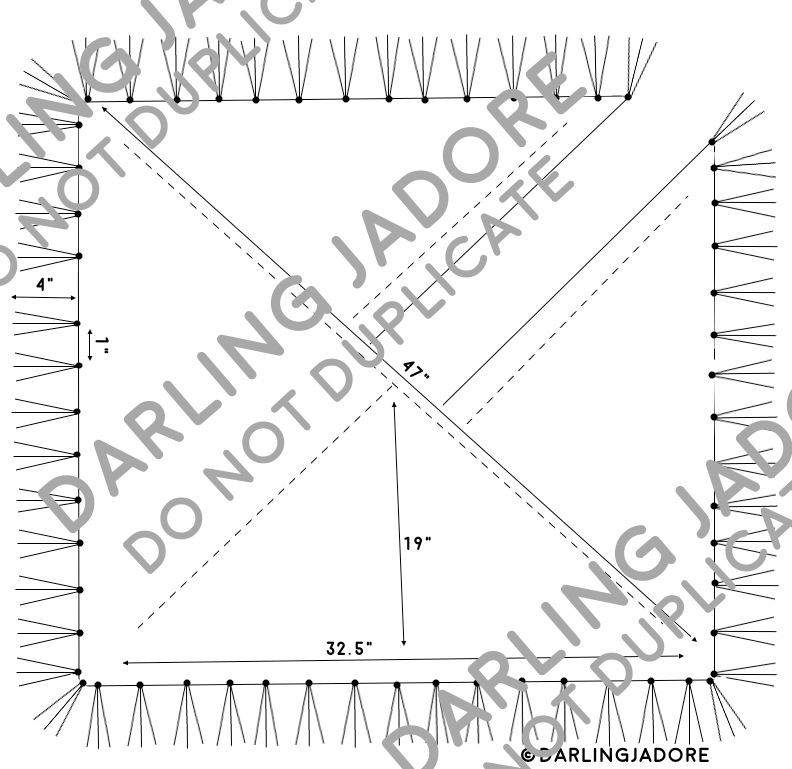
Almost all Darling Jadore knitting patterns contain schematics, which are essentially just a visual rendering of the item or garment that is to be made from the knitting pattern. Each schematic will contain measurements for different parts of the item, as well as a general overview of the shape and size of the finished item made from the pattern. A schematic is a helpful resource to get an overall view of the finished item and a general sense of how it will be knitted up. Below are two examples of Darling Jadore schematics for reference. The schematic below contains watermarks, but the schematics within our knitting patterns have no watermarks.

When caring for an item you finished knitting, there are a few things to keep in mind. Firstly, you need to be aware of the type of yarn it was made with, such as whether it is a natural or animal fiber (e.g., cotton, alpaca, wool) or if it's a synthetic fiber (e.g., acrylic, nylon). Most all yarn will come with a label describing the composition of the fibers, along with useful information regarding care instructions, such as how to wash it, whether or not it can be ironed, whether it's dry-clean only, etc.
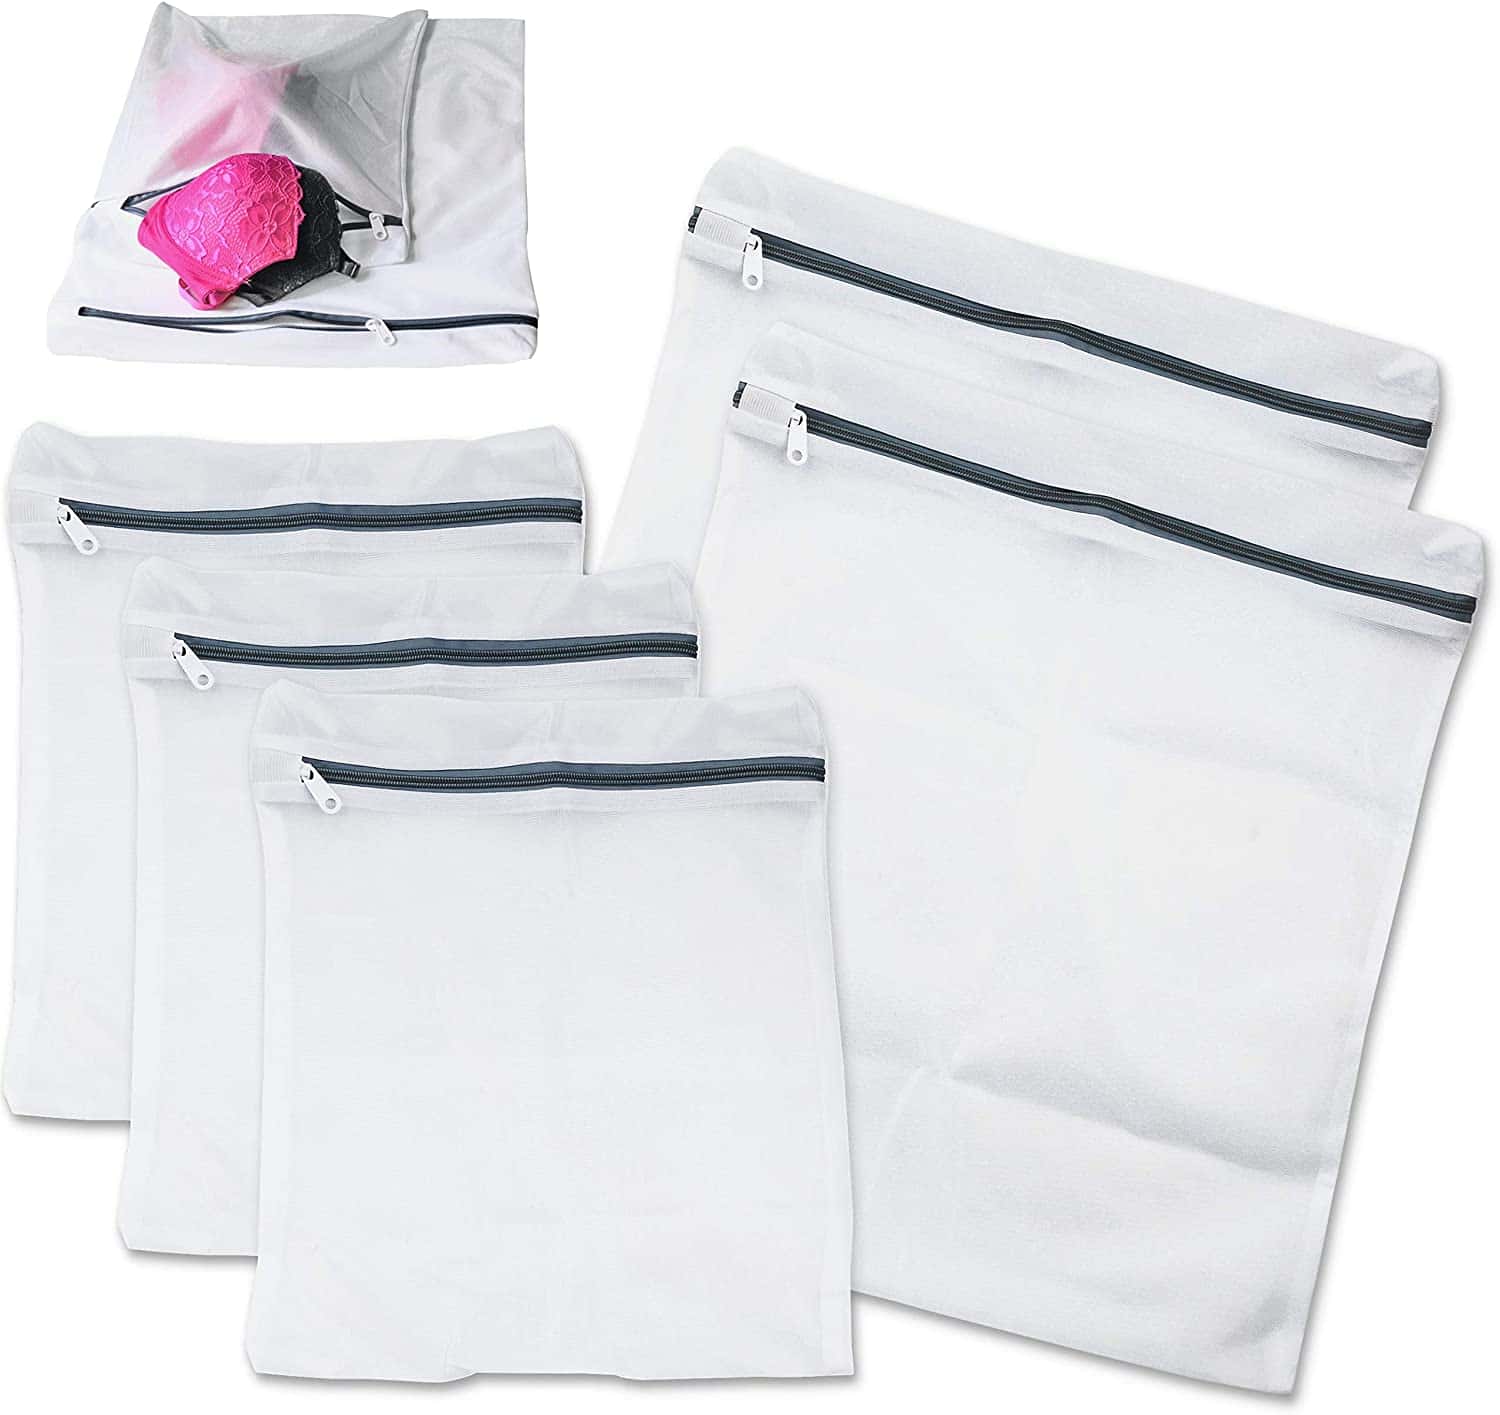
A good rule of thumb that I've used over the years is to wash all my hand-knitted items that can be machine-washed in a mesh laundry bag, washed on the gentle setting on cold. I highly recommend using one of these mesh laundry bags to wash any and all of your knitted or crocheted items, because it keeps them from snagging on the machine or with other items, and in general, just keeps them much safer and lets them last longer.
Most of my smaller knitwear items, however, I will wash by hand using a delicate detergent made for yarn, such as this one, this one, and this one, and then simply lay them flat or hang them up to dry.
Other times, I will simply do a quick steam of my knitwear to sanitize and clean them, using an electric steamer. Sometimes, this is all I need to do to remove any musty odor from a knitted item that's been stored awhile instead of throwing it in the wash or washing it by hand.
An important note about working with pure wool or wool-blend yarns is that the finished item is likely to felt. Felting is what occurs when a wool knitted item is put into the washing and drying machine, and comes out shrunken and the yarn is essentially fused together. For wool items, I prefer to gently hand-wash them in cool or luke-warm water, and wring them out to dry. For bigger items, like The Chateaux Throw , The Aspyn Throw, or The Fireside Throw (all of which were made with a wool-blend yarn), the yarn itself can actually be washed and dried. However, I will throw it in a delicate mesh laundry bag, washed gently on cool, and then lay it flat or hang it to dry.
One last tip: to freshen up your knits after being stored in the closet during the summer months, you can easily steam them out using an electric steamer. This will remove any odor and freshen up the knits without the need to through them in the wash. Steaming instead of washing can really allow your knitwear to last longer and look nice longer.

One of the biggest questions I get asked by those who watch me knit is, "How are you knitting that fast?". There are many styles of knitting used all across the world, and the two most well-known is "English Style" and "Continental Style", also known as "European Style" knitting. When I first learned to knit, I was taught English style, where the working yarn was used and held by my right hand during knitting. This style is also called "throwing", and it involves the knitter picking up the working yarn in his or her right hand, and then wrapping it and knitting that stitch, and coming back to his or her initial hand position. I've even seen English Style knitters need to drop their left knitting needle entirely while they work one stitch. Many people are excellent and proficient English style knitters who can work very quickly and efficiently, but that wasn't the case for me. I personally found that English Style knitting slowed me down quite a bit, and tended to affect my tension while I knitted, resulting in some stitches being knitted looser or tighter than others, creating a slightly more sloppy appearance in my overall finished design.
Many years ago, however, I decided to make the switch to European/Continental Style knitting, and this allowed my speed and efficiency to dramatically increase, the overall tension of my finished item to appear neater and cleaner, and I even had much less hand soreness! When knitting Continental Style, I hold my working yarn in my left hand and keep my movement while knitting to a minimum, with hardly any wrist or hand movements compared to English Style knitting. This has personally allowed me to whiz through projects at a much, much faster pace than before. I watched a few online video tutorials and sought help from proficient Continental Style knitters, and before long, I, too, was knitting at twice or three times my original speed. If you're new to knitting or wanting to start learning this beautiful craft, I highly recommend researching Continental Style knitting and giving it a shot!

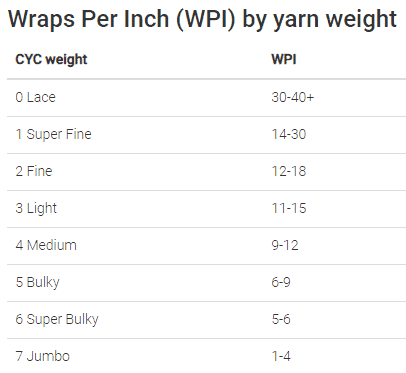
For all Darling Jadore knitting patterns and crochet patterns, the exact products recommended are provided on the listing description, as well as within the pattern file. We provide information on the weight of the yarn (e.g., worsted/medium-weight) and category of yarn (e.g., category 4 yarn). On the listing descriptions, we also provide information regarding the wraps per inch (i.e., "WPI") of the yarn for reference. WPI is a another method of telling the weight of a yarn, most common among weavers, but we provide this information in case our customers wish to know the information. Below is a chart describing the weight of yarns and the WPI of the yarn and the information below is based on information shared by industry experts provided from the Craft Yarn Council.
How to measure WPI? You'll first need a ruler and something to wrap the yarn around that has a consistent circumference, like a crochet hook, knitting needle, or pencil. You'll start by wrapping the yarn around the item for a few inches, ensuring to not cause any gaps between the strands. Then you will simply use the ruler to measure how many wraps are in one inch (2.54 cm). Then use the chart below to compare that number to the weight category to determine the weight of the yarn.

If you're just beginning the lovely craft of knitting and are wondering what tools you'll need for your new tool kit, we're about to run down the basics for you and some of Sierra's top picks for knitting tools. We opened up a Darling Jadore Amazon Shop, where all Sierra's must-have tools, materials, and yarn are linked for your convenience.
A QUALITY KNITTING NEEDLE SET
As a new knitter, we suggest having a smaller tool kit and then to eventually grow your tool kit as you begin knitting more items. We recommend starting out with a set of standard, straight knitting needles in a few different sizes, so you'll be able to play around with different size needles and weights of yarn when learning to knit.
When picking tools for your tool kit, we highly recommend choosing high-quality tools that will last many years (if not forever) and won't break and fall apart easily. There are many different materials that knitting needles are made out of, most commonly wood, bamboo, plastic, and aluminum or other metal alloys. Here at Darling Jadore, our lead designer, Sierra, has tested and tried out all types of knitting needles over the two decades she's been knitting, and she particularly prefers wood because it is super sturdy, won't break easily, and if laminated or coated in a gloss or stain, they glide effortlessly through stitches, increasing her knitting speed. Many knitting needles on the market are made from less-expensive materials such as plastic, bamboo, and metal, but we don't often suggest buying these needles because the plastic and bamboo needles are very delicate and often tend to break, and the metal needles tend to weigh more which can lead to hand and wrist strain, and can also mess with your tension and gauge and create ladders in your work.
We really like this straight knitting needle set that includes U.S. sizes 4-17 because it's made from high quality, sturdy driftwood with a gloss finish that will last forever. If you're a new knitter just starting out, it's best to learn and practice with straight, standard knitting needles like this.
A CIRCULAR KNITTING NEEDLE SET
When you feel comfortable using standard, straight knitting needles, we suggest trying your hand at circular knitting needles to knit flat items. Working with circular knitting needles actually helps to eliminate any hand or wrist straight, because circulars only include a needle tip that is only a few inches long as opposed to straight needles that are at least 12" long, which weigh more and can be bulky and cause hand strain. But with circulars, you will only be working with a smaller needle tip and allow the rest of your stitches to fall onto a cable wire, which weighs little to nothing at all, and can help increase stability and speed when knitting. Once you're comfortable knitting flat items, circular knitting needles also come in handy when knitting circular or tubular-shaped items, so a quality set of circulars are definitely something we recommend investing in.
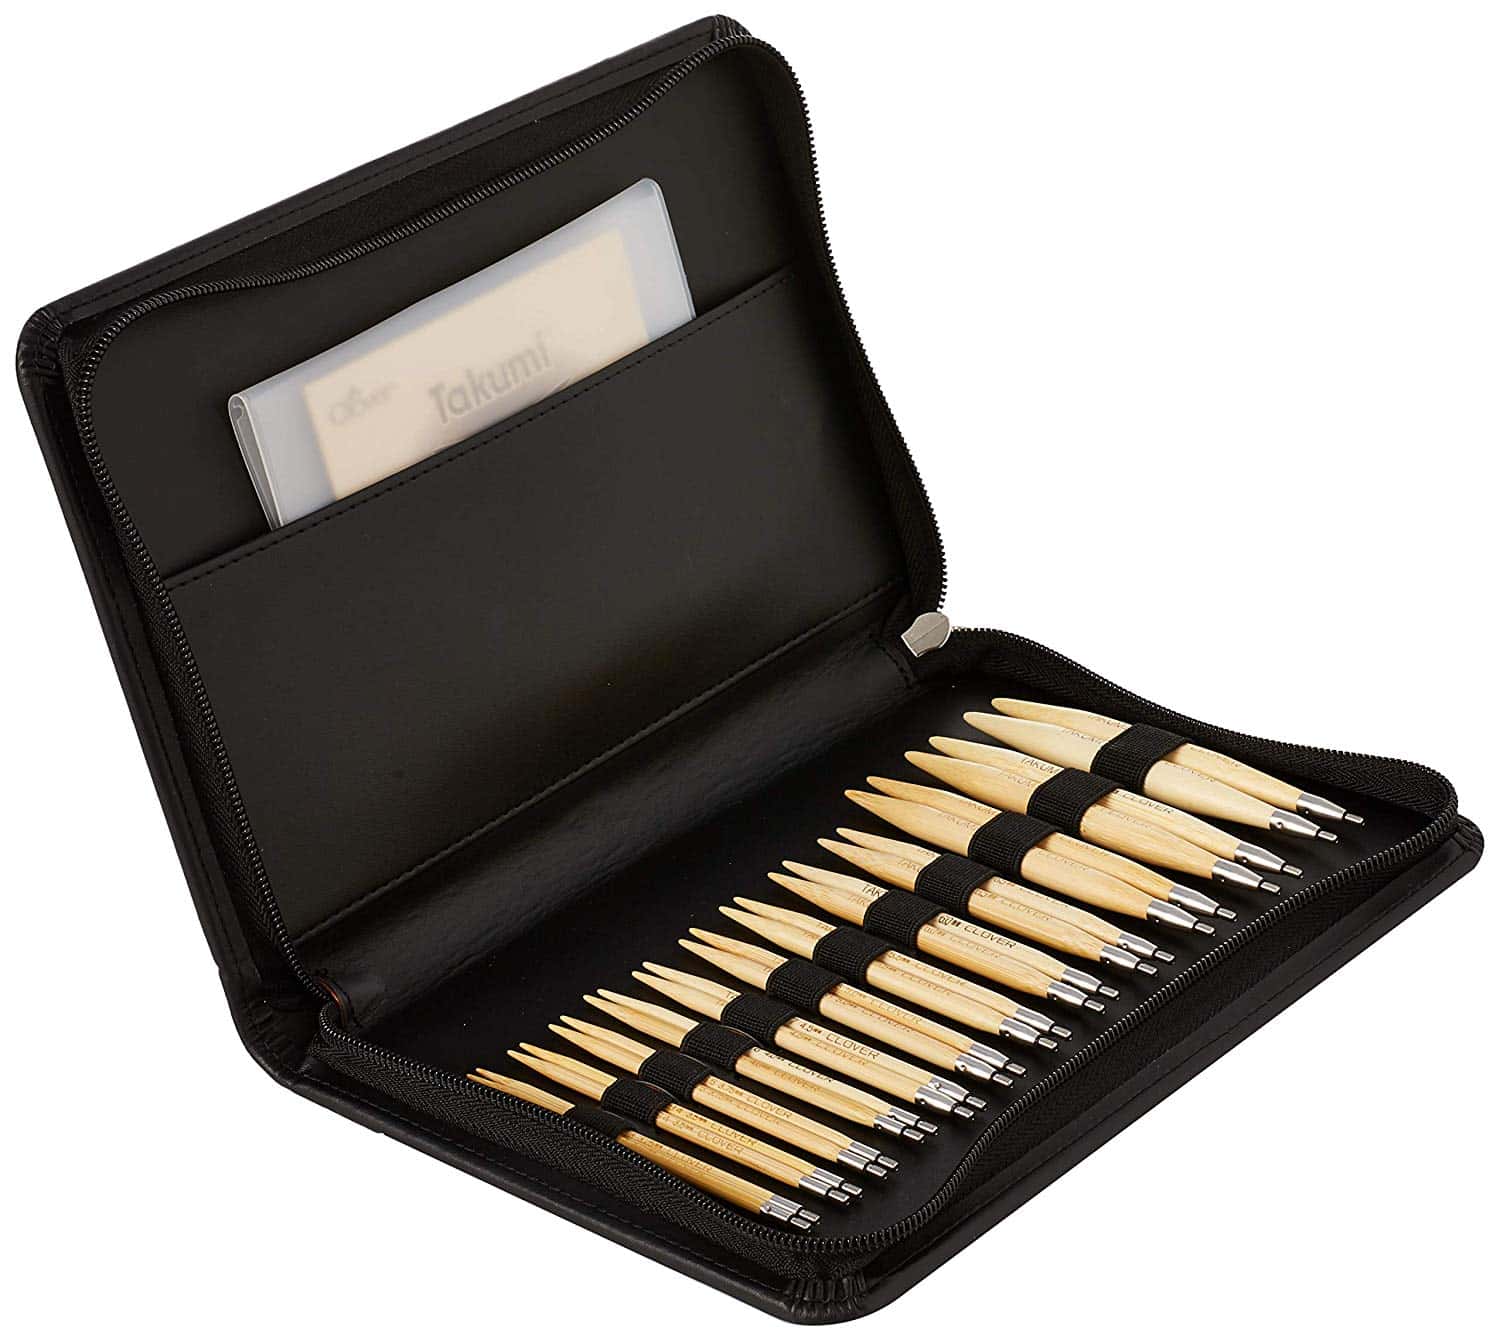
We really like this set of circular knitting needles that includes U.S. sizes 4-11 and are made of high-quality smooth laminated birch needles. The kits provides two length of cables (24" and 32" and give you two cables of each, along with eight end caps, tightening keys and a vinyl case. These needles are laminated with a smooth gloss, so they slide easily into each stitch, and can increase knitting speed.
A DOUBLE-POINTED KNITTING NEEDLE SET
When you've mastered standard, straight knitting needles as well as experimented with circular knitting needles, we recommend next trying your hand at double-pointed knitting needles, also known as "DPNs". We know knitting with 4+ knitting needles might sound scary, but it's really not at all. At any given time, you will only be working with two knitting needles, and the other DPNs will just be holding your unworked stitches. Learning to knit with DPNs are extremely helpful and is good knowledge to have in your knitting repertoire to knit small, tubular items such as mittens, gloves, and socks, or to close up the top of a hat or beanie.
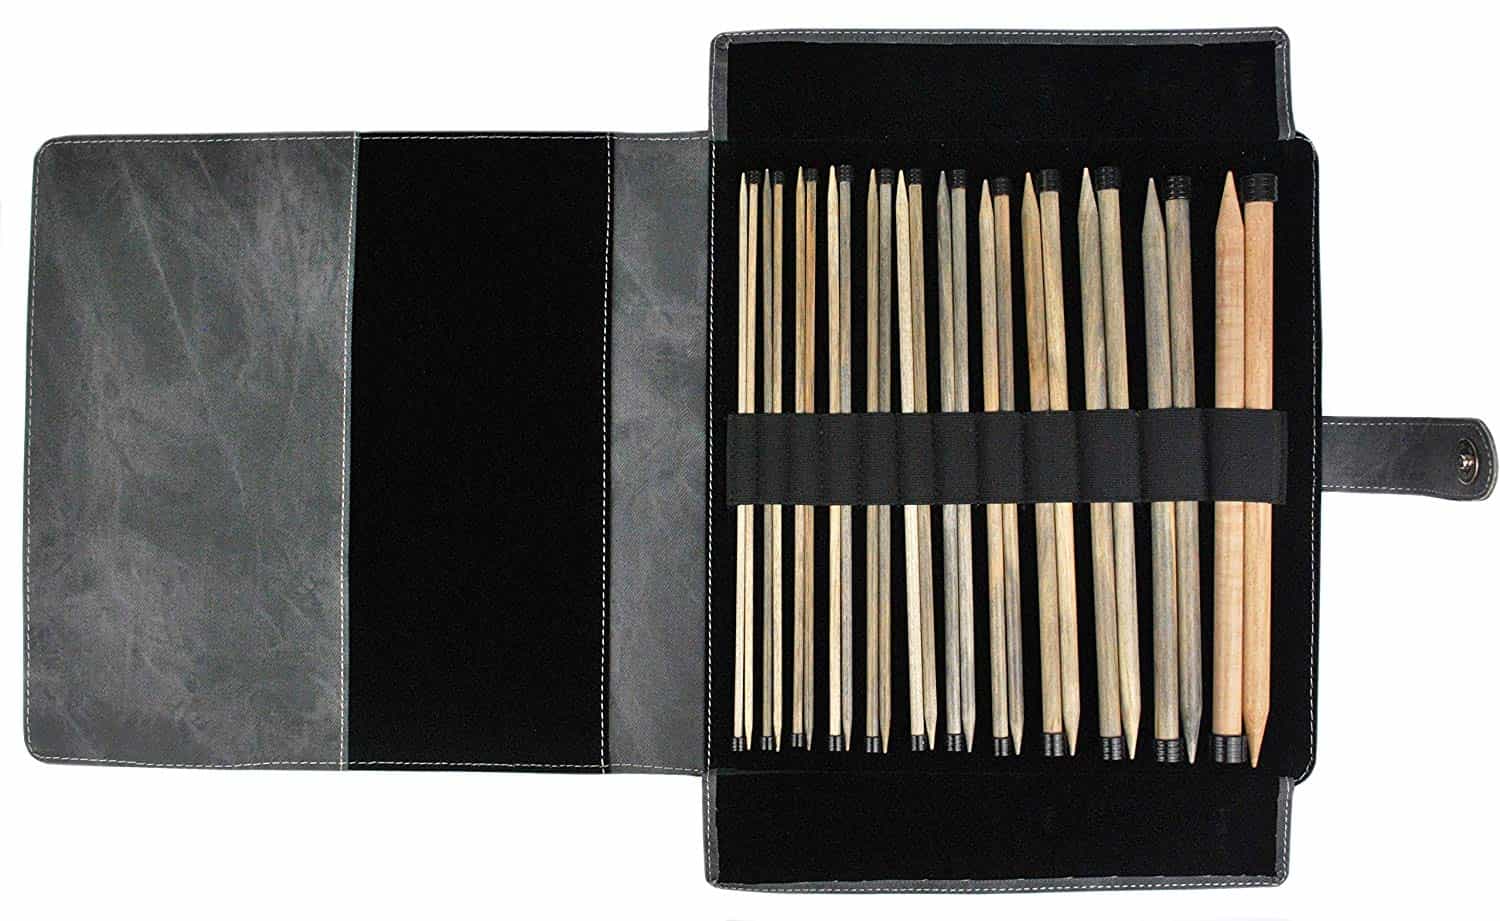
We love love love this beautiful driftwood set of DPNs. Just like with our circular needles recommendations above, this set of DPNs is made from driftwood (which is gorgeous, by the way!), and is coated to make them slippery and easy to knit with. Sierra owns this set (you might've seen it make an appearance on our Instagram page!) and she uses this Lyke needle set almost exclusively. This set includes U.S. Size 6-13 and includes a lovely pouch to keep them organized as well.
We also really like this high-quality laminated birch wood set of DPNs. They come in six sizes, and the smooth, glossy wood allows for faster knitting and ease. You can choose between 4", 5", or 6" DPNs, and we suggest 5" because it will be long enough to hold a lot of stitches, but not too long that it becomes bulky. The set even comes with a vinyl case to store and organize them in, which is a huge plus for DPNs because they can tend to get lost if you don't keep track of them!

A ROW COUNTER FOR KNITTING PROJECTS
All knitters have row counters, so this handy item is the next thing you must have in your knitting tool kit. Whether you're a beginner knitter or an expert knitter, it's extremely beneficial to have a device to count the rows you're on so you don't lose your place when following a knitting pattern.
We love this row counter and Sierra, the lead designer here at Darling Jadore, uses it almost exclusively for smaller projects (you've probably seen it make an appearance on our Instagram page when Sierra shows her behind-the-scene photos of her design process).

A TAPESTRY NEEDLE FOR KNITTING PROJECTS
The next item you'll want to have in your knitting tool kit is a tapestry needle. A tapestry needle is very useful when weaving in any loose ends at the end of a project or for seaming together knitted garments, such as some pieces of a sweater or seaming close a scarf to turn it into an infinity scarf. There are so many uses for tapestry needles, so it's always important to have a couple on hand in your tool kit.
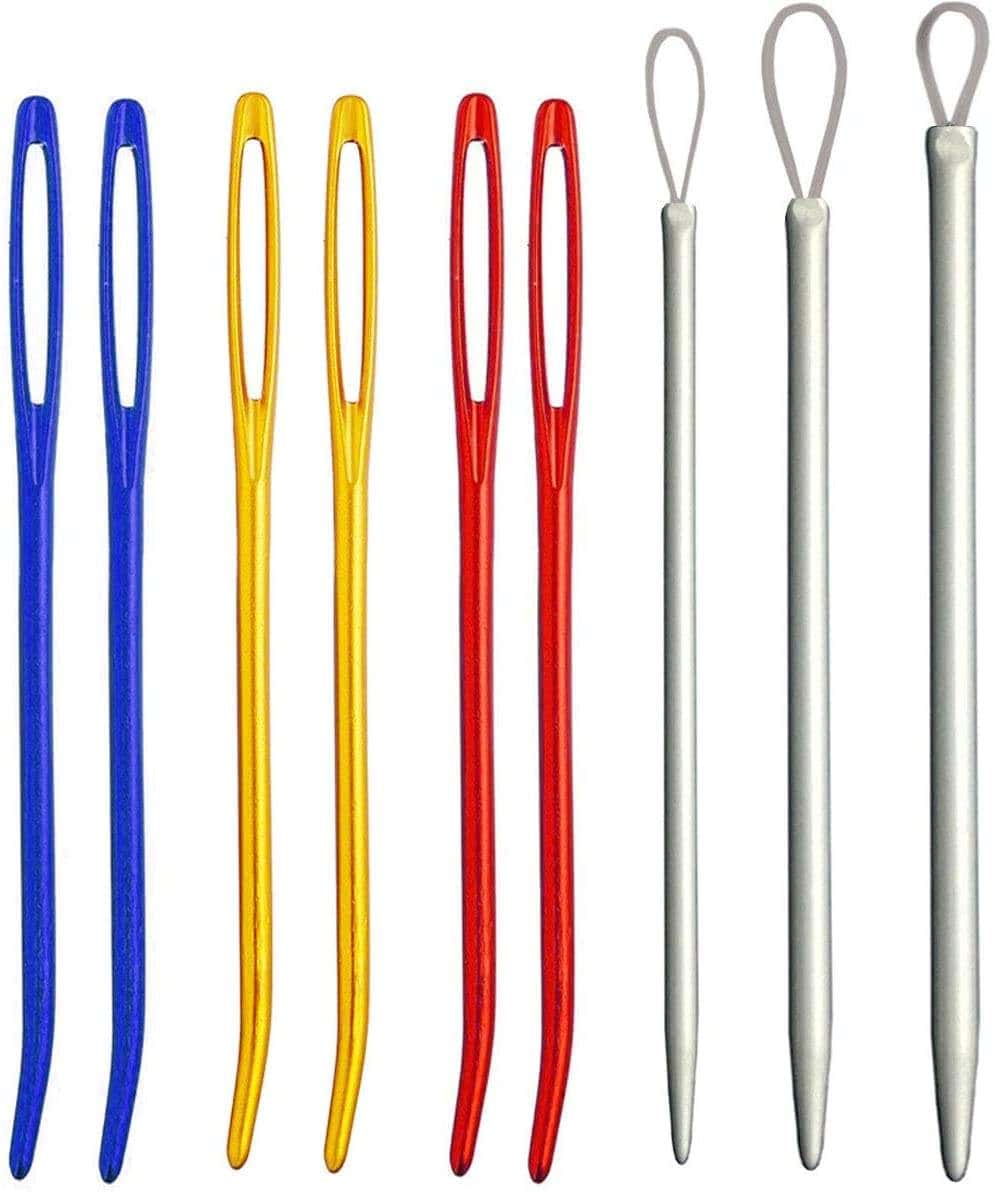
We really like these tapestry needles for a couple of reasons. Because they are made of metal, they will probably never break or bend, unlike many tapestry needles on the market that are made of plastic. Additionally, these needles come in a few different sizes with a large, blunt tip, so it can be useful for smaller projects that require smaller yarn or larger projects that use larger yarn. And they even come with a handy little case to store them in -- can't beat that!
STITCH MARKERS FOR KNITTING PROJECTS
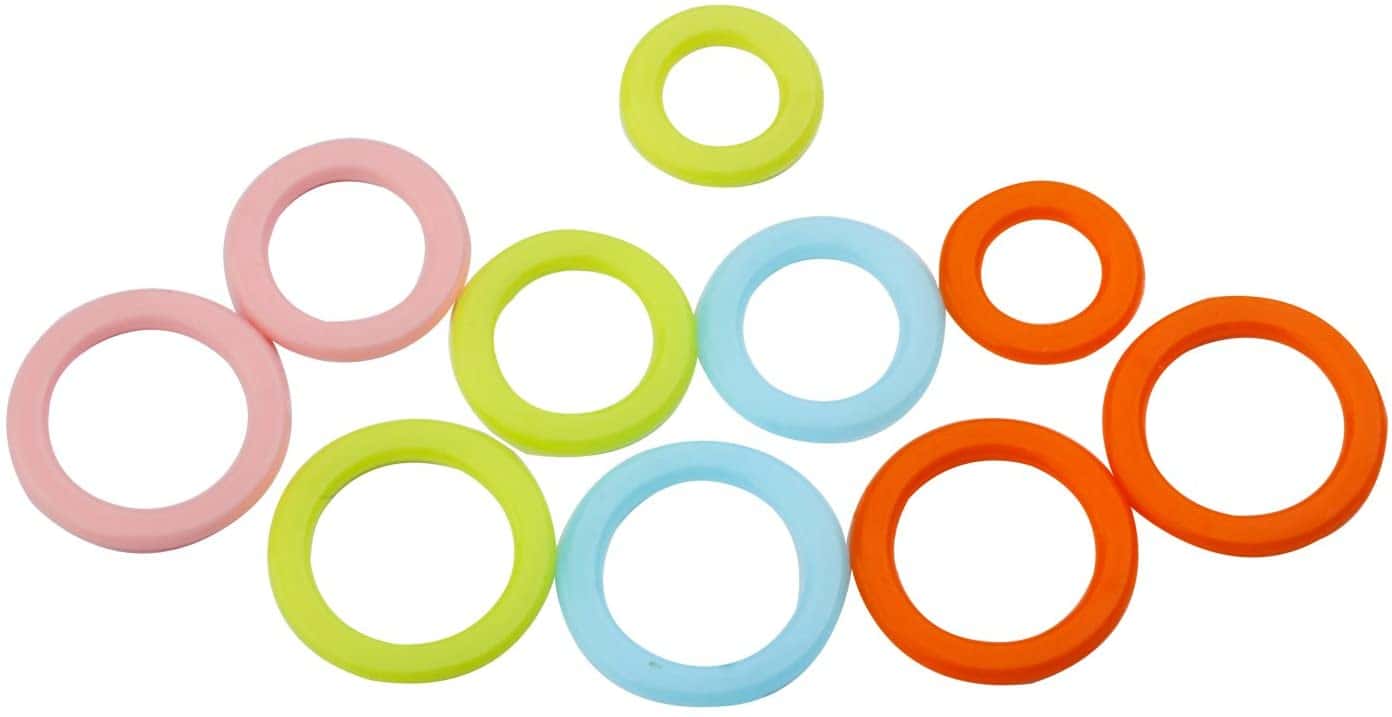
Another tool you'll need for your knitting tool kit are stitch markers, and you'll need them in a few different sizes so that they will fit over the size of knitting needle you are working with. Stitch markers are made in many different materials, plastic and metal being the most common. Sierra, our lead designer, has worked with all types of stitch markers over the years, and has found that lightweight, plastic stitch markers tend to have the best overall performance. Metal stitch markers can tend to rust or turn colors (and therefore stain the yarn) and often have a gap where the metal meets instead of being seamlessly closed. Stitch markers are extremely useful to keep on track while following a knitting pattern and for marking specific spots during your project, such as marking the end of your round when knitting circular or tubular-shaped items.
We highly recommend this stitch marker set, which contains a variety of sizes that can fit knitting needles from size U.S. size 0 to U.S size 13 and contain 120 stitch markers total. Stitch markers are easy to lose, so this set even comes with a hard-plastic container that organizes them by size and color.
SHARP CRAFT SCISSORS FOR KNITTING
Lastly, no knitting kit would be finished without a small, sharp pair of craft scissors. We recommend a smaller pair to keep close by and used exclusively for cutting yarn lets the scissors remain sharp for many years without requiring sharping or replacement.
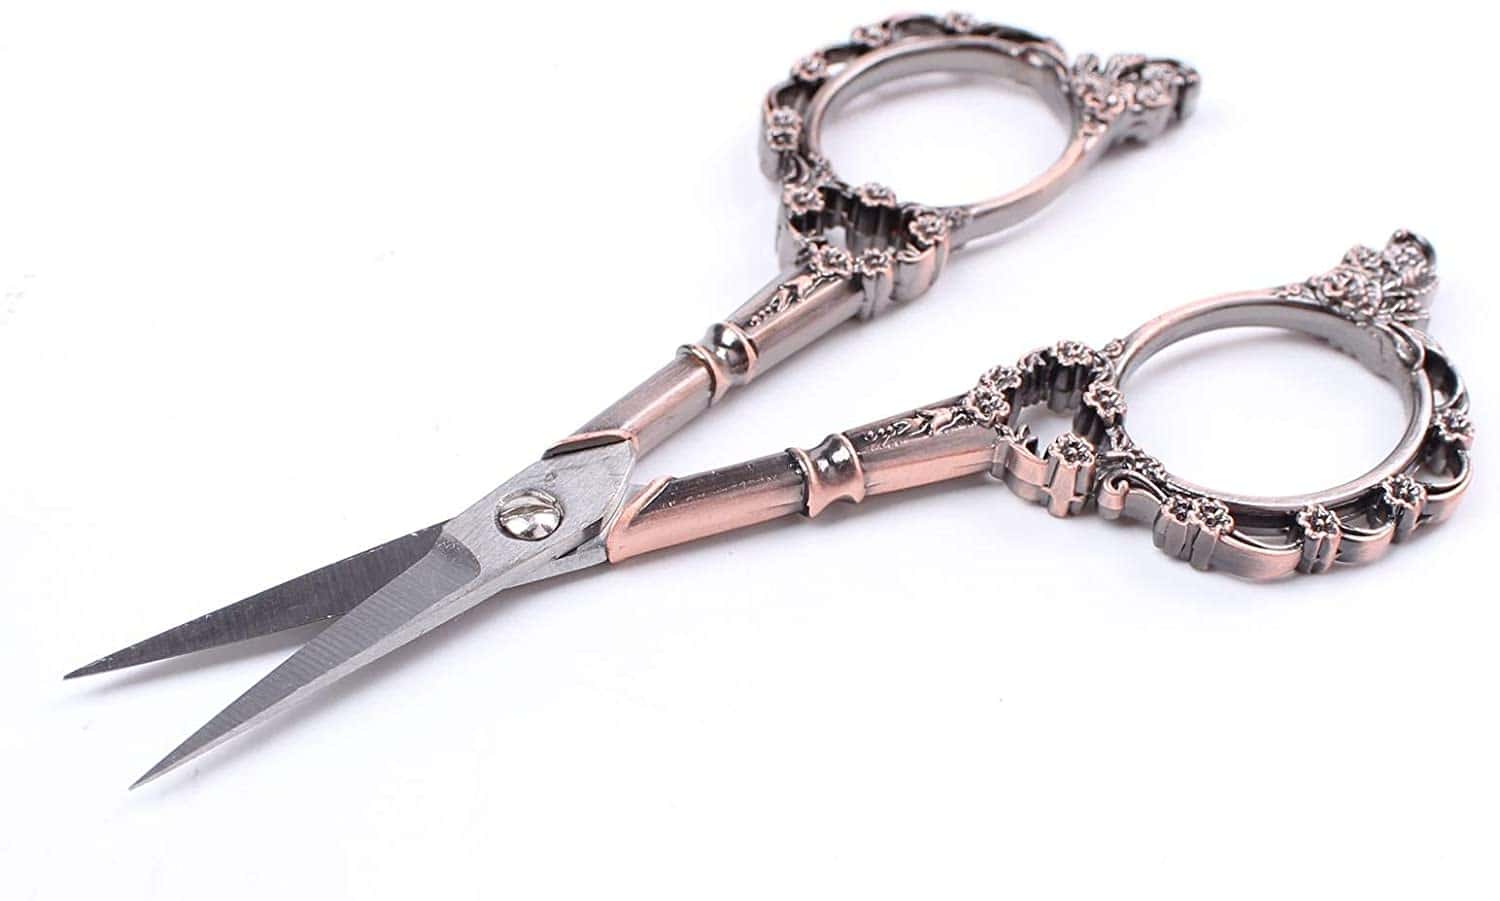
We love these metal, vintage-inspired scissors because they are small enough to keep in your kit (7.5" x 4"), sharp, and made of durable metal materials. Sierra owns these exact scissors (two pairs to be exact), and loves them! The blade is a little thicker than some other small, metal craft scissors we see being sold on the market, so these scissors easily cut through any size or weight of yarn.

